• Skip to primary navigation
  • Skip to main content
  • Skip to primary sidebar
Homesmad

Homesmad

  • Home
  • Breakfast & Brunch
  • Appetizers & Snacks
  • Dinner
  • Dessert
  • About
  • Privacy Policy
  • Contact
Homesmad
  • Home
  • Breakfast & Brunch
  • Appetizers & Snacks
  • Dinner
  • Dessert
  • About
  • Privacy Policy
  • Contact

Easy Sweet & Smoky BBQ Pulled Beef Slaw Wraps Recipe

March 22, 2026 by Lily author

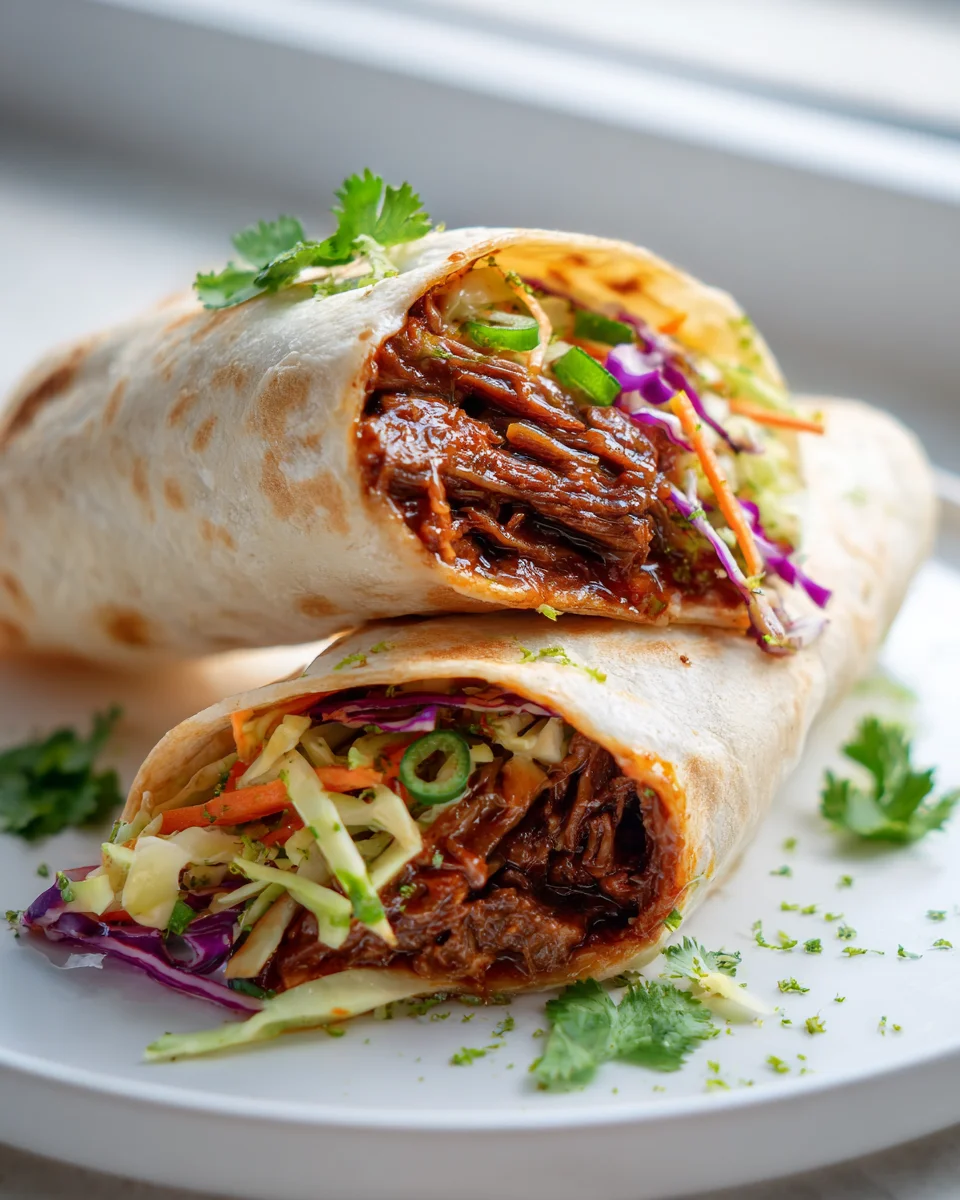
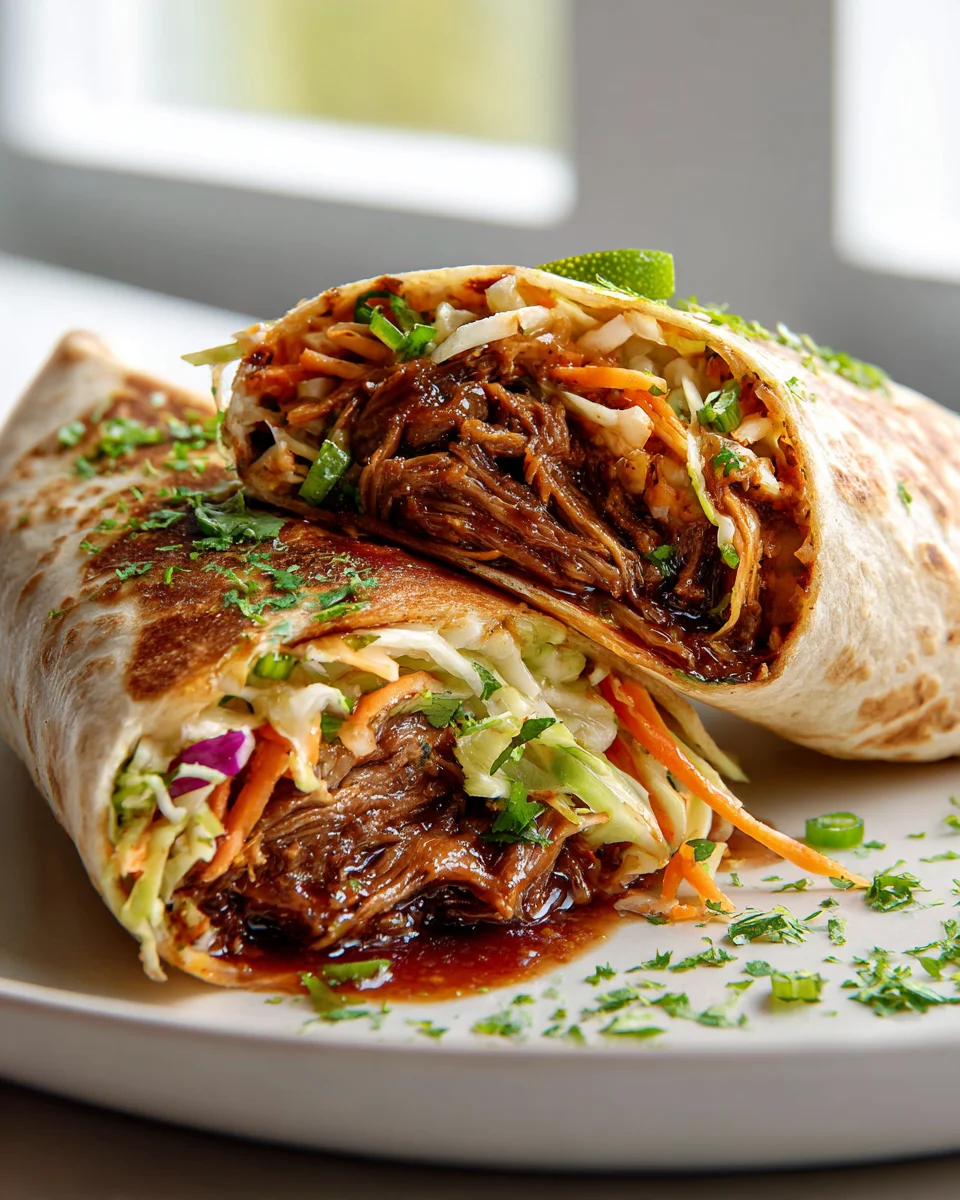
Bbq Pulled Beef Slaw Wraps (sweet & Smoky) – oh boy, are you in for a treat with this one! I’m absolutely thrilled to share a recipe that brings together so many of my favorite things into one incredibly satisfying package. Forget those plain, boring weeknight meals; these wraps are here to inject some serious flavor and fun into your routine.

What makes these Bbq Pulled Beef Slaw Wraps (sweet & Smoky) truly special, you ask? It’s the magical marriage of textures and tastes. Imagine succulent, melt-in-your-mouth beef, slow-cooked to perfection and then generously coated in a homemade, utterly irresistible sweet and smoky BBQ sauce. We’re talking about a sauce that hits all the right notes – a little tang, a lot of savory depth, and just enough sweetness to make your taste buds sing. But we don’t stop there! This glorious beef is then piled high with a vibrant, crunchy slaw that adds a much-needed burst of freshness and a delightful counterpoint to the rich beef. All of this deliciousness is then tucked into a soft tortilla or a crisp lettuce cup, making it perfectly portable and an absolute joy to devour.

You’re going to love these wraps because they’re more than just a meal; they’re an experience. They’re hearty enough to satisfy, yet fresh enough not to feel heavy. They’re fantastic for a casual family dinner, a lively gathering with friends, or even as a fantastic make-ahead lunch. I promise you, the aroma alone will have everyone gravitating towards the kitchen, and that first bite – a symphony of tender beef, tangy slaw, and sweet-smoky sauce – will have you hooked. Get ready to elevate your wrap game!

Easy Sweet & Smoky BBQ Pulled Beef Slaw Wraps Recipe this RECIPE

Ingredient Notes

Crafting the perfect Bbq Pulled Beef Slaw Wraps (sweet & Smoky) starts with understanding the star players and how they contribute to that irresistible flavor profile. I’ve designed this recipe to really highlight the balance between the tender, savory beef, the vibrant, crisp slaw, and the fresh crunch of the lettuce wraps, all tied together with that signature sweet and smoky BBQ sauce.

Pulled Beef

  • The Beef: I always go for a good quality chuck roast for my pulled beef. It’s got fantastic marbling, which breaks down beautifully during a slow cook, yielding incredibly tender, shreddable meat. This cut absorbs flavors wonderfully, making it perfect for our sweet and smoky BBQ treatment.
  • Sweet & Smoky Rub: Before cooking, I like to create a dry rub that enhances the sweet and smoky notes. Think brown sugar, paprika (smoked paprika is a game-changer here!), garlic powder, onion powder, a little bit of cumin, and a touch of cayenne if you like a hint of heat. This builds a great crust and infuses the beef from the inside out.
  • The BBQ Sauce: This is where the magic truly happens! You can use your favorite store-bought sweet and smoky BBQ sauce – I look for ones with molasses, brown sugar, and a good balance of tang. If you’re feeling ambitious, a homemade sauce with a base of tomato paste, apple cider vinegar, brown sugar, liquid smoke (if you want an extra boost of smokiness), and a touch of Worcestershire sauce will elevate these wraps to another level. The beef should be thoroughly coated and simmered in this sauce after shredding to fully absorb the flavor.
  • Substitutions: While beef chuck is my top recommendation, you could adapt this recipe for other cuts like a beef brisket flat. If you’re looking for a non-beef option that still works well in this format, shredded chicken thighs would also be a delicious alternative, just be sure to adjust cooking times.

The Slaw

  • Cabbage & Carrots: For a vibrant and crunchy slaw, I love a mix of green and red cabbage, thinly sliced or shredded. The red cabbage adds a beautiful pop of color and a slightly different texture. Shredded carrots are essential for sweetness and another layer of crunch.
  • Sweet & Tangy Dressing: My go-to slaw dressing for these wraps is a creamy, yet bright, concoction. I start with a base of good quality mayonnaise or Greek yogurt for a lighter option. Then, I whisk in apple cider vinegar for tang, a spoonful of honey or maple syrup for sweetness, a touch of Dijon mustard for complexity, and a pinch of celery seeds. The celery seeds are a secret weapon for that classic, irresistible deli-style slaw flavor.
  • Substitutions: Feel free to experiment with other crunchy vegetables. Broccoli slaw mix, kohlrabi, or even a bit of finely diced bell pepper can add interesting textures and flavors. For a less creamy slaw, you could opt for a purely vinegar and oil-based dressing, though I find the creaminess really balances the richness of the beef.

The Wraps

  • Lettuce Leaves: For “Slaw Wraps,” large, sturdy lettuce leaves are crucial. My favorites are butter lettuce, large romaine hearts, or even vibrant red leaf lettuce. They provide a crisp, refreshing vessel that holds all the delicious fillings without overpowering them. Cabbage leaves can also work if you prefer a slightly firmer, more substantial wrap.
  • Substitutions: While the lettuce wrap is central to this dish’s identity, if you’re looking for an alternative for kids or a heartier meal, small soft flour tortillas or slider buns would also be fantastic.

Optional Toppings

  • Pickled Red Onions: A sprinkling of quick pickled red onions adds a fantastic zing and cuts through the richness of the beef.
  • Fresh Herbs: A scatter of fresh cilantro or finely chopped green onions brings a burst of freshness.
  • Heat: Thinly sliced jalapeños or a dash of your favorite hot sauce can add a welcome kick.

Step-by-Step Instructions

Making these Bbq Pulled Beef Slaw Wraps (sweet & Smoky) is a delightful process, designed to bring out the best in each component. Here’s how I put it all together:

Step 1: Prepare the Sweet & Smoky Pulled Beef

  1. Season the Beef: If you’re starting with a raw chuck roast, pat it dry thoroughly. Generously rub it all over with your sweet and smoky spice blend (brown sugar, smoked paprika, garlic powder, onion powder, cumin, cayenne, salt, and black pepper).
  2. Cook the Beef:
    • Slow Cooker Method: Sear the seasoned beef in a hot pan for a few minutes per side until beautifully browned. Transfer it to your slow cooker. Pour in about 1 cup of beef broth, apple cider, or a non-alcoholic beer alternative (like an alcohol-free stout or amber beer) to provide moisture and flavor. Cook on low for 6-8 hours or on high for 3-4 hours, until the beef is fork-tender and easily shreddable.
    • Oven Method: Sear the beef as above, then place it in a Dutch oven with the same liquid. Cover tightly and braise in an oven preheated to 300°F (150°C) for 3-4 hours, or until very tender.
    • Instant Pot Method: Sear the beef in the Instant Pot on the Sauté function. Add 1 cup of liquid (beef broth, etc.). Seal and cook on High Pressure for 60-75 minutes, followed by a natural pressure release.
  3. Shred and Sauce: Once cooked, carefully remove the beef from the cooking liquid (reserve some liquid if you want to thin your BBQ sauce). Using two forks, shred the beef directly in the pot or in a large bowl. Discard any large pieces of fat. Add about 1 to 1½ cups of your favorite sweet and smoky BBQ sauce to the shredded beef, mixing well to ensure every strand is coated. You can add a splash of the reserved cooking liquid if you want a slightly thinner, saucier consistency. Keep the beef warm.

Step 2: Assemble the Sweet & Tangy Slaw

  1. Prepare Vegetables: In a large mixing bowl, combine the shredded green and red cabbage and shredded carrots. Make sure they are finely shredded for the best texture in a wrap.
  2. Make the Dressing: In a separate small bowl, whisk together the mayonnaise (or Greek yogurt), apple cider vinegar, honey (or maple syrup), Dijon mustard, celery seeds, salt, and black pepper until smooth and well combined. Taste and adjust seasonings – you might want a little more sweetness or tang.
  3. Combine Slaw: Pour the dressing over the shredded vegetables. Toss everything gently but thoroughly until all the cabbage and carrots are evenly coated. Set aside for at least 15-20 minutes to allow the flavors to meld, or longer if you prefer a softer slaw.

Step 3: Prepare the Lettuce Wraps

  1. Wash and Dry Lettuce: Carefully separate the leaves from your butter lettuce, romaine hearts, or cabbage. Wash them gently under cold water and then thoroughly pat them dry with paper towels or use a salad spinner. Dry leaves are essential to prevent the wraps from becoming soggy.
  2. Arrange: Lay out the prepared lettuce cups on a serving platter, ready for assembly.

Step 4: Assemble and Serve Your Bbq Pulled Beef Slaw Wraps

  1. Layer: Take one dry lettuce leaf. Spoon a generous amount of the warm, saucy Bbq pulled beef into the center of the leaf.
  2. Top with Slaw: Follow with a healthy spoonful of the sweet and tangy slaw right on top of the pulled beef.
  3. Add Toppings (Optional): If using, scatter some pickled red onions, fresh cilantro, or sliced jalapeños over the slaw.
  4. Serve Immediately: Gently fold or roll your Bbq Pulled Beef Slaw Wraps and serve them right away for the ultimate fresh and flavorful experience!

Tips & Suggestions

To make your Bbq Pulled Beef Slaw Wraps (sweet & Smoky) truly shine, I’ve gathered a few tips and tricks that I’ve learned along the way:

  • Make Ahead for Ease: Both the pulled beef and the slaw can be prepared a day or two in advance. This is a fantastic time-saver, especially if you’re hosting or just want a quick weeknight meal. Store them separately in airtight containers in the refrigerator. Just remember to warm the beef gently before serving.
  • Balance the Sweet & Smoky: The “sweet & smoky” profile is key here. If your BBQ sauce isn’t quite hitting the mark, you can easily adjust it. A little extra brown sugar or molasses can boost the sweetness, while a dash of liquid smoke (used sparingly!) or an extra pinch of smoked paprika can enhance the smokiness. For a touch of heat, a tiny bit of chipotle powder or cayenne pepper works wonders.
  • Keep Your Slaw Crunchy: To ensure your slaw stays crisp, don’t dress it too far in advance, especially if you’re using a creamy dressing. The salt in the dressing can draw water out of the cabbage, making it softer over time. If making ahead, keep the dressing separate and toss it with the vegetables about 30 minutes before serving.
  • Choosing Your Lettuce: While butter lettuce is wonderfully pliable and soft, sometimes I crave a bit more crunch. Romaine hearts offer a sturdier, crisper vessel. Experiment to find your favorite, but always ensure the leaves are completely dry to prevent a soggy wrap.
  • Serving Suggestions: These wraps are quite hearty on their own, but they also pair beautifully with simple sides. A bowl of extra slaw, some dill pickle spears, or even a side of corn on the cob (especially grilled corn) would complement the flavors perfectly.
  • Customizing for Kids: For little ones who might be sensitive to the bold flavors or textures, you can serve the pulled beef and slaw separately on a plate, perhaps with some soft slider buns instead of lettuce wraps. You can also make a milder, less tangy slaw dressing.
  • Flavor Boost for Beef: If you’re reheating store-bought pulled beef, I recommend simmering it with a little extra BBQ sauce and a splash of beef broth. This helps to rehydrate the meat and really infuse it with that sweet and smoky flavor.

Storage

Proper storage is essential to keep your Bbq Pulled Beef Slaw Wraps (sweet & Smoky) components fresh and delicious for future enjoyment. Here’s how I recommend storing each part:

  • Pulled Beef:
    • Separate Storage: The cooked, sauced pulled beef should be stored separately from the slaw and lettuce.
    • Container: Transfer the beef to an airtight container.
    • Refrigeration: It will keep well in the refrigerator for up to 3-4 days.
    • Freezing: Pulled beef freezes exceptionally well! Allow it to cool completely, then transfer it to a freezer-safe airtight container or heavy-duty freezer bag. It can be frozen for up to 2-3 months. Thaw overnight in the refrigerator before reheating.
    • Reheating: Gently reheat the pulled beef on the stovetop over low heat, adding a splash of beef broth or extra BBQ sauce if it seems a little dry, stirring occasionally until warmed through. You can also reheat it in the microwave in short bursts, stirring in between.
  • Slaw:
    • Separate Storage: If you’ve already dressed the slaw, it’s best consumed within 1-2 days, as the cabbage can soften. Store it in an airtight container in the refrigerator.
    • Undressed Slaw: For maximum freshness, I highly recommend storing the shredded vegetables and the dressing separately. The shredded cabbage and carrots (undressed) can be stored in an airtight container in the refrigerator for up to 3-4 days. The dressing, also in an airtight container, will last about 5-7 days in the fridge.
    • Combining: When ready to serve, simply toss the desired amount of vegetables with the dressing. This ensures a crisp, vibrant slaw every time.
  • Lettuce Wraps:
    • Separate Storage: The lettuce leaves should never be stored with the fillings, as they will quickly become soggy.
    • Preparation: Wash and thoroughly dry the lettuce leaves. Place them between layers of paper towels in an airtight container or a large zip-top bag.
    • Refrigeration: Stored this way, the lettuce leaves will stay fresh and crisp in the refrigerator for 3-5 days.

By storing each component individually, you’ll be able to enjoy fresh, delicious Bbq Pulled Beef Slaw Wraps (sweet & Smoky) for several days after preparing!

Easy Sweet & Smoky BBQ Pulled Beef Slaw Wraps Recipe

Final Thoughts

I truly believe that the Bbq Pulled Beef Slaw Wraps (sweet & Smoky) are more than just a meal – they’re an experience! The incredible tenderness of the slow-cooked beef, infused with that irresistible sweet and smoky BBQ flavor, is perfectly complemented by the refreshing crunch of the slaw. This combination creates a symphony of textures and tastes that you simply won’t forget. Whether you’re looking for a delightful weeknight dinner or a crowd-pleasing dish for your next gathering, these wraps deliver on every front. I hope you’ll give them a try and discover just how utterly delicious and satisfying the Bbq Pulled Beef Slaw Wraps (sweet & Smoky) can be. Get ready to savor every single bite!

Print
clock clock iconcutlery cutlery iconflag flag iconfolder folder iconinstagram instagram iconpinterest pinterest iconfacebook facebook iconprint print iconsquares squares iconheart heart iconheart solid heart solid icon

Easy Sweet & Smoky BBQ Pulled Beef Slaw Wraps Recipe


  • Author: Lily author
  • Total Time: 38 minute
  • Yield: 4 servings 1x
Pin Recipe
Print Recipe

Description

These BBQ Pulled Beef Slaw Wraps are a delightful fusion of tender, slow-cooked beef and vibrant, crunchy slaw, all wrapped in crisp lettuce or soft tortillas. Perfect for any occasion, they bring a burst of flavor and fun to your meal!


Ingredients

Scale
  • 1 chuck roast
  • brown sugar
  • smoked paprika
  • garlic powder
  • onion powder
  • cumin
  • cayenne pepper
  • salt
  • black pepper
  • 1 cup beef broth
  • apple cider or non-alcoholic beer
  • 1 to 1½ cups sweet and smoky BBQ sauce
  • green cabbage
  • red cabbage
  • shredded carrots
  • mayonnaise or Greek yogurt
  • apple cider vinegar
  • honey or maple syrup
  • Dijon mustard
  • celery seeds
  • pickled red onions (optional)
  • fresh cilantro (optional)
  • sliced jalapeños (optional)

Instructions

  1. Step 1: Prepare the Sweet & Smoky Pulled Beef
  2. 1. Season the Beef: Pat the chuck roast dry and rub it with the sweet and smoky spice blend (brown sugar, smoked paprika, garlic powder, onion powder, cumin, cayenne, salt, and black pepper).
  3. 2. Cook the Beef: Choose a method – Slow Cooker: Sear the beef, transfer to the slow cooker, add 1 cup of liquid, and cook on low for 6-8 hours or high for 3-4 hours. Oven: Sear the beef, place in a Dutch oven with liquid, cover, and braise at 300°F for 3-4 hours. Instant Pot: Sear the beef, add liquid, seal, and cook on High Pressure for 60-75 minutes.
  4. 3. Shred and Sauce: Remove the beef, shred it, and mix with 1 to 1½ cups of BBQ sauce, adding reserved cooking liquid if desired.
  5. Step 2: Assemble the Sweet & Tangy Slaw
  6. 1. Prepare Vegetables: In a bowl, combine shredded green and red cabbage and shredded carrots.
  7. 2. Make the Dressing: Whisk together mayonnaise (or Greek yogurt), apple cider vinegar, honey (or maple syrup), Dijon mustard, celery seeds, salt, and black pepper until smooth.
  8. 3. Combine Slaw: Pour dressing over vegetables and toss until coated. Let sit for 15-20 minutes.
  9. Step 3: Prepare the Lettuce Wraps
  10. 1. Wash and Dry Lettuce: Separate and wash lettuce leaves, then dry thoroughly.
  11. 2. Arrange: Lay out the prepared lettuce cups on a platter.
  12. Step 4: Assemble and Serve Your Bbq Pulled Beef Slaw Wraps
  13. 1. Layer: Spoon pulled beef into the center of a lettuce leaf.
  14. 2. Top with Slaw: Add a spoonful of slaw on top of the beef.
  15. 3. Add Toppings (Optional): Scatter pickled red onions, cilantro, or jalapeños over the slaw.
  16. 4. Serve Immediately: Fold or roll the wraps and serve right away.
  • Prep Time: 30 mins
  • Cook Time: 6-8 hours
  • Category: Dinner
  • Method: Slow Cooking
  • Cuisine: American

Nutrition

  • Serving Size: 1 wrap
  • Calories: 450
  • Sugar: 15 g
  • Sodium: 800 mg
  • Fat: 20 g
  • Saturated Fat: 5 g
  • Unsaturated Fat: 10 g
  • Trans Fat: 0 g
  • Carbohydrates: 35 g
  • Fiber: 5 g
  • Protein: 30 g
  • Cholesterol: 80 mg

Keywords: Make ahead for ease by preparing the pulled beef and slaw in advance. Adjust the sweetness and smokiness of the BBQ sauce to your taste. Keep slaw crunchy by dressing it shortly before serving.

Did you make this recipe?

Share a photo and tag us — we can't wait to see what you've made!

« Previous Post
Best Mexican Tortilla Soup with Crispy Toppings Recipe
Next Post »
Best Honey Cinnamon Roasted Sweet Potato Cubes, Caramelized

If you enjoyed this…

Sweet Chili Chicken Bowl: A Delicious & Easy Recipe

Bang Bang Chicken Bowl Recipe: Easy & Delicious Dinner!

Beef and Broccoli: The Ultimate Guide to a Perfect Stir-Fry

Primary Sidebar

Browse by Diet

BreakfastDinnerLunchDessertAppetizer

Sweet Peach Yogurt Parfait Delight

One of my fondest memories is from a lazy summer afternoon spent at my grandmother’s house. The sun filtered through the kitchen window, casting a warm glow over the table where she would create her culinary magic. It was during one of those blissful moments that I first tasted her Peach Yogurt Parfait with Honey and Granola. The sweet aroma of ripe peaches mingling with creamy yogurt and the crunch of granola was nothing short of heavenly. It felt like summer captured in a bowl, and I still remember the joy of diving in with a spoon, each layer revealing a new burst of flavor.

When I think about that parfait, I can almost hear the gentle hum of the bees outside, reminding me of the floral notes that honey brings to every bite. The vibrant yellows and soft oranges of the peaches contrast beautifully with the creamy white yogurt and the golden crunch of granola. It’s a dish that not only looks delightful but also tastes like a celebration of fresh, wholesome ingredients.

What makes my version of this Peach Yogurt Parfait special is the careful balance of flavors and textures. I use ripe, juicy peaches, drizzled with locally sourced honey, and a homemade granola that’s bursting with nuts and seeds for an extra crunch. It’s a simple dish, but every layer is crafted with love and attention.

Let me show you exactly how to make this delightful parfait, so you can bring a bit of that summer magic into your kitchen!

Sweet Peach Yogurt Parfait Delight

Why You’ll Love This Recipe

  • Delightfully creamy texture from the Greek yogurt, paired with the juicy sweetness of fresh peaches.
  • Ready in under 20 minutes, making it a quick and satisfying breakfast or snack option.
  • Budget-friendly, using common ingredients that you may already have in your pantry.
  • Customizable with your favorite granola and nuts, allowing you to tailor each parfait to your taste.
  • Perfectly balanced flavors with the bright acidity of lemon juice and the sweetness of honey enhancing the peaches.

Ingredients

  • For the Parfait:
  • 2 cups plain Greek yogurt (or vanilla yogurt for a sweeter option)
  • 2 large ripe peaches, diced (about 2 cups)
  • 1 tablespoon fresh lemon juice (to prevent browning of peaches)
  • 2 tablespoons honey (plus more for drizzling)
  • 1 teaspoon vanilla extract (optional for extra flavor)
  • For the Granola:
  • 1 cup granola (store-bought or homemade; see notes for a simple granola recipe)
  • 1/4 cup sliced almonds (optional for added crunch)
  • 1/4 cup shredded coconut (optional for added flavor)

Let’s dive into some key ingredients that make this Peach Yogurt Parfait so delightful! First, the Greek yogurt is not only creamy but also packed with protein, making it a satisfying option for breakfast or a snack. If you’re looking for a sweeter option, you can easily substitute it with vanilla yogurt, though it may alter the overall flavor balance. Next, the ripe peaches are the star of the show; their natural sweetness shines through, so I recommend choosing peaches that yield slightly to pressure, indicating they’re perfectly ripe. If peaches aren’t in season, feel free to use nectarines or even frozen peaches—just thaw them before use. Finally, honey adds a lovely floral sweetness that ties everything together. If you prefer, maple syrup can serve as a delicious substitute.

Step-by-Step Instructions

  1. Start by preparing the peaches. Wash them thoroughly, then slice and dice them into bite-sized pieces. In a medium bowl, toss the diced peaches with 1 tablespoon of fresh lemon juice to prevent browning. Set aside for about 5 minutes while the lemon juice works its magic.
  2. In a separate bowl, combine the Greek yogurt, 2 tablespoons of honey, and 1 teaspoon of vanilla extract if using. Stir the mixture until smooth and thoroughly blended. This should take about a minute. Avoid overmixing to maintain the creaminess of the yogurt.
  3. Now it’s time to layer your parfait. Grab a clear glass or bowl to showcase your beautiful creation. Start with a generous spoonful of the yogurt mixture at the bottom—about 1/4 cup will do. Use a spoon to spread it evenly.
  4. Add a layer of the diced peaches over the yogurt, ensuring they cover the yogurt completely. You might want to use about half of what you have prepared—roughly 1 cup. This layer should be visually appealing, so arrange the peaches neatly.
  5. Sprinkle 1/4 cup of granola over the peaches. This adds a delightful crunch. Make sure to distribute it evenly to ensure every bite has that satisfying texture. Avoid packing it down too tightly, as you want it to maintain its crunch.
  6. Repeat the layers: spoon in another 1/4 cup of yogurt, followed by another cup of peaches, and another sprinkle of granola. You should have at least two layers, but feel free to add more depending on your glass size.
  7. Finish off your parfait with a drizzle of honey on top for added sweetness and a touch of elegance. If you’re using sliced almonds or shredded coconut, sprinkle them on top now. It adds a lovely visual contrast and extra flavor.
  8. Serve immediately or refrigerate for up to 30 minutes before serving to allow the flavors to meld together. However, I recommend enjoying it fresh to maintain the granola’s crunch.

Pro Tips for the Best Peach Yogurt Parfait With Honey And Granola

  • Make sure to choose ripe peaches for the best flavor and texture. A common mistake is using unripe fruit, which can lead to a less enjoyable parfait. Look for peaches that are fragrant and slightly soft to the touch.
  • Use a clear glass to assemble your parfait; this not only makes for a beautiful presentation but also allows you to see the colorful layers, which adds to the enjoyment of eating it.
  • For an even creamier texture, consider whipping the Greek yogurt with a hand mixer for a couple of minutes before layering. This small adjustment makes a huge difference in mouthfeel.
  • Be mindful of the granola-to-yogurt ratio. Too much granola can overwhelm the parfait, while too little can make it feel too creamy. Aim for about 1/4 cup of granola per layer for the perfect balance.
  • If you’re making this for a gathering, consider preparing the yogurt and peaches ahead of time and layering them just before serving. This ensures the granola stays crunchy!

Variations & Serving Ideas

There are so many ways to get creative with your Peach Yogurt Parfait! For a tropical twist, swap out the peaches for mangoes or pineapples and top with coconut flakes. If you prefer a berry flavor, mix in some blueberries or strawberries with the peaches for added color and taste. For a nutty version, incorporate chopped walnuts or pecans instead of almonds.

As for serving ideas, this parfait pairs beautifully with a side of scrambled eggs for a hearty breakfast or fresh fruit salad for a light lunch. You might also enjoy it alongside whole grain toast with almond butter for an energizing snack. The contrast of flavors and textures will elevate your meal experience!

Storage, Make-Ahead & Reheating

The Peach Yogurt Parfait is best enjoyed fresh, but you can prepare some components ahead of time. Store the layered parfait in an airtight container in the refrigerator for up to 24 hours. However, be cautious; the granola may lose its crunch if stored too long. You can freeze the yogurt and peach mixture for up to 2 months; just remember to thaw it in the refrigerator overnight before serving.

If you plan to enjoy this dish the next day, it can taste even better as the flavors meld together. Just remember to add the granola right before serving to keep its delightful crunch!

Frequently Asked Questions

Can I make Peach Yogurt Parfait With Honey And Granola ahead of time?

Yes — in fact, it tastes even better the next day as the flavors meld. However, I recommend waiting to add the granola until just before serving to maintain its crunch.

What can I substitute for Greek yogurt?

If you prefer a lighter option, you can substitute Greek yogurt with regular yogurt or a dairy-free alternative like coconut yogurt. Just remember that this may alter the creaminess and flavor profile slightly.

Can I use frozen peaches for this parfait?

Absolutely! Just make sure to thaw the frozen peaches before using them. They will still add great flavor, though the texture may be slightly softer than fresh peaches.

How do I make the parfait vegan?

To make a vegan version, substitute the Greek yogurt with a plant-based yogurt alternative, and replace honey with maple syrup or agave nectar. This keeps the parfait sweet while adhering to a vegan diet.

What other fruits can I use in this recipe?

You can mix and match fruits based on your preference. Try using strawberries, blueberries, raspberries, or even bananas. Just make sure to adjust the lemon juice as needed to prevent browning.

Sweet Peach Yogurt Parfait Delight

Final Thoughts

The Peach Yogurt Parfait with Honey and Granola is a delightful blend of creamy yogurt, sweet peaches, and crunchy granola that creates a satisfying and nourishing treat. Each layer bursts with flavor, making it a perfect choice for breakfast or a light dessert.

This is the kind of recipe I come back to again and again, especially when I want something refreshing and wholesome to start my day. The harmony of sweet and tart flavors, combined with the delightful crunch, never fails to lift my spirits!

I encourage you to give this parfait a try and indulge in its comforting goodness. Feel free to share your results or even add your own twist—perhaps a sprinkle of cinnamon or a handful of nuts. Enjoy creating your perfect parfait!

Print
clock clock iconcutlery cutlery iconflag flag iconfolder folder iconinstagram instagram iconpinterest pinterest iconfacebook facebook iconprint print iconsquares squares iconheart heart iconheart solid heart solid icon

Peach Yogurt Parfait


  • Author: Lily author
  • Total Time: 15 minutes
  • Yield: 4 servings 1x
Pin Recipe
Print Recipe

Description

This Peach Yogurt Parfait combines creamy Greek yogurt, juicy peaches, and crunchy granola for a delightful treat. It’s a perfect breakfast or snack that captures the essence of summer in every bite.


Ingredients

Scale
  • For the Parfait:
  • 2 cups plain Greek yogurt (or vanilla yogurt for a sweeter option)
  • 2 large ripe peaches, diced (about 2 cups)
  • 1 tablespoon fresh lemon juice (to prevent browning of peaches)
  • 2 tablespoons honey (plus more for drizzling)
  • 1 teaspoon vanilla extract (optional for extra flavor)
  • For the Granola:
  • 1 cup granola (store-bought or homemade; see notes for a simple granola recipe)
  • 1/4 cup sliced almonds (optional for added crunch)
  • 1/4 cup shredded coconut (optional for added flavor)

Instructions

  1. Start by preparing the peaches. Wash them thoroughly, then slice and dice them into bite-sized pieces. In a medium bowl, toss the diced peaches with 1 tablespoon of fresh lemon juice to prevent browning. Set aside for about 5 minutes while the lemon juice works its magic.
  2. In a separate bowl, combine the Greek yogurt, 2 tablespoons of honey, and 1 teaspoon of vanilla extract if using. Stir the mixture until smooth and thoroughly blended. This should take about a minute. Avoid overmixing to maintain the creaminess of the yogurt.
  3. Now it’s time to layer your parfait. Grab a clear glass or bowl to showcase your beautiful creation. Start with a generous spoonful of the yogurt mixture at the bottom—about 1/4 cup will do. Use a spoon to spread it evenly.
  4. Add a layer of the diced peaches over the yogurt, ensuring they cover the yogurt completely. You might want to use about half of what you have prepared—roughly 1 cup. This layer should be visually appealing, so arrange the peaches neatly.
  5. Sprinkle 1/4 cup of granola over the peaches. This adds a delightful crunch. Make sure to distribute it evenly to ensure every bite has that satisfying texture. Avoid packing it down too tightly, as you want it to maintain its crunch.
  6. Repeat the layers: spoon in another 1/4 cup of yogurt, followed by another cup of peaches, and another sprinkle of granola. You should have at least two layers, but feel free to add more depending on your glass size.
  7. Finish off your parfait with a drizzle of honey on top for added sweetness and a touch of elegance. If you’re using sliced almonds or shredded coconut, sprinkle them on top now. It adds a lovely visual contrast and extra flavor.
  8. Serve immediately or refrigerate for up to 30 minutes before serving to allow the flavors to meld together. However, I recommend enjoying it fresh to maintain the granola’s crunch.
  • Prep Time: 15 mins
  • Cook Time: 0 mins
  • Category: Breakfast
  • Method: No-cook
  • Cuisine: American

Nutrition

  • Serving Size: 1 parfait
  • Calories: 250
  • Sugar: 20 g
  • Sodium: 50 mg
  • Fat: 5 g
  • Saturated Fat: 2 g
  • Unsaturated Fat: 3 g
  • Trans Fat: 0 g
  • Carbohydrates: 40 g
  • Fiber: 3 g
  • Protein: 10 g
  • Cholesterol: 10 mg

Keywords: Choose ripe peaches for the best flavor and texture. Use a clear glass for a beautiful presentation. For creaminess, consider whipping the yogurt before layering. Be mindful of the granola-to-yogurt ratio. Prepare yogurt and peaches ahead of time for gatherings, layering just before serving.

Did you make this recipe?

Share a photo and tag us — we can't wait to see what you've made!

Sun-Kissed Frozen Orange Cream Slush

As a child, summer days felt like they lasted forever. I remember the sticky heat wrapping around me as I played outside, my laughter mingling with the sounds of the neighborhood. But nothing could cool me down quite like the moment I’d spot my grandmother, laboring over her blender, whipping up her famous Frozen Orange Creamsicle Slush. That vibrant orange treat, with its frosty texture and sweet citrus aroma, was like a burst of sunshine in a cup. Just one sip, and I could feel the coolness wash over me, sparking pure joy.

This Frozen Orange Creamsicle Slush has a way of making you feel like a kid again. Its creamy, dreamy consistency is a delightful balance of bright orange and soft vanilla, inviting you to dive right in. The refreshing tang of orange dances on your tongue, while the smooth creaminess envelops you in a comforting embrace. It’s a nostalgic treat that’s perfect for hot summer afternoons or anytime you need a little pick-me-up.

What makes my version of this slush stand out is the addition of a hint of vanilla bean, which elevates the flavor and adds an extra layer of richness. Plus, it’s super easy to whip up with just a few simple ingredients that you probably already have on hand! So, if you’re ready to relive those sun-soaked memories, let me show you exactly how to make it.

Sun-Kissed Frozen Orange Cream Slush

Why You’ll Love This Recipe

  • Each slush is a perfect blend of creamy vanilla and zesty orange, creating a nostalgic flavor reminiscent of summer days.
  • This refreshing treat is ready in under 15 minutes, making it an ideal quick dessert for unexpected guests or hot afternoons.
  • With just 8 simple ingredients, it’s budget-friendly, ensuring you don’t have to break the bank to enjoy a delicious slush.
  • The slush has a perfectly smooth texture, thanks to the combination of ice and ice cream, providing a delightful contrast to the bright citrus flavors.
  • It’s highly customizable; you can easily adjust the sweetness and add fresh herbs for a unique twist that suits your taste.

Ingredients

  • 2 cups orange juice (freshly squeezed or store-bought)
  • 1 cup vanilla ice cream
  • 1 cup crushed ice
  • 1/2 cup milk (whole or 2%)
  • 1/4 cup granulated sugar (adjust based on sweetness preference)
  • 1 teaspoon vanilla extract
  • Zest of 1 orange (for added flavor)
  • Fresh orange slices and mint leaves (for garnish)

The star of this Frozen Orange Creamsicle Slush is the orange juice, which provides the vibrant, citrusy base. Freshly squeezed juice will yield the brightest flavor, but store-bought options can be just as convenient. If you’re opting for store-bought, choose 100% pure juice with no added sugars for the best results. Another essential ingredient is the vanilla ice cream; it adds creaminess and sweetness. You can substitute it with dairy-free ice cream if you’re looking for a vegan option. Whole or 2% milk complements the ice cream, creating a smooth blend. If you want a lower-calorie version, almond or oat milk can be good alternatives.

Lastly, the granulated sugar can be adjusted based on your sweetness preference. If you prefer a more natural sweetener, consider using honey or agave syrup. The orange zest enhances the flavor profile, providing an aromatic pop that brings the whole slush together. Don’t skip it! It adds an extra layer of brightness that makes this slush truly special.

Step-by-Step Instructions

  1. Start by preparing your ingredients. Gather 2 cups of orange juice, 1 cup of vanilla ice cream, and 1 cup of crushed ice. Make sure the ice is finely crushed, as larger chunks can make blending difficult.
  2. In a blender, combine the orange juice, vanilla ice cream, crushed ice, and 1/2 cup of milk. Add 1/4 cup of granulated sugar and 1 teaspoon of vanilla extract. If you like a sweeter slush, consider adding a bit more sugar at this stage.
  3. Add the zest of 1 orange to the blender. This step is crucial for enhancing the citrus flavor of your slush. Make sure not to include the bitter white pith—only the flavorful zest.
  4. Blend the mixture on medium-high speed for about 30-45 seconds. Stop once the ingredients are fully combined and the slush has a smooth, even consistency. If you notice large chunks of ice, blend for an additional 10-15 seconds. Avoid over-blending, as this can make the slush too liquidy.
  5. Once blended, taste the slush. If it needs more sweetness, add a little more sugar and blend for a few more seconds. If it’s too thick, you can add a splash of milk to reach your desired consistency.
  6. Pour the slush into glasses. This recipe typically serves 4, but you can easily double it for larger gatherings. Use a spoon to help guide the slush into the glasses if needed.
  7. Garnish each serving with fresh orange slices and mint leaves. The mint not only adds a pop of color but also a refreshing aroma that complements the citrus flavors beautifully.
  8. Serve immediately and enjoy! If you’ve made extra, you can refrigerate it for a short time, but it’s best enjoyed fresh.

Pro Tips for the Best Frozen Orange Creamsicle Slush

  • Don’t skip the orange zest! It’s a game-changer for flavor. Always zest before juicing to make it easier.
  • Use a high-powered blender for the best texture. A standard blender may struggle with ice, leading to uneven consistency. If you have a food processor, that can work too, but ensure the ice is finely crushed.
  • Adjust the ice-to-liquid ratio carefully. If your slush is too thick, it won’t blend well. Start with less ice and add more until you reach your preferred texture.
  • Be cautious with the sugar! Always start with the lower amount, as you can easily add more, but it’s hard to fix an overly sweet slush.
  • For a fun twist, consider adding a splash of coconut milk or a handful of fresh fruit like strawberries or pineapple. This not only enhances the flavor but also adds a beautiful color contrast.

Variations & Serving Ideas

There are countless ways to put a spin on your Frozen Orange Creamsicle Slush. Consider making a tropical version by adding in some pineapple juice or coconut milk for a delightful tropical twist. If you’re feeling adventurous, try incorporating a handful of frozen mango or peach slices for added sweetness. For a lighter version, swap out the vanilla ice cream for Greek yogurt for a creamy yet tangy alternative.

As for serving ideas, this refreshing slush pairs wonderfully with light summer dishes like grilled chicken skewers, fish tacos, or a simple salad topped with citrus vinaigrette. The bright, zesty flavors of the slush complement these dishes perfectly, making them an ideal pairing for a sunny day.

Storage, Make-Ahead & Reheating

This Frozen Orange Creamsicle Slush is best enjoyed fresh, but if you have leftovers, you can store them in an airtight container in the fridge for up to 2 days. Just keep in mind that the slush may lose some of its texture over time as the ice melts. It doesn’t freeze well, as the ice will turn into a solid block. If you must freeze it, blend again after thawing to restore the slushy consistency. This treat is best the day you make it, as the flavors meld together beautifully overnight, enhancing its deliciousness.

Frequently Asked Questions

Can I make Frozen Orange Creamsicle Slush ahead of time?

Yes — in fact, it tastes even better the next day as the flavors meld. However, it’s best to enjoy it fresh, as the texture can change if stored for too long. If you need to prepare it ahead, keep it in the fridge and re-blend before serving.

What kind of orange juice should I use?

For the best flavor, use freshly squeezed orange juice. However, if you’re short on time, opt for 100% pure store-bought juice without added sugars. This will ensure that your slush remains flavorful and refreshing.

Can I substitute the vanilla ice cream?

Absolutely! If you’re looking for a dairy-free option, coconut milk ice cream or a non-dairy vanilla ice cream can work wonderfully. They will still provide the creamy texture and sweetness you desire.

How can I adjust the sweetness of my slush?

You can easily adjust the sweetness by modifying the amount of sugar added. Start with 1/4 cup and taste the mixture before blending. If you prefer it sweeter, add more sugar gradually until it reaches your desired level.

What should I do if my slush is too thick?

If your slush is too thick, simply add a splash of milk or orange juice and blend again. This will help achieve a more drinkable consistency while maintaining the slushy texture. Adjust gradually to reach your preferred thickness.

Sun-Kissed Frozen Orange Cream Slush

Final Thoughts

The Frozen Orange Creamsicle Slush is a delightful blend of refreshing citrus and creamy goodness, making it a perfect treat for warm days or any time you crave a taste of nostalgia. The way the bright orange flavor dances with the creamy texture truly elevates this slush, transforming it into a satisfying escape from the everyday.

This is the kind of recipe I come back to again and again, especially when I’m looking to cool down or impress guests at a summer gathering. It’s simple to make and always brings smiles all around! I encourage you to try this recipe for yourself—don’t hesitate to share your results or even put your own spin on it. Happy slushing!

Print
clock clock iconcutlery cutlery iconflag flag iconfolder folder iconinstagram instagram iconpinterest pinterest iconfacebook facebook iconprint print iconsquares squares iconheart heart iconheart solid heart solid icon

Frozen Orange Creamsicle Slush


  • Author: Lily author
  • Total Time: 15 minutes
  • Yield: 4 servings 1x
Pin Recipe
Print Recipe

Description

This Frozen Orange Creamsicle Slush is a refreshing treat that combines creamy vanilla and zesty orange flavors. Perfect for hot summer days, it brings back nostalgic memories with every sip.


Ingredients

Scale
  • 2 cups orange juice (freshly squeezed or store-bought)
  • 1 cup vanilla ice cream
  • 1 cup crushed ice
  • 1/2 cup milk (whole or 2%)
  • 1/4 cup granulated sugar (adjust based on sweetness preference)
  • 1 teaspoon vanilla extract
  • Zest of 1 orange (for added flavor)
  • Fresh orange slices and mint leaves (for garnish)

Instructions

  1. Start by preparing your ingredients. Gather 2 cups of orange juice, 1 cup of vanilla ice cream, and 1 cup of crushed ice. Make sure the ice is finely crushed, as larger chunks can make blending difficult.
  2. In a blender, combine the orange juice, vanilla ice cream, crushed ice, and 1/2 cup of milk. Add 1/4 cup of granulated sugar and 1 teaspoon of vanilla extract. If you like a sweeter slush, consider adding a bit more sugar at this stage.
  3. Add the zest of 1 orange to the blender. This step is crucial for enhancing the citrus flavor of your slush. Make sure not to include the bitter white pith—only the flavorful zest.
  4. Blend the mixture on medium-high speed for about 30-45 seconds. Stop once the ingredients are fully combined and the slush has a smooth, even consistency. If you notice large chunks of ice, blend for an additional 10-15 seconds. Avoid over-blending, as this can make the slush too liquidy.
  5. Once blended, taste the slush. If it needs more sweetness, add a little more sugar and blend for a few more seconds. If it’s too thick, you can add a splash of milk to reach your desired consistency.
  6. Pour the slush into glasses. This recipe typically serves 4, but you can easily double it for larger gatherings. Use a spoon to help guide the slush into the glasses if needed.
  7. Garnish each serving with fresh orange slices and mint leaves. The mint not only adds a pop of color but also a refreshing aroma that complements the citrus flavors beautifully.
  8. Serve immediately and enjoy! If you’ve made extra, you can refrigerate it for a short time, but it's best enjoyed fresh.
  • Prep Time: 15 min
  • Cook Time: 0 min
  • Category: Dessert
  • Method: Blending
  • Cuisine: American

Nutrition

  • Serving Size: 1 serving
  • Calories: 200
  • Sugar: 30 g
  • Sodium: 50 mg
  • Fat: 5 g
  • Saturated Fat: 3 g
  • Unsaturated Fat: 2 g
  • Trans Fat: 0 g
  • Carbohydrates: 40 g
  • Fiber: 1 g
  • Protein: 2 g
  • Cholesterol: 20 mg

Keywords: Don't skip the orange zest! It's a game-changer for flavor. Always zest before juicing to make it easier.

Did you make this recipe?

Share a photo and tag us — we can't wait to see what you've made!

Zesty Lemon Poppy Seed Delight

One rainy afternoon, I found myself in my grandmother’s cozy kitchen, the kind that always smelled like warmth and love. She was whipping up her famous Lemon Poppy Seed Loaf, a recipe that had been passed down through generations. As the batter came together, the zesty aroma of fresh lemons filled the air, mingling perfectly with the nutty fragrance of poppy seeds. I can still picture her, apron-clad, as she expertly drizzled a vibrant citrus icing over the loaf, creating a glossy, sun-kissed finish that beckoned us to dive in. It was a moment that sparked my own passion for baking, and this recipe has become a cherished staple in my home ever since.

When you take a bite of this Lemon Poppy Seed Loaf, it’s like a burst of sunshine on your palate. The loaf is beautifully golden, with a tender crumb that melts in your mouth. Each slice is speckled with tiny poppy seeds, adding a delightful crunch that contrasts beautifully with the tangy sweetness of the lemon. And that citrus icing? It’s the finishing touch that elevates this loaf from ordinary to extraordinary, with its bright, zesty flavor dancing on your taste buds.

This recipe stands out because it embraces simplicity while delivering on flavor. I’ve added a hint of vanilla to the batter, enhancing the overall taste and making it even more indulgent. Trust me, once you make this Lemon Poppy Seed Loaf With Citrus Icing, it’ll become a go-to in your baking repertoire.

So, let me show you exactly how to make it!

Zesty Lemon Poppy Seed Delight

Why You’ll Love This Recipe

  • Moist and tender crumb that melts in your mouth, thanks to the perfect balance of butter and buttermilk.
  • Bright, zesty lemon flavor paired with crunchy poppy seeds, creating a delightful texture and taste experience.
  • Easy to whip up in just about an hour, perfect for last-minute gatherings or a cozy afternoon treat.
  • Budget-friendly with everyday ingredients, making it an accessible option for all home bakers.
  • The citrus icing adds a sweet tang that elevates the loaf, turning a simple recipe into a showstopper!

Ingredients

  • 1 ½ cups (190g) all-purpose flour
  • 1 teaspoon baking powder
  • ½ teaspoon baking soda
  • ½ teaspoon salt
  • 3 tablespoons poppy seeds
  • ½ cup (115g) unsalted butter, softened to room temperature
  • 1 cup (200g) granulated sugar
  • 2 large eggs
  • 1 teaspoon vanilla extract
  • 1 teaspoon lemon zest (from about 1 medium lemon)
  • ½ cup (120ml) buttermilk
  • 2 tablespoons fresh lemon juice

For the Citrus Icing:

  • 1 cup (120g) powdered sugar
  • 2 tablespoons fresh lemon juice
  • 1 tablespoon orange juice
  • 1 teaspoon lemon zest (for garnish, optional)

Let’s dive into the key ingredients that make this Lemon Poppy Seed Loaf so special. The all-purpose flour provides the structure and base for the loaf, while the baking powder and baking soda ensure it rises perfectly, giving the loaf a light texture. For a gluten-free variation, you could substitute the flour with a gluten-free all-purpose blend. Poppy seeds not only add a delightful crunch but also contribute to the unique flavor profile that pairs well with the citrus notes.

Unsalted butter is crucial for achieving the buttery richness that makes this loaf so moist. If you’re looking for a dairy-free option, coconut oil or a vegan butter can be used instead. The buttermilk is another essential component, providing acidity that activates the baking soda for a fluffy texture. If you don’t have buttermilk on hand, you can easily make a substitute by mixing ½ cup of milk with 1 tablespoon of vinegar or lemon juice and letting it sit for about 5 minutes.

Step-by-Step Instructions

  1. Preheat your oven to 350°F (175°C). Grease a 9×5-inch loaf pan or line it with parchment paper for easy removal later.
  2. In a medium mixing bowl, whisk together 1 ½ cups of all-purpose flour, 1 teaspoon of baking powder, ½ teaspoon of baking soda, ½ teaspoon of salt, and 3 tablespoons of poppy seeds. This helps to evenly distribute the baking agents and ensures a uniform rise.
  3. In a large mixing bowl, cream together ½ cup of softened unsalted butter and 1 cup of granulated sugar using an electric mixer on medium speed for about 3-4 minutes, until the mixture is light and fluffy. Make sure to scrape down the sides of the bowl occasionally.
  4. Add 2 large eggs, 1 teaspoon of vanilla extract, and 1 teaspoon of lemon zest to the creamed butter and sugar, mixing until fully combined. You want a smooth consistency, so ensure there are no lumps of butter.
  5. In a small bowl, combine ½ cup of buttermilk and 2 tablespoons of fresh lemon juice. Alternately add the dry ingredients and buttermilk mixture to the butter mixture, starting and ending with the dry ingredients. Mix just until combined; do not overmix, as this can lead to a dense loaf.
  6. Pour the batter into the prepared loaf pan. Smooth the top with a spatula, ensuring it’s even. Bake in the preheated oven for 50-60 minutes, or until a toothpick inserted in the center comes out clean. The edges should be lightly golden brown, and the center should feel just set.
  7. Once baked, remove the loaf from the oven and allow it to cool in the pan for about 10 minutes. Then, transfer it to a wire rack to cool completely. Resist the urge to slice too soon, as it will be crumbly if it’s still warm.
  8. While the loaf is cooling, prepare the citrus icing. In a medium bowl, whisk together 1 cup of powdered sugar, 2 tablespoons of fresh lemon juice, and 1 tablespoon of orange juice until smooth. If the icing is too thick, you can add a little more juice to reach your desired consistency.
  9. Once the loaf is completely cool, drizzle the citrus icing over the top. If you like, sprinkle with an additional teaspoon of lemon zest for an extra pop of flavor and color.

Pro Tips for the Best Lemon Poppy Seed Loaf With Citrus Icing

  • Be careful not to overmix your batter; this is a common mistake that can lead to a dense loaf. Mix just until the dry ingredients are incorporated for a light and fluffy texture.
  • Use room temperature ingredients, especially the butter and eggs. This helps to create a smoother batter and ensures even baking. Take your eggs out of the fridge about 30 minutes before you start.
  • For a more pronounced lemon flavor, consider adding a little lemon extract in addition to the zest and juice. Just a half teaspoon can elevate the citrus notes significantly.
  • When measuring your flour, spoon it into the measuring cup and level it off with a knife instead of scooping directly from the bag. This prevents packing and ensures you don’t end up with a dry loaf.
  • Invest in a good quality loaf pan; it makes a difference in heat distribution, which ensures even baking. If your pan is dark-coated, reduce the oven temperature by 25°F to prevent over-browning.

Variations & Serving Ideas

For a delightful twist, consider adding blueberries or raspberries to the batter for a fruity burst of flavor. You can also experiment with different citrus fruits—try lime or grapefruit zest and juice for a refreshing change. For a healthier option, substitute half of the all-purpose flour with whole wheat flour for added fiber without compromising too much on texture.

This Lemon Poppy Seed Loaf pairs beautifully with a light salad, such as a mixed greens salad with a vinaigrette, or a cup of tea for a cozy afternoon treat. It also complements a creamy cheese platter, as the acidity of the loaf balances rich cheeses perfectly. Lastly, a scoop of vanilla ice cream on the side creates a delightful contrast of temperatures and flavors!

Storage, Make-Ahead & Reheating

This Lemon Poppy Seed Loaf can be stored at room temperature for up to 3 days if wrapped tightly in plastic wrap. If you want to keep it longer, it freezes well for up to 3 months. To freeze, wrap the loaf tightly in plastic wrap and then in aluminum foil to prevent freezer burn.

When you’re ready to enjoy it again, simply thaw it in the fridge overnight. Reheat individual slices in the microwave for 15-20 seconds or in a toaster oven until warmed through. Interestingly, many people find that this loaf tastes even better the next day, as the flavors have time to meld!

Frequently Asked Questions

Can I make Lemon Poppy Seed Loaf With Citrus Icing ahead of time?

Yes — in fact, it tastes even better the next day! You can make the loaf a day in advance, allowing the flavors to develop. Just be sure to store it in an airtight container to maintain its moisture.

Can I substitute the poppy seeds?

Absolutely! If you don’t have poppy seeds on hand or prefer an alternative, you can use sesame seeds for a similar crunch or omit them entirely for a smooth loaf.

What can I use instead of buttermilk?

If you don’t have buttermilk, you can easily create a substitute by mixing ½ cup of milk (dairy or plant-based) with 1 tablespoon of vinegar or lemon juice. Let it sit for 5 minutes before using in the recipe.

How can I make this recipe gluten-free?

To make a gluten-free version of this Lemon Poppy Seed Loaf, substitute the all-purpose flour with a gluten-free all-purpose flour blend. Just ensure that the blend contains a binding agent like xanthan gum for the best results.

What is the best way to store leftover loaf?

Leftover Lemon Poppy Seed Loaf should be stored in an airtight container at room temperature for up to 3 days. For longer storage, wrap it tightly and freeze for up to 3 months. Thaw it before serving for the best texture.

Zesty Lemon Poppy Seed Delight

Final Thoughts

The Lemon Poppy Seed Loaf with Citrus Icing is truly a delightful treat that brings a burst of brightness to any occasion. The zesty lemon flavor combined with the subtle crunch of poppy seeds creates a satisfying balance, while the citrus icing adds a touch of sweetness that perfectly complements the loaf’s tanginess.

This is the kind of recipe I come back to again and again, especially when I want to brighten up a gloomy day or celebrate a small victory. The aroma that fills the kitchen as it bakes is absolutely heavenly! I encourage you to give this recipe a try; you might just find it becoming a beloved staple in your home. Don’t forget to share your results or even add your own unique twist—I can’t wait to see what you create!

Print
clock clock iconcutlery cutlery iconflag flag iconfolder folder iconinstagram instagram iconpinterest pinterest iconfacebook facebook iconprint print iconsquares squares iconheart heart iconheart solid heart solid icon

Lemon Poppy Seed Loaf


  • Author: Lily author
  • Total Time: 23 minute
  • Yield: 1 loaf 1x
Pin Recipe
Print Recipe

Description

This Lemon Poppy Seed Loaf is a delightful treat that combines zesty lemon flavor with crunchy poppy seeds. Topped with a citrus icing, it’s perfect for any occasion.


Ingredients

Scale
  • 1 ½ cups (190g) all-purpose flour
  • 1 teaspoon baking powder
  • ½ teaspoon baking soda
  • ½ teaspoon salt
  • 3 tablespoons poppy seeds
  • ½ cup (115g) unsalted butter, softened to room temperature
  • 1 cup (200g) granulated sugar
  • 2 large eggs
  • 1 teaspoon vanilla extract
  • 1 teaspoon lemon zest (from about 1 medium lemon)
  • ½ cup (120ml) buttermilk
  • 2 tablespoons fresh lemon juice
  • 1 cup (120g) powdered sugar
  • 2 tablespoons fresh lemon juice
  • 1 tablespoon orange juice
  • 1 teaspoon lemon zest (for garnish, optional)

Instructions

  1. Preheat your oven to 350°F (175°C). Grease a 9×5-inch loaf pan or line it with parchment paper for easy removal later.
  2. In a medium mixing bowl, whisk together 1 ½ cups of all-purpose flour, 1 teaspoon of baking powder, ½ teaspoon of baking soda, ½ teaspoon of salt, and 3 tablespoons of poppy seeds. This helps to evenly distribute the baking agents and ensures a uniform rise.
  3. In a large mixing bowl, cream together ½ cup of softened unsalted butter and 1 cup of granulated sugar using an electric mixer on medium speed for about 3-4 minutes, until the mixture is light and fluffy. Make sure to scrape down the sides of the bowl occasionally.
  4. Add 2 large eggs, 1 teaspoon of vanilla extract, and 1 teaspoon of lemon zest to the creamed butter and sugar, mixing until fully combined. You want a smooth consistency, so ensure there are no lumps of butter.
  5. In a small bowl, combine ½ cup of buttermilk and 2 tablespoons of fresh lemon juice. Alternately add the dry ingredients and buttermilk mixture to the butter mixture, starting and ending with the dry ingredients. Mix just until combined; do not overmix, as this can lead to a dense loaf.
  6. Pour the batter into the prepared loaf pan. Smooth the top with a spatula, ensuring it’s even. Bake in the preheated oven for 50-60 minutes, or until a toothpick inserted in the center comes out clean. The edges should be lightly golden brown, and the center should feel just set.
  7. Once baked, remove the loaf from the oven and allow it to cool in the pan for about 10 minutes. Then, transfer it to a wire rack to cool completely. Resist the urge to slice too soon, as it will be crumbly if it’s still warm.
  8. While the loaf is cooling, prepare the citrus icing. In a medium bowl, whisk together 1 cup of powdered sugar, 2 tablespoons of fresh lemon juice, and 1 tablespoon of orange juice until smooth. If the icing is too thick, you can add a little more juice to reach your desired consistency.
  9. Once the loaf is completely cool, drizzle the citrus icing over the top. If you like, sprinkle with an additional teaspoon of lemon zest for an extra pop of flavor and color.
  • Prep Time: 15 mins
  • Cook Time: 50-60 mins
  • Category: Dessert
  • Method: Baking
  • Cuisine: American

Nutrition

  • Serving Size: 1 slice
  • Calories: 200
  • Sugar: 15 g
  • Sodium: 150 mg
  • Fat: 8 g
  • Saturated Fat: 5 g
  • Unsaturated Fat: 3 g
  • Trans Fat: 0 g
  • Carbohydrates: 30 g
  • Fiber: 1 g
  • Protein: 3 g
  • Cholesterol: 40 mg

Keywords: Be careful not to overmix your batter; this is a common mistake that can lead to a dense loaf. Use room temperature ingredients for a smoother batter and even baking.

Did you make this recipe?

Share a photo and tag us — we can't wait to see what you've made!

  • Privacy Policy
  • Terms Of Service
  • Contact
  • About
  • GDPR

Copyright © 2025 Homesmad