Christmas Red Velvet Cheesecake Recipe Festive Delicious – what a mouthful, and what a truly magnificent dessert we’re about to create today! Imagine the hush of a winter evening, twinkling lights, and the aroma of something truly special filling your home. That’s the exact magic we’re crafting. This isn’t just any dessert; it’s a showstopper, a vibrant beacon of holiday cheer destined to grace your festive table. Red velvet cake, with its intriguing origins often debated between Victorian elegance and Southern charm, has long been a cherished symbol of celebration, bringing a touch of luxury to any occasion. When this classic cake base is married with the timeless indulgence of a creamy cheesecake, it transforms into an unstoppable force of deliciousness, particularly perfect for the most wonderful time of the year.
Why This Festive Cheesecake is an Unforgettable Treat
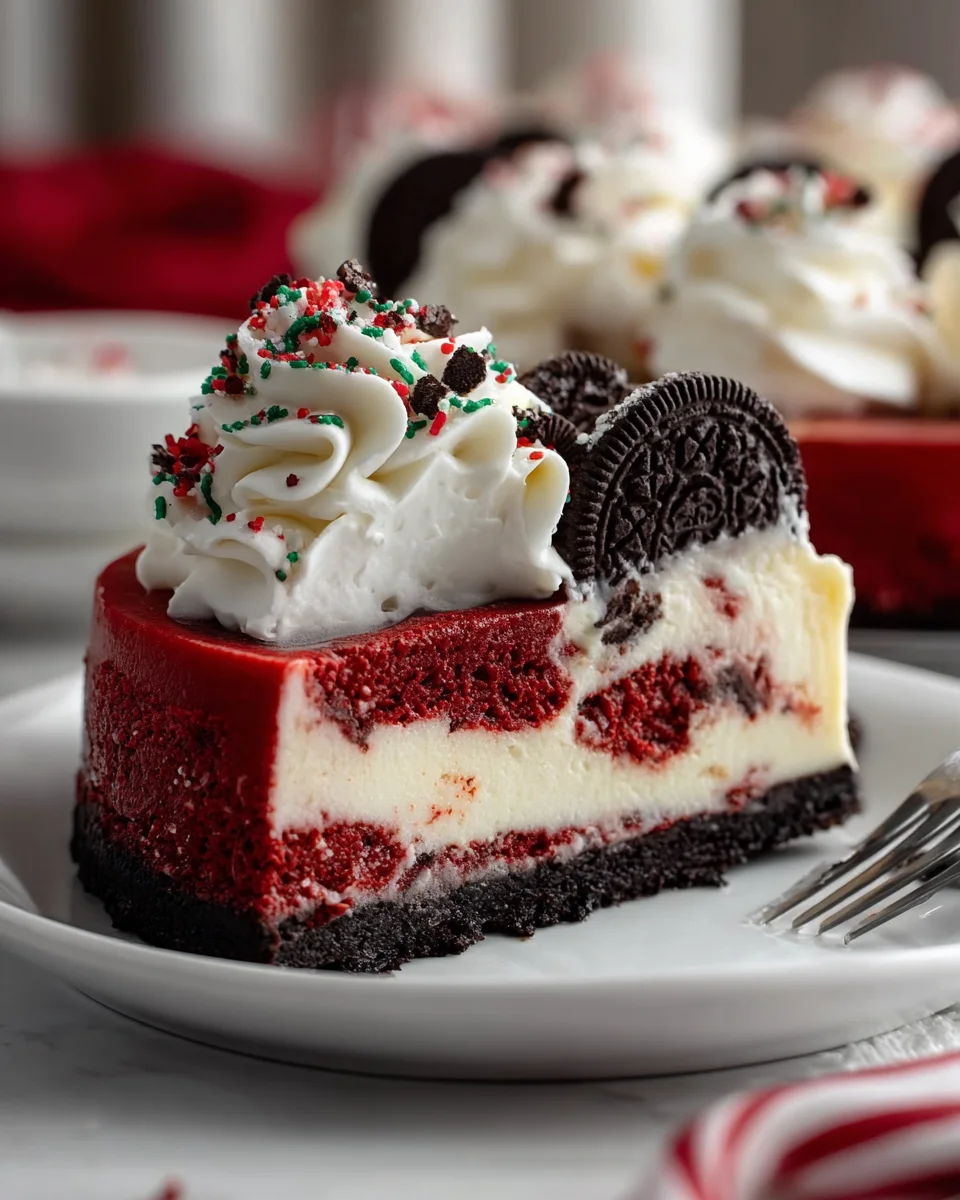
I find that people absolutely adore this stunning combination for so many compelling reasons. The deep, rich red of the cake layer, crowned with the cloud-like swirl of cream cheese filling – the hallmark of a decadent cheesecake – is simply irresistible, offering a visual feast even before the first bite. It’s the perfect balance of a subtle cocoa flavor with a delightful tang, all enveloped in the luxurious, smooth texture that only a perfectly baked cheesecake can provide. It’s truly a delight for both the eyes and the palate, striking the perfect festive note. Trust me, mastering this Christmas Red Velvet Cheesecake Recipe Festive Delicious will undoubtedly make you the star of any holiday gathering, delivering an unforgettable grand finale to your seasonal feast.

Ingredients:
-
For the Crumb Crust:
- 1 ¾ cups (about 180g) chocolate cookie crumbs (from approximately 24-26 regular chocolate sandwich cookies, scraped clean of filling)
- ¼ cup (50g) granulated sugar
- ½ teaspoon ground cinnamon (optional, but adds a lovely warmth)
- 6 tablespoons (85g) unsalted butter, melted
-
For the Red Velvet Cheesecake Batter:
- 32 ounces (about 4 ½ blocks or 900g) full-fat cream cheese, softened completely to room temperature
- 1 ¾ cups (350g) granulated sugar
- 2 tablespoons all-purpose flour
- ½ cup (120g) sour cream, full-fat, at room temperature
- ½ teaspoon pure vanilla extract
- 1 tablespoon unsweetened cocoa powder, Dutch-processed for richer color
- 1 ounce (approximately 2 tablespoons) liquid red food coloring (gel food coloring provides a more vibrant color, adjust as needed)
- 4 large eggs, at room temperature
-
For the Cream Cheese Frosting:
- 8 ounces (1 block or 225g) full-fat cream cheese, softened to room temperature
- ½ cup (113g) unsalted butter, softened to room temperature
- 4 cups (480g) confectioners’ sugar (powdered sugar), sifted
- 1 teaspoon pure vanilla extract
- 1-2 tablespoons milk or cream, as needed for desired consistency
-
For Decoration (Optional):
- Additional chocolate cookie crumbs
- White chocolate shavings or curls
- Fresh cranberries or raspberries
- Sprigs of fresh mint
- Preheat Your Oven and Prepare Your Pan: First things first, let’s get that oven ready. Preheat your oven to 350°F (175°C). While the oven heats up, prepare a 9-inch springform pan. To prevent any dreaded leaks from the water bath we’ll be using later, wrap the outside bottom and sides of the springform pan tightly with two layers of heavy-duty aluminum foil. Make sure the foil extends all the way up the sides of the pan. This creates a protective barrier, ensuring your cheesecake stays perfectly dry during its baking journey.
- Mix the Crumb Crust Ingredients: In a medium bowl, combine your finely crushed chocolate cookie crumbs, granulated sugar, and the optional (but highly recommended) ground cinnamon. Give these dry ingredients a good whisk until they’re thoroughly combined. Then, pour in the melted unsalted butter. Use a fork or your hands to mix everything together until the crumbs are evenly moistened and resemble wet sand. Every crumb should be coated in that buttery goodness.
- Press the Crust into the Pan: Now it’s time to build the foundation for our magnificent cheesecake. Transfer the crumb mixture into your prepared springform pan. Using the bottom of a flat-bottomed glass or your clean fingers, press the mixture firmly and evenly across the bottom of the pan. For an extra touch of elegance and to create a sturdy edge, you can also press some of the crumbs slightly up the sides of the pan, about ½ to 1 inch high. A well-pressed crust is key to preventing crumbling when you slice into your finished cheesecake.
- Pre-bake the Crust: Place the springform pan with the pressed crust into your preheated oven. Bake for 8 to 10 minutes. This short bake time helps to set the crust, making it sturdy and slightly crispy, preventing it from becoming soggy once the cheesecake filling is added. Once baked, remove the crust from the oven and set it aside on a wire rack to cool completely while you prepare the cheesecake batter. Allowing the crust to cool fully is important; adding warm batter to a warm crust can affect its texture.
- Soften and Beat the Cream Cheese: This is where the magic begins! In a large mixing bowl, preferably using a stand mixer fitted with the paddle attachment, or with an electric hand mixer, place your completely softened full-fat cream cheese. It’s absolutely crucial that your cream cheese is at true room temperature; this ensures a smooth, lump-free batter. Beat the cream cheese on medium speed for about 3-5 minutes, scraping down the sides of the bowl frequently, until it is incredibly smooth, creamy, and free of any lumps. We’re aiming for a cloud-like consistency.
- Incorporate Sugar and Flour: Gradually add the granulated sugar to the creamed cheese, beating on medium speed for another 2-3 minutes. Make sure to scrape down the sides of the bowl as needed to ensure the sugar is fully incorporated. The mixture should now be light and fluffy. Next, sprinkle in the 2 tablespoons of all-purpose flour. The flour acts as a stabilizer, helping to prevent cracks in your cheesecake as it bakes and cools. Beat on low speed until just combined, being careful not to overmix.
- Add Wet Ingredients and Color: Now, let’s bring in the signature red velvet elements. Add the room temperature sour cream and pure vanilla extract to the bowl. Beat on low speed until well combined. In a separate small bowl, whisk together the unsweetened cocoa powder with the liquid red food coloring until a smooth paste forms. This step helps to dissolve the cocoa and ensures an even distribution of color. Add this vibrant red paste to the cream cheese mixture and beat on low speed until the color is completely uniform and a beautiful, deep red hue emerges. Make sure there are no streaks of unmixed color. This combination of cocoa and red coloring is what gives our Christmas Red Velvet Cheesecake Recipe Festive Delicious look!
- Carefully Incorporate the Eggs: This is a critical step for preventing cracks. Add the large eggs one at a time, beating on very low speed (the lowest setting on your mixer) just until each egg is combined before adding the next. It is vital not to overmix at this stage. Overmixing introduces too much air into the batter, and that air will expand during baking, then collapse during cooling, leading to cracks. Scrape down the sides of the bowl once or twice, but keep the mixing to a minimum after the eggs are added. The batter should be smooth and creamy.
- Prepare the Water Bath: Gently pour the prepared red velvet cheesecake batter over the cooled chocolate cookie crust in your foil-wrapped springform pan. Tap the pan lightly on the counter a few times to release any large air bubbles. Next, prepare your water bath, which is essential for a perfectly smooth, uncracked cheesecake. Place the foil-wrapped springform pan inside a larger roasting pan. Carefully pour hot water into the larger roasting pan, making sure the water comes about halfway up the sides of the springform pan. Be very careful not to splash any water into the cheesecake batter itself.
- Bake the Cheesecake: Carefully transfer the entire roasting pan with the cheesecake into your preheated 350°F (175°C) oven. Bake for 15 minutes at this temperature. This initial higher temperature helps the cheesecake to rise slightly. After 15 minutes, reduce the oven temperature to 325°F (160°C) without opening the oven door if possible. Continue to bake for another 60-75 minutes, or until the edges are set, but the very center (about a 2-inch circle) still has a slight jiggle when you gently shake the pan. A slight jiggle is perfect; it means the cheesecake is cooked through but will finish setting as it cools. Overbaking will lead to a dry cheesecake and potentially cracks.
- Cooling in the Oven: Once the baking time is complete and the center has that perfect jiggle, turn off the oven. Crack open the oven door about an inch or two (you can use a wooden spoon to prop it open). Leave the cheesecake inside the cooling oven, still in its water bath, for 1 hour. This slow, gradual cooling process helps prevent drastic temperature changes, which are a major culprit for cheesecake cracks.
- Cooling to Room Temperature: After the hour in the cooling oven, carefully remove the springform pan from the water bath and the roasting pan. Gently remove the foil from around the springform pan. Place the cheesecake on a wire rack and let it cool completely to room temperature, which will take at least 2-3 hours. Do not rush this step.
- The Critical Chill: Once the cheesecake has reached room temperature, cover it loosely with plastic wrap. Transfer the cheesecake to the refrigerator and chill for a minimum of 6-8 hours, but ideally overnight. This extended chilling time is absolutely crucial. It allows the cheesecake to fully set, firm up, and for all the delicious flavors to meld together beautifully. Proper chilling is key to achieving that rich, dense, and creamy cheesecake texture we all crave. Patience truly is a virtue here!
- Beat Cream Cheese and Butter: In a large mixing bowl, using a stand mixer with the paddle attachment or an electric hand mixer, combine the softened full-fat cream cheese and softened unsalted butter. Beat on medium speed for 3-5 minutes, scraping down the sides of the bowl often, until the mixture is incredibly light, fluffy, and perfectly smooth. There should be no lumps remaining; this ensures a silky-smooth frosting.
- Gradually Add Confectioners’ Sugar: Reduce the mixer speed to low. Gradually add the sifted confectioners’ sugar, about one cup at a time, beating until each addition is fully incorporated and the frosting begins to thicken. Sifting the sugar beforehand is important to prevent lumps in your frosting.
- Flavor and Adjust Consistency: Once all the sugar is added and the frosting is thick, beat in the pure vanilla extract. Then, add milk or cream one tablespoon at a time, beating on low speed until you reach your desired consistency. You want a frosting that is spreadable and pipeable but not too runny. If it’s too thick, add a tiny bit more milk; if it’s too thin, you can add a little more sifted confectioners’ sugar. Beat on medium-high speed for a final minute to make it extra fluffy.
- Unmolding the Cheesecake: Once your cheesecake is thoroughly chilled, it’s time for the big reveal! Carefully run a thin knife around the outer edge of the cheesecake before unlatching and removing the springform pan collar. This helps ensure a clean release. Transfer the cheesecake to a serving platter.
- Frosting the Cheesecake: Using an offset spatula, spread an even layer of the creamy cream cheese frosting over the top of the chilled cheesecake. For a classic look, you can spread it smoothly from edge to edge. For a more festive appearance, you could pipe decorative borders or swirls around the edge using a piping bag fitted with your favorite nozzle.
- Final Decorations (Optional): This is where you can truly make your Christmas Red Velvet Cheesecake Recipe Festive Delicious! Sprinkle additional chocolate cookie crumbs around the base or over the top for texture. Adorn with elegant white chocolate shavings or curls for a beautiful contrast. Fresh cranberries or raspberries, perhaps with a few sprigs of fresh mint, add a pop of color and a touch of seasonal charm, making it perfect for your holiday table.
- Serving: Use a sharp knife dipped in hot water and wiped clean between each slice for the cleanest cuts. Serve chilled, allowing everyone to enjoy this magnificent, decadent dessert. This Red Velvet Cheesecake is an absolute showstopper, perfect for any special occasion, especially during the festive holiday season!
Preparing the Crust
Making the Red Velvet Cheesecake Batter
Baking the Cheesecake
Chilling the Cheesecake
Preparing the Cream Cheese Frosting
Decorating and Serving
Conclusion:
Well, my friends, we’ve journeyed through the steps of creating what I genuinely believe will be the star of your next holiday gathering, or frankly, any occasion that calls for something truly extraordinary. This isn’t just another dessert; it’s an experience, a masterpiece of flavors and textures designed to delight. I can confidently say that this Christmas Red Velvet Cheesecake Recipe Festive Delicious is a must-try for so many reasons. Imagine the moment you slice into it: the vibrant, deep red hue of the cake layer, perfectly contrasted by the pristine white of the cream cheese topping and the rustic crunch of the cookie crust. It’s a visual feast that immediately signals celebration, perfectly aligning with the festive spirit of Christmas. But the beauty isn’t just skin deep. Each forkful delivers a harmonious symphony: the subtle cocoa notes and moist crumb of the red velvet, giving way to the rich, creamy, and ever-so-slightly tangy cheesecake layer that simply melts in your mouth. The graham cracker crust provides that essential textural contrast, a buttery foundation that holds everything together beautifully. It’s comforting, luxurious, and undeniably special, making it a truly delicious highlight for any festive occasion.
I’ve poured my heart into perfecting this recipe because I know the joy a truly exceptional dessert can bring to a table, transforming a simple meal into a memorable event. It’s more than just ingredients; it’s about crafting moments, and this cheesecake, with its incredible balance of sweetness, tang, and incredible richness, is a true moment-maker. The combination of classic red velvet with the irresistible creaminess of cheesecake creates a dessert that feels both familiar and excitingly new. It’s the kind of treat that conjures up warm holiday feelings, a dessert that’s rich enough to satisfy but balanced enough to leave you craving just one more bite. You’re not just baking a dessert; you’re creating a centerpiece, a conversation starter, and a treat that will have everyone asking for the recipe. Trust me when I say, the effort is so incredibly worth it for the sheer delight this cheesecake delivers, making it an absolute showstopper for your holiday spread.
Elevate Your Cheesecake Experience: Serving Suggestions & Variations
Once your magnificent creation has chilled to perfection, ready to be unveiled, think about how you’ll present it. For a simple yet elegant touch, I always recommend garnishing each slice just before serving. A dusting of confectioners’ sugar adds a delicate touch, while a scattering of fresh raspberries or cranberries enhances the vibrant red theme, adding a burst of fresh fruitiness and a lovely textural counterpoint. A few sprigs of fresh mint can introduce a beautiful pop of green, especially fitting for a festive holiday table. For those who love a bit of extra indulgence, a drizzle of high-quality white chocolate ganache or a sprinkle of finely grated dark chocolate curls can take this cheesecake to another level of decadence. And if you’re feeling extra festive, a tiny dash of edible glitter can make it truly sparkle under the holiday lights!
But the fun doesn’t stop there! This recipe is wonderfully adaptable, allowing you to put your own creative spin on it. If you’re looking to mix up the crust, consider using crushed chocolate sandwich cookies (like Oreos, filling removed) for a darker, richer base, or even gingersnap cookies for a spicy, festive twist that perfectly complements the red velvet flavor. For the topping, while my classic cream cheese frosting is divine, you could also experiment with a light whipped cream stabilized with a touch of gelatin for a fluffier texture, or even a different flavor of cream cheese frosting, perhaps with a hint of orange zest or peppermint extract for a truly unique holiday take.
If you’re serving a large crowd or prefer individual portions, this recipe easily translates into beautiful mini cheesecakes baked in cupcake liners – just adjust baking times accordingly. Or, consider baking it in a rectangular pan for easy cheesecake bars that are perfect for a party buffet. For those who enjoy a bit of boozy elegance, a splash of crème de cassis or raspberry liqueur drizzled over the fruit garnish can add an adult sophisticated note. Don’t be afraid to experiment with different extracts in your cheesecake filling itself – a touch of almond or even a hint of rum extract could introduce intriguing new dimensions to this already delicious dessert. The possibilities are truly endless, allowing you to tailor this incredible recipe to your personal taste and occasion.
Your Culinary Adventure Awaits!
Now that I’ve shared all my tips and tricks, it’s your turn to embark on this delightful baking adventure. I truly believe that creating something beautiful and delicious with your own hands is one of life’s great pleasures, and this recipe offers that in spades. Don’t be intimidated by the layers; each step is straightforward, and the result is so incredibly rewarding. Imagine the smiles on your loved ones’ faces when you present this stunning dessert. The compliments will surely pour in, making all your efforts worthwhile. It’s a wonderful way to show you care, to celebrate, and to simply indulge in something truly special.
I wholeheartedly encourage you to give this Christmas Red Velvet Cheesecake Recipe Festive Delicious a try. Whether it’s for a grand holiday feast, a cozy family dinner, or simply because you deserve a treat, this cheesecake is guaranteed to impress. And once you’ve created your masterpiece, please, please share your experience with me! I absolutely adore hearing from you and seeing your creations. Did you try a new variation? Did you find a unique way to garnish it? What did your family and friends think? Share your photos, your stories, and your feedback in the comments section below, or tag me on social media. Your insights and culinary adventures inspire me and our entire baking community. Happy baking, everyone, and get ready to enjoy one of the most memorable desserts you’ll ever make!
Festive & Delicious Christmas Red Velvet Cheesecake
Imagine the hush of a winter evening, twinkling lights, and the aroma of something truly special filling your home. This isn’t just any dessert; it’s a showstopper, a vibrant beacon of holiday cheer destined to grace your festive table. This Christmas Red Velvet Cheesecake marries the classic cake with the timeless indulgence of a creamy cheesecake, transforming into an unstoppable force of deliciousness, particularly perfect for the most wonderful time of the year.
Ingredients
Instructions
Important Information
Nutrition Facts (Per Serving)
It is important to consider this information as approximate and not to use it as definitive health advice.
Allergy Information
Please check ingredients for potential allergens and consult a health professional if in doubt.