No Bake Peanut Butter Lasagna Recipe is truly a dessert marvel, promising pure indulgence with astonishing ease. Have you ever wished for a dessert that perfectly blends creamy, dreamy peanut butter with layers of delightful texture, all without the hassle of baking? If so, you’re in for an absolute treat! This particular recipe has skyrocketed in popularity, not just for its incredibly satisfying flavor profile but also for its sheer convenience. It represents the best of modern dessert trends: gourmet taste without the exhaustive effort, making it a beloved staple for busy hosts and sweet-toothed enthusiasts alike.
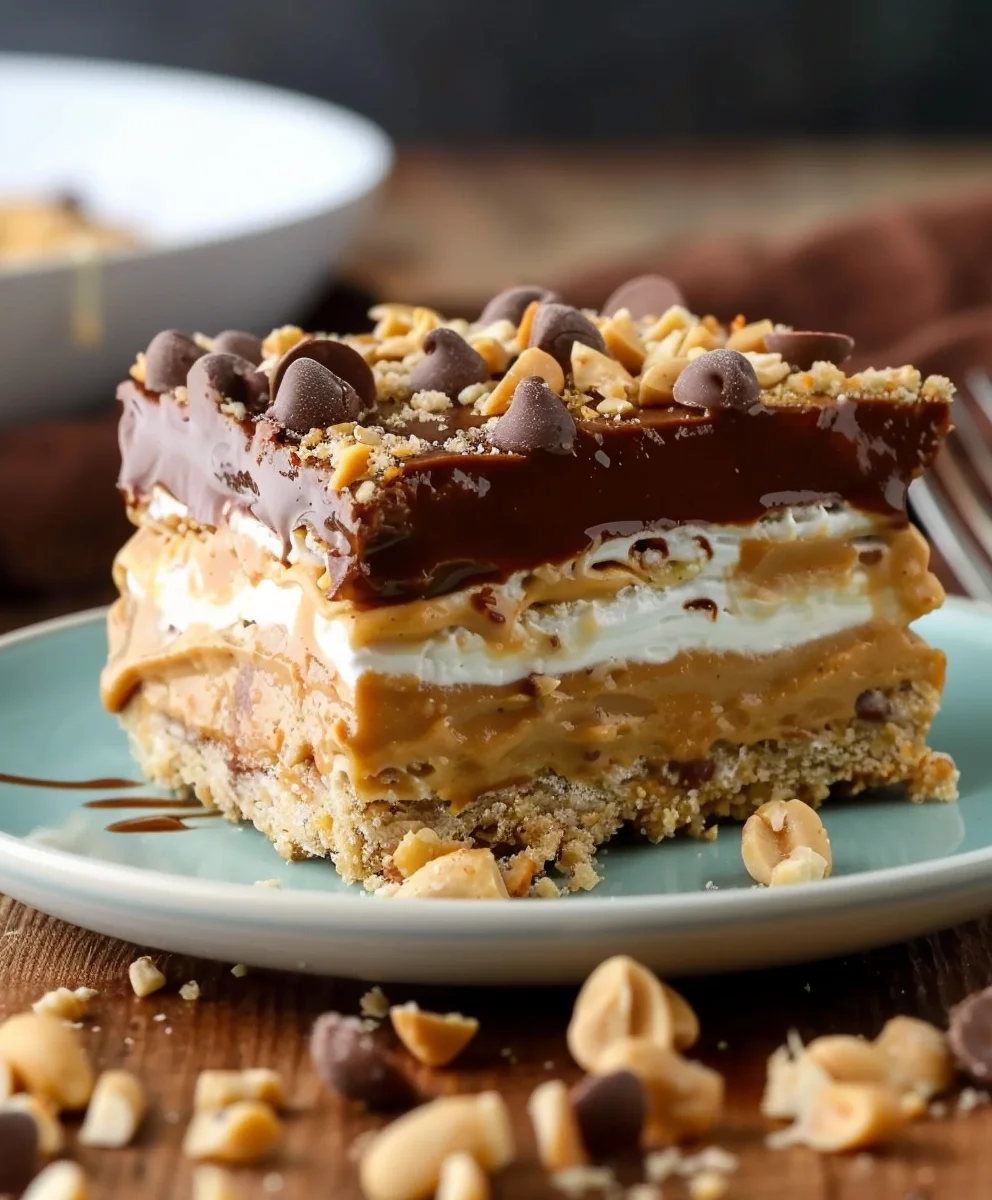
I personally find that the genius behind this dish lies in its brilliant combination of beloved elements. Imagine a buttery, crunchy cookie crust, a smooth and luscious peanut butter cream cheese layer, and a rich chocolate pudding topping, all crowned with airy whipped cream and your favorite candies. It’s a symphony of sweet and savory, soft and firm, that appeals to nearly every palate. People adore this No Bake Peanut Butter Lasagna Recipe because it delivers an irresistible comfort food experience, perfect for potlucks, family gatherings, or simply a decadent weeknight treat. It’s the ultimate crowd-pleaser that requires minimal kitchen time, leaving you more moments to savor with loved ones. Prepare to fall in love with your new go-to stress-free dessert!

Ingredients:
- For the Oreo Crust:
- 1 (14.3-ounce) package chocolate sandwich cookies (like Oreos), about 36 cookies
- 6 tablespoons unsalted butter, melted
- For the Cream Cheese Layer:
- 1 (8-ounce) block full-fat cream cheese, softened at room temperature
- 1 cup powdered sugar (confectioners’ sugar)
- ¼ cup cold milk (2% or whole milk works best)
- 1 (8-ounce) container frozen whipped topping (like Cool Whip), thawed and divided
- For the Peanut Butter Layer:
- 1 cup creamy peanut butter (I prefer natural, but any creamy kind works)
- 1 cup powdered sugar (confectioners’ sugar)
- ½ (8-ounce) container frozen whipped topping, thawed (the other half of the container from above)
- For the Top Whipped Topping Layer & Garnish:
- 1 (8-ounce) container frozen whipped topping, thawed (this is a separate, full container)
- Optional garnishes: chocolate shavings, chopped roasted peanuts, mini peanut butter cups, or a drizzle of chocolate sauce
Equipment You’ll Need:
To embark on this delightful journey of creating the No Bake Peanut Butter Lasagna Recipe, you’ll find the right tools make all the difference. Here’s what I recommend having on hand:
- A 9×13 inch baking dish (glass or ceramic works wonderfully for chilling and serving)
- Food processor or a sturdy zip-top bag and a rolling pin for crushing cookies
- Large mixing bowls (at least three, to keep your layers separate and neat)
- Electric mixer (handheld or stand mixer) – this is a game-changer for achieving light, fluffy layers
- Rubber spatula or spoon for mixing and spreading
- Measuring cups and spoons
- Small microwave-safe bowl for melting butter
Phase 1: Preparing the Irresistible Oreo Crust
This is where our journey to the perfect No Bake Peanut Butter Lasagna Recipe begins, with a sturdy and delicious foundation. A good crust is key!
- First things first, let’s prepare those chocolate sandwich cookies. I like to use a food processor for this because it gives you a perfectly fine crumb, which is essential for a solid crust. Simply place the entire package of cookies, filling and all, into your food processor and pulse until you have very fine crumbs. If you don’t have a food processor, no worries! You can place the cookies in a large zip-top bag, seal it, and then use a rolling pin or the bottom of a heavy pan to crush them into fine crumbs. The finer, the better, believe me!
- Once your cookies are perfectly crushed, transfer them to a medium-sized mixing bowl.
- Now, melt your 6 tablespoons of unsalted butter. You can do this in a microwave-safe bowl in 30-second intervals until fully melted, or in a small saucepan on the stovetop over low heat.
- Pour the melted butter over the cookie crumbs. Using a fork or a spoon, mix them thoroughly until all the crumbs are moistened. It should resemble wet sand. This step is crucial because the butter acts as the binding agent, ensuring your crust holds together beautifully when sliced.
- Next, take your 9×13 inch baking dish. Pour the moistened cookie crumbs into the bottom of the dish.
- Using the back of a spoon, your fingers, or the bottom of a clean measuring cup, firmly press the mixture evenly across the bottom of the pan. You want it to be compact and level. The firmer you press, the less likely your crust is to crumble when you serve your amazing No Bake Peanut Butter Lasagna Recipe later.
- Once pressed, place the pan in the refrigerator for at least 15-20 minutes to allow the butter to firm up, setting the crust. This quick chill is important before adding your next layers.
Phase 2: Crafting the Silky-Smooth Cream Cheese Layer
Now that our crust is chilling, it’s time to whip up the first creamy layer of our No Bake Peanut Butter Lasagna Recipe. This layer provides a lovely tang that perfectly complements the sweetness.
- In a large mixing bowl, place your softened cream cheese. It’s really important that your cream cheese is at room temperature; otherwise, you’ll end up with lumps, and we want a perfectly smooth filling!
- Using your electric mixer (either handheld or stand mixer with the paddle attachment), beat the cream cheese on medium speed for about 1-2 minutes until it’s light and fluffy. Scrape down the sides of the bowl as needed to ensure everything gets incorporated.
- Gradually add 1 cup of powdered sugar to the cream cheese, beating on low speed until combined, then increase to medium-high and beat until smooth and creamy.
- Pour in ¼ cup of cold milk. Continue to beat on medium speed until the mixture is light, airy, and thoroughly combined. This might take another 1-2 minutes. The milk helps to thin out the cream cheese slightly, giving it that wonderful spreadable consistency.
- Gently fold in HALF of one 8-ounce container of thawed whipped topping. I emphasize gently fold because we want to keep as much air in the whipped topping as possible, making the layer light and fluffy. Reserve the other half of this container for the peanut butter layer.
- Retrieve your chilled crust from the refrigerator. Carefully and evenly spread the cream cheese mixture over the set Oreo crust. Take your time to ensure it’s smooth and covers the entire surface.
- Pop the dish back into the refrigerator while you prepare the next layer. This helps each layer set a bit before the next one is added, making for cleaner slices later.
Phase 3: The Star – Rich Peanut Butter Layer
This is arguably the most exciting part for peanut butter lovers like me! This layer is what truly makes this a No Bake Peanut Butter Lasagna Recipe. Get ready for some serious flavor!
- In another clean, large mixing bowl, combine your 1 cup of creamy peanut butter and 1 cup of powdered sugar.
- Using your electric mixer, start beating these two ingredients together on low speed. The mixture will be quite thick and crumbly at first, so be patient and keep mixing until it starts to come together.
- Now, remember that other half of the whipped topping container from the cream cheese layer? Add it to your peanut butter mixture.
- Continue beating with your electric mixer on medium speed until the mixture is smooth, creamy, and wonderfully light. This takes a few minutes, but the transformation is magical – it goes from thick to incredibly fluffy and spreadable. Scrape down the sides of the bowl frequently to ensure everything is well combined.
- Retrieve your dish from the refrigerator. Carefully spread the peanut butter mixture over the cream cheese layer. I find it easiest to dollop spoonfuls of the peanut butter mixture over the cream cheese and then gently spread them out with a rubber spatula, working from the center outwards to avoid disturbing the layer beneath.
- Once spread evenly, return your nascent No Bake Peanut Butter Lasagna Recipe to the refrigerator for another short chill, about 10-15 minutes, just to give that peanut butter layer a chance to firm up slightly.
Phase 4: Whipped Topping Perfection
The final layer of our magnificent No Bake Peanut Butter Lasagna Recipe is a cloud of whipped topping. This adds a beautiful lightness and completes the dessert visually and texturally.
- Take your separate, full 8-ounce container of thawed whipped topping. This is the last container we need!
- Gently spread this entire container of whipped topping over the peanut butter layer. Again, use a rubber spatula and be gentle to create a smooth, even top. This layer provides a beautiful contrast to the richer layers below.
Phase 5: Chilling and Serving Your Delightful No Bake Peanut Butter Lasagna:
The hardest part is waiting, but I promise you, the chilling time is absolutely essential for the best possible outcome of your No Bake Peanut Butter Lasagna Recipe!
- Once your whipped topping is spread, it’s time for the final, and perhaps most important, chill. Cover the dish tightly with plastic wrap.
- Place the covered dish in the refrigerator for a minimum of 4 hours. For the absolute best results, I highly recommend chilling it overnight. This extended chill allows all the layers to firm up properly, meld their flavors, and become easy to slice cleanly. Trust me, it’s worth the wait!
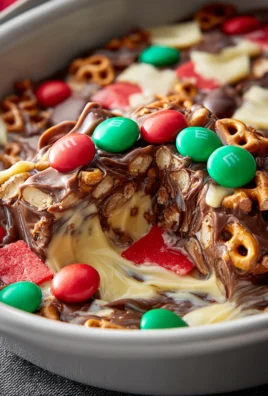
- Before serving, you can add your optional garnishes. I love to sprinkle some chocolate shavings, a handful of chopped roasted peanuts, or even a few mini peanut butter cups on top. A drizzle of chocolate syrup can also add a nice touch. These little extras make your No Bake Peanut Butter Lasagna Recipe look as amazing as it tastes!
- To serve, remove the dish from the refrigerator. Using a sharp knife that has been run under hot water and wiped clean (this helps for clean slices!), cut the lasagna into squares. Serve immediately and watch it disappear!
Tips and Tricks for the Perfect No Bake Peanut Butter Lasagna Recipe:
I’ve made this No Bake Peanut Butter Lasagna Recipe countless times, and I’ve picked up a few pointers along the way to ensure your success and elevate your dessert experience!
- Cream Cheese Temperature is Key: I cannot stress this enough – ensure your cream cheese is at true room temperature. If it’s too cold, your cream cheese layer will be lumpy, no matter how much you beat it.
- Don’t Skimp on Chilling Time: While 4 hours is the minimum, an overnight chill truly makes all the difference. The layers set more firmly, making for perfectly clean slices, and the flavors have more time to meld together, resulting in a richer, more cohesive dessert. Patience is a virtue here!
- Whip It Good (But Gently): When folding in the whipped topping into your cream cheese and peanut butter layers, be gentle. You want to maintain that airy texture, so overmixing can deflate it.
- Peanut Butter Choice: While creamy peanut butter is standard, you can experiment! For a slightly different texture, a natural, unsweetened creamy peanut butter works wonderfully and can tone down the overall sweetness a touch. Avoid crunchy peanut butter for the layers themselves, as it will disrupt the smooth texture, but it makes a fantastic garnish!
- Making Your Own Whipped Cream: If you prefer to avoid store-bought whipped topping, you can certainly make your own! You’ll need about 3 cups of heavy whipping cream, ½ cup powdered sugar, and 1 teaspoon vanilla extract. Whip until stiff peaks form. Just remember it might be a bit softer than the frozen variety.
- Customizing Your Crust: While Oreos are classic for this No Bake Peanut Butter Lasagna Recipe, feel free to try other chocolate cookies or even graham crackers for a different base flavor.
- Storage: Store any leftover No Bake Peanut Butter Lasagna Recipe tightly covered in the refrigerator for up to 3-4 days. It actually tastes even better the next day once the flavors have fully melded! While it’s generally best fresh, you can freeze individual slices in an airtight container for up to a month. Just let them thaw in the refrigerator for a few hours before serving.
- Clean Slices: For picture-perfect slices, dip your knife in hot water and wipe it clean between each cut. This creates clean lines and prevents the layers from sticking to the knife.
- Garnish Galore: Don’t underestimate the power of a good garnish! Besides the suggestions, you could add mini chocolate chips, a drizzle of caramel, or even a sprinkle of sea salt flakes to enhance the peanut butter flavor.
Why This No Bake Peanut Butter Lasagna Recipe is a Crowd-Pleaser:
This dessert is not only incredibly easy to make, requiring no oven time at all, but it also combines some of the most beloved flavors: rich chocolate, tangy cream cheese, and irresistible peanut butter. The layered presentation is always impressive, making it perfect for potlucks, parties, or a special treat at home. Every bite offers a delightful contrast of textures and tastes, from the crisp crust to the creamy, dreamy fillings. It’s truly a dessert that brings smiles!
Conclusion:
Well, my friends, we’ve reached the sweet end of our journey, and I genuinely hope you’re feeling inspired to whip up this incredible dessert. If there’s one thing I want you to take away from our time together, it’s that this isn’t just another dessert recipe; it’s a gateway to pure, unadulterated joy, all without ever needing to preheat your oven. This dessert is truly a game-changer for anyone who loves the irresistible combination of peanut butter and chocolate, but perhaps doesn’t have a lot of time, or simply prefers to keep things delightfully simple in the kitchen. It’s a testament to the fact that some of the most delicious creations come from clever layering and the best ingredients, not necessarily complex techniques.
Why is this a must-try? For starters, it’s unbelievably easy. We’re talking about a dessert that practically assembles itself, leaving you more time to actually enjoy the process and the company you might be sharing it with. Imagine the smiles when you present a dessert that looks this impressive, yet you barely broke a sweat preparing it. The layers are what make this dish so special: a crisp, buttery cookie crust providing the perfect foundation, followed by a light and tangy cream cheese layer that cuts through the richness, then a luscious, dreamy peanut butter filling that’s impossibly smooth and packed with flavor, all capped off with a generous blanket of silky chocolate ganache. Each forkful is an experience, a delightful dance of textures and tastes that will leave you wanting more. It’s perfect for potlucks, family gatherings, casual weeknight treats, or whenever you need a surefire crowd-pleaser that caters to almost every palate. Trust me, this dessert is destined to become a staple in your recipe repertoire.
Serving Suggestions & Creative Variations to Elevate Your Dessert:
While this dessert is utterly perfect served simply, sliced chilled from the pan, there are so many ways to personalize it and make it your own. For a touch of elegance, consider garnishing each slice with a swirl of fresh whipped cream and a sprinkle of mini chocolate chips or finely chopped roasted peanuts. A light dusting of cocoa powder or a delicate drizzle of melted chocolate syrup can also add a professional finish. For those who love a bit of contrasting flavor, a few flaky sea salt crystals sprinkled over the top just before serving can truly make the chocolate and peanut butter flavors sing.
Feeling adventurous? Let’s talk variations! The beauty of a layered dessert like this is its adaptability. Instead of a traditional chocolate cookie crust, why not try crushed graham crackers for a more classic pie feel, or even Nutter Butter cookies for an extra punch of peanut butter goodness? If you’re not a fan of chocolate wafer cookies, Oreos are always a fantastic choice. For the cream cheese layer, you could infuse it with a hint of vanilla bean paste for a more sophisticated flavor profile, or even a tiny amount of instant espresso powder to subtly enhance the chocolate. The peanut butter layer itself is ripe for customization; stir in some mini chocolate chips or finely chopped peanut butter cups for added texture and richness. If you’re feeling particularly indulgent, swap out some of the peanut butter for a hazelnut spread like Nutella, or even almond butter for a different nutty twist. For the chocolate topping, you could experiment with a dark chocolate ganache for a more intense flavor, or even a white chocolate ganache for a beautiful color contrast and different sweetness level. You could even make individual portions by pressing the crust into cupcake liners, layering the fillings, and then chilling them – perfect for parties or portion control! The possibilities are truly endless, limited only by your imagination.
Your Turn: Try the No Bake Peanut Butter Lasagna Recipe Today!
Now, it’s your turn! I genuinely encourage you to dive in and try this fantastic No Bake Peanut Butter Lasagna Recipe for yourself. Don’t be shy; it’s designed to be simple, enjoyable, and incredibly rewarding. You’ll be amazed at how quickly you can create something so utterly delicious. Once you’ve experienced the magic of this dessert, I would absolutely love to hear from you. Your feedback and experiences are incredibly valuable to me and to other readers who might be considering making it. Did you try a fun variation? Did it disappear instantly at your gathering? What was your favorite part of making it? Please feel free to share your thoughts, tips, and photos in the comments section below, or even tag me on your favorite social media platforms. There’s nothing more satisfying than seeing your culinary creations come to life. So go ahead, treat yourself, treat your loved ones, and let’s spread the joy of easy, delicious, no-bake desserts far and wide!
No Bake Peanut Butter Lasagna: Easy, Creamy Dessert!
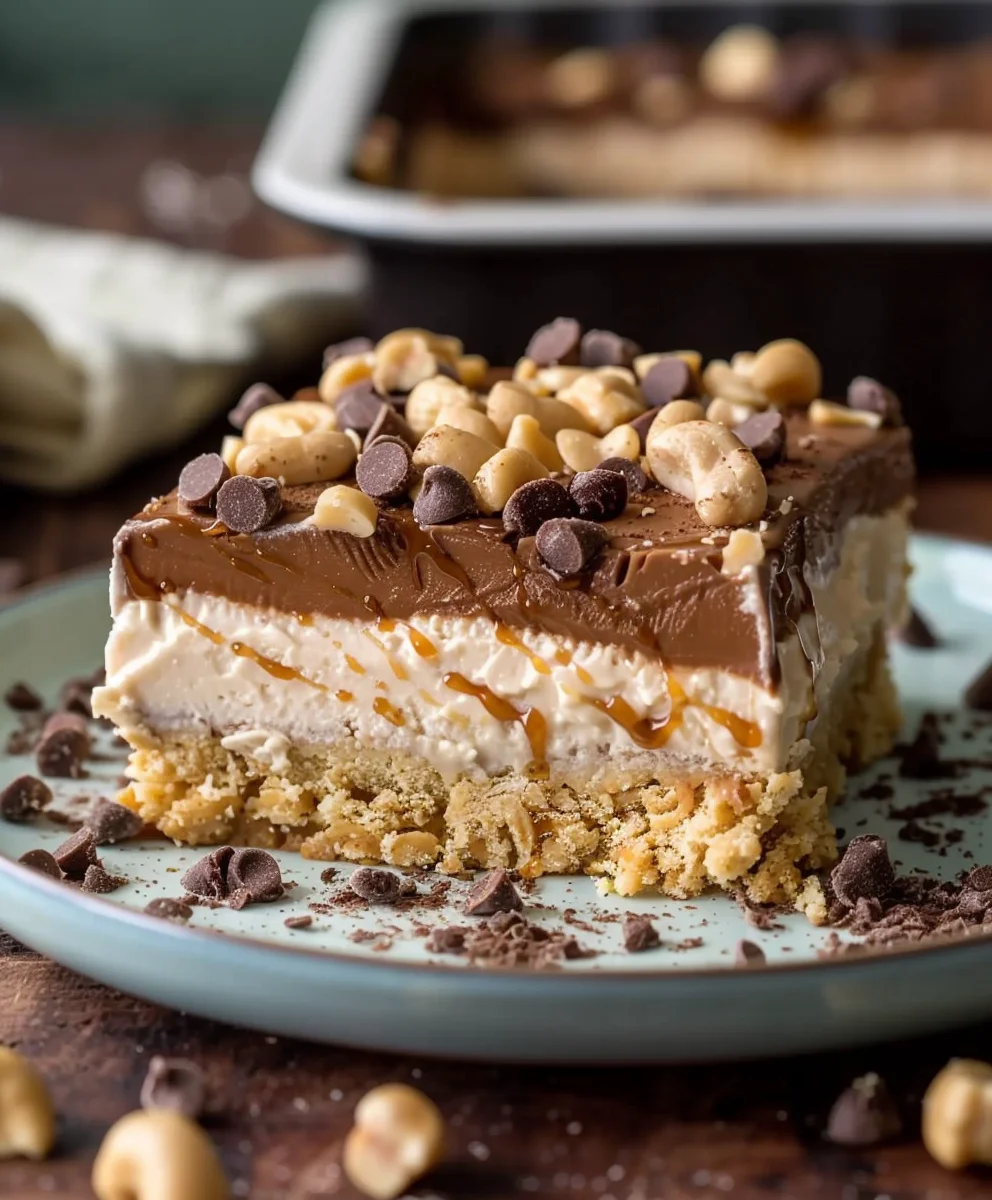
A delightful No Bake Peanut Butter Lasagna recipe, blending creamy peanut butter with layers of delightful texture. Features a graham cracker and peanut crust, a rich chocolate ganache, a smooth peanut butter cheesecake, and a chocolate mousse topping. An irresistible comfort food experience, perfect for any gathering without the baking hassle.
Ingredients
-
2 cups crushed graham crackers
-
½ cup chopped salted peanuts
-
½ cup melted unsalted butter
-
1.5 cups semi-sweet chocolate chips
-
0.75 cup heavy cream
-
1 cup creamy peanut butter
-
8 oz softened cream cheese
-
1 cup powdered sugar
-
1 tsp vanilla extract
-
1.5 cups whipped topping
-
1 (3.9 oz) box instant chocolate pudding mix
Instructions
-
Step 1
Combine crushed graham crackers, chopped salted peanuts, and melted unsalted butter. Press the mixture firmly and evenly into the bottom of a 9×13 inch baking dish. Chill in the refrigerator for at least 15 minutes. -
Step 2
Heat heavy cream in a small saucepan until it simmers. Pour the hot cream over the semi-sweet chocolate chips in a heatproof bowl. Let sit for 5 minutes, then stir until smooth and fully melted. Allow the ganache to cool slightly before pouring evenly over the chilled crust. Chill for an additional 30 minutes to set. -
Step 3
In a large mixing bowl, beat softened cream cheese, creamy peanut butter, powdered sugar, and vanilla extract with an electric mixer until smooth and creamy. Gently fold in 1.5 cups of whipped topping until just combined. Carefully spread this peanut butter cheesecake mixture over the set chocolate ganache layer. Chill for at least 1 hour. -
Step 4
Whisk the instant chocolate pudding mix with the appropriate amount of cold milk (as per package directions) until the mixture thickens. Spread this chocolate mousse evenly over the peanut butter cheesecake layer. -
Step 5
Cover the dish tightly with plastic wrap and refrigerate for a minimum of 4 hours, or preferably overnight, to allow all layers to set completely and flavors to meld. Before serving, you may garnish with additional chopped peanuts, chocolate shavings, or mini peanut butter cups. Slice into squares with a hot, clean knife and serve immediately.
Important Information
Nutrition Facts (Per Serving)
It is important to consider this information as approximate and not to use it as definitive health advice.
Allergy Information
Please check ingredients for potential allergens and consult a health professional if in doubt.