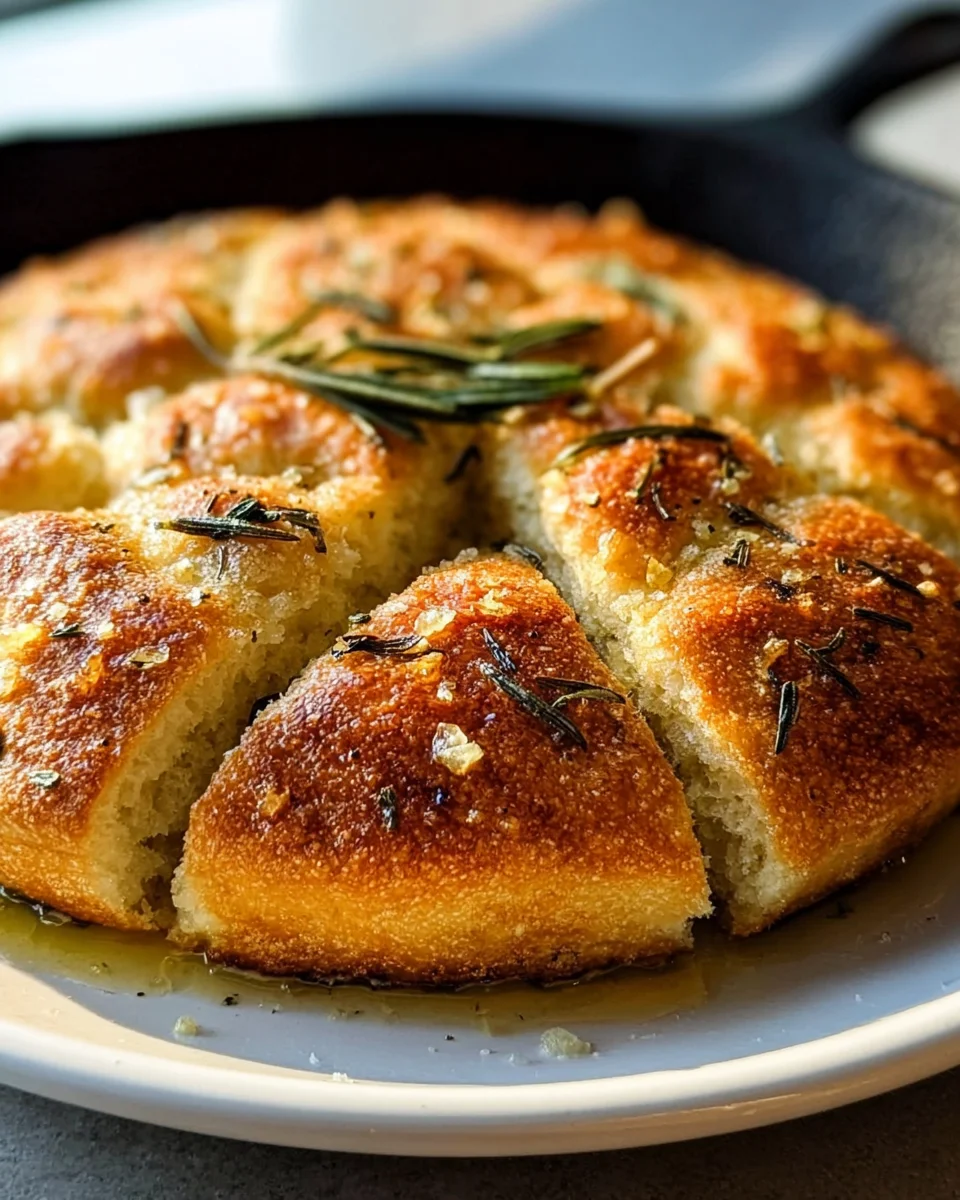
Rustic Garlic Rosemary Skillet Bread Recipe. Imagine stepping into your kitchen, not to the usual dinner prep, but to the intoxicating aroma of freshly baked bread, filling every corner with warmth and anticipation. That’s precisely the magic I’m inviting you to create today, a culinary experience that transcends the ordinary. There’s something inherently comforting and deeply satisfying about homemade bread, especially when it carries the warm, earthy notes of aromatic garlic and the fragrant whisper of fresh rosemary. This isn’t just any bread; it’s a delicious nod to timeless culinary traditions, harkening back to simpler times when meals were cooked over an open fire or in a humble skillet, infusing every bite with authentic, rustic charm.
People adore this particular bread for its incredibly flavorful crust, which emerges perfectly golden and crisp from the hot skillet, giving way to a wonderfully soft and airy interior. The convenience of baking directly in a skillet means less fuss and more deliciousness, making it an accessible joy for even novice bakers. Whether you’re pairing it with a hearty stew, a vibrant pasta dish, or simply tearing off a piece to enjoy with good olive oil, this Rustic Garlic Rosemary Skillet Bread Recipe promises to elevate any meal into an unforgettable, heartwarming experience. I can’t wait for you to discover the simple pleasure of making and sharing this delightful creation with your loved ones.

Ingredients:
- For the Dough:
- 3 cups (approximately 360g) all-purpose flour, plus extra for dusting – I always start with a good quality unbleached flour, it makes a real difference in texture.
- 1 teaspoon instant yeast – While active dry yeast can work, instant yeast is my go-to for its reliability and no-proof convenience.
- 1 teaspoon granulated sugar – Just a tiny bit to help activate our yeast and give it a head start!
- 1 teaspoon fine sea salt – Essential for flavor, don’t skimp on this!
- 1 cup (240ml) warm water (about 105-115°F / 40-46°C) – Think bathwater warm, not scalding hot, to keep our yeast happy and alive.
- 2 tablespoons olive oil, plus more for greasing the bowl – A good extra virgin olive oil adds richness and a beautiful tenderness to the crumb.
- 3-4 cloves garlic, minced – This is where the “garlic” in our Rustic Garlic Rosemary Skillet Bread truly shines! Feel free to add more if you’re a garlic fiend like me.
- 1 tablespoon fresh rosemary, finely chopped – Fresh is absolutely key here; dried rosemary just doesn’t deliver the same aromatic punch.
- For the Topping (Optional but Highly Recommended):
- 1 tablespoon olive oil – For brushing before baking, ensuring a golden crust.
- 1/2 teaspoon flaky sea salt – A sprinkle on top adds both visual appeal and bursts of salty goodness.
- 1/2 teaspoon fresh rosemary, finely chopped – Extra freshness to intensify that beautiful herb flavor.
- Pinch of red pepper flakes (optional) – If you like a little subtle heat to complement the savory notes.
Equipment You’ll Need:
Before we dive into the magic, let’s make sure we have all our tools ready. Having everything at hand makes the process so much smoother and more enjoyable!
- Large mixing bowl
- Measuring cups and spoons
- Stand mixer with dough hook attachment (optional, but a real arm-saver) or a sturdy wooden spoon
- Clean kitchen towel or plastic wrap
- 9-10 inch cast iron skillet (or other oven-safe heavy-bottomed pan) – A well-seasoned cast iron skillet is ideal for achieving that perfect crispy crust on our Rustic Garlic Rosemary Skillet Bread.
- Pastry brush (optional, for egg wash/oil)
- Wire cooling rack
Preparing the Dough: The Foundation of Our Rustic Garlic Rosemary Skillet Bread
This is where the journey to truly spectacular bread begins. Taking your time here will pay off immensely in the final product!
-
Activate the Yeast:
In your large mixing bowl, combine the warm water, granulated sugar, and instant yeast. Give it a gentle stir. Let this mixture sit for 5-10 minutes. You’re looking for it to become frothy and bubbly on the surface. This is a crucial step because it confirms that your yeast is alive and ready to do its job, which is to make our bread light and airy. If it doesn’t get frothy, your water might have been too hot or too cold, or your yeast might be old. It’s best to start over with fresh yeast and properly tempered water if this happens.
-
Combine Dry Ingredients:
While your yeast is proofing, measure out your flour and sea salt into a separate bowl. Give them a quick whisk to ensure they’re well combined. This prevents pockets of unmixed salt in your dough later on.
-
Mix Wet and Dry:
Once your yeast mixture is bubbly, add the 2 tablespoons of olive oil to it. Now, gradually add the dry flour mixture to the wet ingredients, a cup at a time, mixing with a wooden spoon or a stand mixer fitted with the dough hook on low speed. Continue mixing until all the flour is incorporated and a shaggy dough forms. At this stage, it will look quite sticky and unruly, but don’t worry, that’s perfectly normal.
-
Knead the Dough:
Now for the fun part – developing that gluten structure!
- By Hand: Turn the dough out onto a lightly floured surface. Begin to knead the dough. This involves pushing the dough away from you with the heels of your hands, folding it over, rotating it a quarter turn, and repeating. It might be sticky at first, but resist the urge to add too much extra flour, as this can make your bread tough. A bench scraper can be really helpful for managing sticky dough. Knead for about 8-10 minutes until the dough becomes smooth, elastic, and less sticky. When you press it gently with your finger, it should spring back slowly.
- By Stand Mixer: If using a stand mixer, let it knead on medium-low speed for about 6-8 minutes with the dough hook. Keep an eye on the dough; it should clear the sides of the bowl and gather around the hook. Again, it will be smooth and elastic when properly kneaded.
-
Incorporate Garlic and Rosemary:
Once your dough is beautifully kneaded and elastic, it’s time to infuse it with the star flavors of our Rustic Garlic Rosemary Skillet Bread. Flatten the dough slightly on your work surface. Sprinkle the minced garlic and chopped fresh rosemary evenly over the surface. Now, fold the dough over itself and continue kneading for another 1-2 minutes, just until the garlic and rosemary are well distributed throughout the dough. Be careful not to over-knead at this stage, as the sharp edges of the garlic can sometimes cut the gluten strands if kneaded too vigorously for too long. You want them nestled cozily within the dough.
The First Rise (Bulk Fermentation): Building Flavor and Structure
This is where the magic really starts to happen as the yeast begins its work, producing gases that will make our bread light and airy.
-
Prepare for Rising:
Lightly grease your large mixing bowl with a little olive oil. Place the kneaded dough into the bowl, turning it once to coat the entire surface with oil. This prevents the dough from drying out and sticking to the bowl during its rise. Cover the bowl tightly with plastic wrap or a clean, damp kitchen towel. Creating a humid environment is important for a good rise.
-
The Rising Process:
Place the covered bowl in a warm, draft-free spot in your kitchen. This could be near a sunny window, in a slightly warm oven (turned off!), or just on your kitchen counter if it’s warm enough. Let the dough rise for 1 to 1.5 hours, or until it has noticeably doubled in size. The exact timing will vary depending on the temperature of your kitchen. On a cooler day, it might take a bit longer. What you’re looking for is the visual cue of “doubled in size” rather than strictly adhering to a timer. You can gently poke the dough with a floured finger; if the indentation remains, it’s ready.
Shaping and Second Rise: Preparing for the Skillet
Almost there! We’re giving our bread its final form and a last little boost before it hits the oven.
-
Punch Down and Shape:
Once the dough has doubled, gently punch it down to release the trapped gases. This step helps create a finer crumb structure and makes the dough easier to handle. Turn the dough out onto a lightly floured surface. Gently shape it into a round ball. You want to create a smooth surface on top by pulling the edges of the dough underneath and pinching them together to form a seam at the bottom. This tension on the surface will help the bread hold its shape and contribute to a lovely crust.
-
Prepare the Skillet:
Lightly grease your 9-10 inch cast iron skillet with a teaspoon of olive oil. Place the shaped dough seam-side down into the prepared skillet. Give it a gentle pat to ensure it settles evenly.
-
The Second Rise (Proofing):
Cover the skillet loosely with plastic wrap or a clean kitchen towel. Return it to that warm, draft-free spot for its second rise, or “proofing.” This time, let it rise for another 30-45 minutes, or until the dough looks visibly puffy and has increased in size by about 50-75%. It won’t double again as dramatically as the first rise, but it should look light and airy. This second rise is crucial for a tender crumb and helps prevent a dense loaf.
Baking Your Rustic Garlic Rosemary Skillet Bread: The Grand Finale!
This is the moment we’ve been waiting for – when our kitchen fills with the irresistible aroma of freshly baked bread.
-
Preheat Oven and Skillet:
About 20 minutes before the second rise is complete, place your empty cast iron skillet (if you didn’t proof the dough in it) or your proofed dough in the skillet into the oven. Preheat your oven to 400°F (200°C). If your dough is already in the skillet, simply place the skillet directly into the cold oven as it preheats. The gradual heating of the skillet with the dough can sometimes give a slightly better spring. However, if you prefer, you can preheat the empty skillet and then carefully transfer the proofed dough to the hot skillet just before baking. Preheating the skillet is a key step for creating that wonderfully crispy bottom crust characteristic of a true Rustic Garlic Rosemary Skillet Bread.
-
Prepare for Baking:
Once your oven is preheated and your dough has completed its second rise (if not already in the hot skillet), it’s time for the final touches. If your dough is in the preheated skillet, carefully pull the hot skillet out of the oven. Brush the top of the dough generously with a tablespoon of olive oil. If you wish, score the top of the bread with a very sharp knife or a bread lame. You can make a simple cross, or a few parallel slashes. This isn’t just for aesthetics; scoring helps control where the bread expands during baking, preventing uncontrolled tearing. Finally, sprinkle with flaky sea salt, extra chopped rosemary, and red pepper flakes (if using). Be quick but careful when handling a hot skillet!
-
Bake:
Carefully place the skillet back into the preheated oven. Bake for 25-35 minutes, or until the crust is deeply golden brown and sounds hollow when tapped on the bottom. The internal temperature of a fully baked bread should register around 200-210°F (93-99°C) with an instant-read thermometer. Resist the urge to open the oven door too frequently during the first 15-20 minutes of baking, as this can cause the bread to deflate.
Cooling and Serving: The Rewarding Moment
Almost there! Patience is a virtue, especially when it comes to freshly baked bread.
-
Cool the Bread:
Once baked, carefully remove the skillet from the oven. Immediately transfer the bread from the hot skillet to a wire cooling rack. It’s very important to let your Rustic Garlic Rosemary Skillet Bread cool completely on a rack for at least 30-60 minutes before slicing. This allows the internal structure to set, moisture to redistribute, and prevents a gummy texture. While it’s tempting to dig in right away (and the smell is truly intoxicating!), proper cooling is essential for the best texture and flavor.
-
Serve and Enjoy:
Once cooled, slice your beautiful Rustic Garlic Rosemary Skillet Bread into wedges or thick slices. Serve it warm with a pat of butter, alongside a hearty soup or stew, or simply with a good quality olive oil for dipping. This bread is incredibly versatile and delicious on its own. It’s perfect for sharing with friends and family, and the aroma alone will make everyone flock to the kitchen!
Storage Tip: Leftovers can be stored in an airtight container or bread bag at room temperature for up to 2-3 days. For longer storage, slice and freeze. Reheat slices in a toaster or oven for a fresh-from-the-oven experience.
Conclusion:
Well, my friends, we’ve reached the delicious end of our culinary journey for today, and I truly hope you’re feeling as inspired as I am about this particular creation. If there’s one recipe I could implore you to try, to experience firsthand, it’s this one. The aroma alone, when this bread is baking, is enough to transform your kitchen into the most inviting space imaginable, a true testament to the power of simple, honest ingredients. It’s more than just a side dish; it’s an experience, a conversation starter, and quite frankly, a little piece of edible comfort that everyone deserves.
Why is this recipe a non-negotiable must-try, you ask? Beyond the incredible scent that will waft through your home, it’s the symphony of textures and flavors that truly sets it apart. Imagine: a beautifully crisp, golden crust, lovingly seared in a hot skillet, giving way to an impossibly soft, airy interior. Each bite is generously infused with the pungent warmth of roasted garlic and the fragrant, piney notes of fresh rosemary, creating a taste profile that is both rustic and sophisticated. It’s comforting without being heavy, intensely flavorful without being overwhelming, making it an instant classic for any meal. This isn’t just any bread; it’s a celebration of wholesome ingredients coming together in perfect harmony, delivering a warmth and satisfaction that you can truly feel. It requires minimal fuss but delivers maximum impact, making it ideal for both novice bakers looking for a confident win and seasoned cooks seeking a reliable showstopper that impresses every single time.
Elevate Your Meals with this Versatile Bread
Now, let’s talk about how you can bring this incredible bread to your table and truly make it shine. The versatility of this particular skillet bread is undeniably one of its greatest assets, allowing it to seamlessly integrate into almost any dining scenario. Of course, it’s absolutely divine served warm, straight from the skillet, with just a generous pat of good quality butter melting into its nooks and crannies, or a luxurious drizzle of extra virgin olive oil for an elegant dipping experience. But don’t stop there! Think of it as the ultimate companion to almost any meal you can imagine. It’s magnificent alongside a hearty beef bourguignon or a rich lamb stew, eagerly soaking up all those complex, savory juices that define comfort food. Picture it with a classic Italian pasta dish, the crusty edges perfect for wiping the plate clean of every last drop of marinara or pesto. I also find it incredibly satisfying when paired with a robust tomato soup or a creamy butternut squash soup on a chilly evening; the delightful contrast in textures and the complementary flavors are simply divine. For a lighter touch, tear pieces off to accompany a fresh garden salad, adding a satisfying crunch and an unexpected depth of savory flavor that elevates the greens.
Feeling a little adventurous and ready to put your own stamp on it? This bread lends itself beautifully to a myriad of exciting variations. Before baking, consider generously sprinkling a handful of freshly grated Parmesan or a sharp aged cheddar over the dough for an extra layer of cheesy goodness that melts into a golden crust. You could also experiment with different aromatic herbs – a delicate touch of fresh thyme or a sprinkle of dried oregano would be wonderful additions to the rosemary. For those who love a bit of heat, a pinch of red pepper flakes incorporated into the dough or even dusted on top before baking would add a delightful and unexpected kick. You could even fold in some finely chopped sun-dried tomatoes, briny Kalamata olives, or even caramelized onions for an even more Mediterranean-inspired twist. Don’t be afraid to make it truly your own; that’s the beauty and the joy of home cooking!
Your Invitation to Culinary Delight
So, there you have it. My heartfelt recommendation for a recipe that I genuinely believe will not only become a cherished staple in your kitchen but also a source of immense culinary satisfaction. This is your personal invitation to dive into the comforting, soul-satisfying embrace of homemade bread, specifically the kind that makes your entire home smell like a gourmet eatery, beckoning everyone to the table. There’s something profoundly satisfying and almost magical about pulling a warm, fragrant loaf out of the oven, especially one that looks as impressive and tastes as incredible as this without demanding hours of your precious time. I genuinely hope you’ll take the plunge and bake this Rustic Garlic Rosemary Skillet Bread Recipe very soon. Experience the sheer joy of that first bite, the satisfied smiles of your family and friends, and the sheer pleasure of creating something truly special and delicious with your own hands.
Once you’ve had the chance to try it, I would absolutely love to hear about your experience! Did you stick to the original recipe and savor its classic flavors, or did you put your own unique spin on it with some adventurous additions? What delightful dishes did you serve it with, and what was the general consensus around your table? Please, share your culinary triumphs, your creative variations, and any tips you discovered along the way with me. Your feedback, your stories, and your kitchen adventures inspire not only me but also our entire growing community of passionate food lovers. Let’s continue to spread the joy of delicious, homemade food, one perfect, fragrant slice of skillet bread at a time. Happy baking!
Rustic Garlic Rosemary Skillet Bread – Easy & Delicious
This Rustic Garlic Rosemary Skillet Bread recipe is the perfect blend of crisp, golden crust and a tender, chewy center bursting with the aroma of fresh herbs and roasted garlic. Whether you’re serving it alongside a bowl of creamy soup or as the star of your charcuterie spread, this bread makes everything feel a bit more special. There’s something incredibly cozy about baking bread in a skillet — it feels old-fashioned in the best way and fills the kitchen with irresistible warmth.
Ingredients
Instructions
Important Information
Nutrition Facts (Per Serving)
It is important to consider this information as approximate and not to use it as definitive health advice.
Allergy Information
Please check ingredients for potential allergens and consult a health professional if in doubt.