• Skip to primary navigation
  • Skip to main content
  • Skip to primary sidebar
Homesmad

Homesmad

  • Home
  • Breakfast & Brunch
  • Appetizers & Snacks
  • Dinner
  • Dessert
  • About
  • Privacy Policy
  • Contact
Homesmad
  • Home
  • Breakfast & Brunch
  • Appetizers & Snacks
  • Dinner
  • Dessert
  • About
  • Privacy Policy
  • Contact

Das Butter Chicken: Rich, Creamy Tomato Chicken Recipe

September 22, 2025 by Lily author

Das Butter Chicken is more than just a dish; it’s a truly iconic culinary embrace that has captivated palates worldwide. Imagine succulent pieces of chicken, marinated to perfection, gently simmered in a velvety, tomato-based sauce infused with a fragrant blend of aromatic spices, finished with a generous swirl of butter and cream. This harmonious blend creates a symphony of flavors and textures that truly delights the senses and offers a comforting warmth with every spoonful.

Its remarkable journey began in the bustling kitchens of Moti Mahal in Delhi during the 1950s, where an ingenious chef transformed leftover tandoori chicken into this now-legendary creation. What started as a resourceful innovation quickly evolved into a global phenomenon, celebrated for its rich heritage and irresistible taste that resonates with diners across cultures.

People universally adore this dish for its incredible balance – the delightful tanginess from ripe tomatoes, a subtle underlying sweetness, and the luxurious, creamy texture that makes every bite an absolute pleasure. The chicken, always incredibly tender, absorbs the rich gravy beautifully, creating an experience that is both sophisticated and deeply satisfying. Learning to create Das Butter Chicken at home is a rewarding culinary adventure, and I am absolutely thrilled to guide you through crafting this Indian masterpiece in your own kitchen.

Das Butter Chicken: Rich, Creamy Tomato Chicken Recipe this RECIPE

Ingredients:

  • For the Chicken Marinade:

    • Boneless, Skinless Chicken: 1.5 – 2 pounds (approximately 700-900g) chicken thighs or breast, cut into 1-inch bite-sized pieces. I personally find thighs yield a more tender and flavorful result for Das Butter Chicken.
    • Greek Yogurt: 1/2 cup, plain and full-fat. This is crucial for tenderizing the chicken and creating a rich base.
    • Lemon Juice: 1 tablespoon, freshly squeezed. Adds a bright, acidic note to the marinade.
    • Ginger-Garlic Paste: 1 tablespoon. You can make this fresh by blending equal parts ginger and garlic, or use a good quality store-bought paste.
    • Turmeric Powder: 1/2 teaspoon. For a warm color and earthy flavor.
    • Red Chili Powder: 1 teaspoon. Use Kashmiri red chili powder for a vibrant color with mild heat, or regular chili powder if you prefer more kick in your Das Butter Chicken.
    • Garam Masala: 1 teaspoon. A staple Indian spice blend, adding aromatic depth.
    • Cumin Powder: 1/2 teaspoon. Earthy and warm.
    • Salt: 1 teaspoon, or to taste.
  • For the Rich Gravy/Sauce:

    • Unsalted Butter: 4 tablespoons (56g). It wouldn’t be Das Butter Chicken without plenty of butter!
    • Ghee or Neutral Oil: 1 tablespoon. For sautéing without burning the butter too quickly.
    • Onions: 1 large, very finely chopped. The foundation of our flavorful gravy.
    • Ginger-Garlic Paste: 1 tablespoon. Builds on the aromatic base.
    • Green Chilies: 1-2, slit lengthwise (optional, adjust according to your preferred spice level).
    • Tomatoes: 1 can (28 oz / 794g) crushed tomatoes, or 4-5 large, ripe fresh tomatoes, pureed. I often use canned for convenience and consistent flavor.
    • Cashews: 1/4 cup. Soaked in warm water for at least 15-20 minutes, then pureed with a little of the soaking water until smooth. These are key for thickness and a creamy texture in Das Butter Chicken.
    • Kashmiri Red Chili Powder: 1 tablespoon. For that beautiful red-orange hue without excessive heat.
    • Cumin Powder: 1 teaspoon.
    • Coriander Powder: 1 tablespoon. Adds a citrusy, earthy note.
    • Garam Masala: 1 teaspoon. Another dose for aromatic finish.
    • Fenugreek Leaves (Kasuri Methi): 1 tablespoon, lightly crushed between your palms. This is a non-negotiable secret ingredient for authentic Das Butter Chicken flavor!
    • Sugar: 1-2 teaspoons, optional but highly recommended to balance the acidity of the tomatoes.
    • Salt: To taste.
    • Water or Chicken Stock: 1/2 to 1 cup, as needed to adjust sauce consistency.
  • For Finishing & Garnish:

    • Heavy Cream: 1/2 cup or more, to taste. The final touch of luxurious creaminess that defines Das Butter Chicken.
    • Fresh Cilantro: 1/4 cup, finely chopped, for garnishing.
    • Optional: An extra knob of butter for ultimate richness.
    • Optional Garnish: Sliced green chilies or ginger juliennes for an extra flourish.

Phase 1: Marinating the Chicken (The Heart of Das Butter Chicken)

  1. Prepare the Chicken: Begin by taking your chicken pieces and patting them thoroughly dry with paper towels. This step is incredibly important for achieving a good sear later, which locks in flavor. Place the dried chicken into a large, non-reactive mixing bowl.
  2. Mix the Marinade: To the bowl with the chicken, add the Greek yogurt, fresh lemon juice, ginger-garlic paste, turmeric powder, red chili powder (Kashmiri if you have it!), garam masala, cumin powder, and salt. These spices and the yogurt work together to tenderize the chicken and infuse it with layers of flavor, setting the stage for an incredible Das Butter Chicken.
  3. Coat Thoroughly: Using your hands (I often wear gloves for this, especially with the turmeric!), massage the marinade into every single piece of chicken. Ensure each morsel is completely and evenly coated. You want all those vibrant flavors to penetrate deeply into the meat.
  4. Refrigerate: Cover the bowl tightly with plastic wrap and place it in the refrigerator. Allow the chicken to marinate for at least 30 minutes, but for truly outstanding flavor and melt-in-your-mouth tenderness, I highly recommend marinating for 2-4 hours, or even better, overnight. This extended marination is a secret weapon for deeply flavorful Das Butter Chicken.

Phase 2: Cooking the Marinated Chicken to Perfection

  1. Preheat Your Pan: Heat 1 tablespoon of ghee or neutral oil in a large, heavy-bottomed pan or skillet over medium-high heat. You’re looking for the pan to be hot enough to create a beautiful sear on the chicken, but not so hot that the oil starts to smoke excessively.
  2. Sear the Chicken: Once the pan is shimmering hot, carefully add the marinated chicken pieces in a single layer. It’s crucial not to overcrowd the pan; if you do, the chicken will steam instead of sear, and we want those lovely browned, slightly charred edges for our Das Butter Chicken. You’ll likely need to do this in 2-3 batches. Cook each batch for about 3-5 minutes per side, until deeply browned and slightly caramelized in places. The chicken doesn’t need to be fully cooked through at this point; we’re just building a flavor crust.
  3. Set Aside: Once seared, remove the chicken pieces from the pan and transfer them to a clean plate. Set them aside for now. Don’t worry about any browned bits stuck to the bottom of the pan – those are pure flavor gold and will contribute wonderfully to our sauce!

Phase 3: Crafting the Silky, Aromatic Gravy for “Das Butter Chicken”

  1. Melt Butter & Sauté Aromatics: In the very same pan you used for the chicken (no need to clean it, embrace those fond bits!), melt 4 tablespoons of unsalted butter over medium heat. Once the butter is gloriously melted and slightly foamy, add the very finely chopped onions. Sauté them patiently for about 8-10 minutes, stirring frequently, until they become incredibly soft, translucent, and just beginning to turn golden. This patient sautéing of the onions is fundamental for a sweet, deep, and complex base for your Das Butter Chicken sauce.
  2. Add Ginger-Garlic & Chilies: Stir in the additional 1 tablespoon of ginger-garlic paste and the slit green chilies (if using). Cook for another 1-2 minutes, stirring constantly, until the raw aroma of the ginger-garlic disappears and the paste becomes fragrant. Be careful not to let the garlic burn, as it can turn bitter very quickly.
  3. Introduce the Spices: Slightly lower the heat to medium-low. Add the Kashmiri red chili powder, cumin powder, and coriander powder. Stir constantly for a brief 30 seconds to 1 minute, allowing the spices to “bloom” in the hot butter and oil. This step is vital as it releases their full aromatic potential and intensifies their flavors, making your Das Butter Chicken truly aromatic.
  4. Incorporate Tomatoes: Pour in the crushed tomatoes (or your fresh tomato puree). Add the sugar (to balance acidity) and a good pinch of salt. Stir everything together well. Bring the mixture to a gentle simmer, then reduce the heat to low, cover the pan, and cook for 15-20 minutes. Stir occasionally to prevent sticking. You’re looking for the tomatoes to break down significantly and for the oil to start separating from the mixture, which indicates the sauce is concentrating and the flavors are deepening.
  5. Add Cashew Paste: While the tomatoes are simmering, ensure your cashew paste is ready. If not, blend the soaked cashews with just enough warm water until it’s a completely smooth, thick paste. Stir this velvety cashew paste into the tomato mixture. Cashews are essential for adding incredible richness, body, and a luxurious creamy texture to your Das Butter Chicken. Continue to cook for another 5 minutes, stirring frequently to prevent the cashews from sticking to the bottom.
  6. Blend for Smoothness (Optional but Highly Recommended): For that unbelievably smooth, restaurant-quality gravy that truly defines a gourmet Das Butter Chicken, carefully transfer the entire sauce mixture to a blender (or use an immersion blender directly in the pot, if suitable). Blend until the sauce is absolutely silky smooth, with no discernible lumps. For the ultimate smooth experience, I often push the blended sauce through a fine-mesh sieve back into a clean pan to remove any tiny fibrous bits. This extra effort guarantees an incredibly luxurious and refined texture that elevates your Das Butter Chicken to new heights. If you prefer a slightly more rustic sauce, you can skip the straining.

Phase 4: Bringing it All Together for the Ultimate Das Butter Chicken

  1. Combine Chicken and Sauce: Return the beautifully seared chicken pieces to the smooth, simmering sauce. Add about 1/2 to 1 cup of water or chicken stock to adjust the consistency of the gravy to your liking. You want a rich, luscious, yet pourable sauce that coats the chicken beautifully.
  2. Simmer Gently: Bring the mixture back to a gentle simmer, then cover the pan and cook on low heat for another 15-20 minutes. This allows the chicken to finish cooking through, becoming wonderfully tender, and lets all the incredible flavors meld and marry perfectly. This is where the magic of Das Butter Chicken truly happens.
  3. Add Fenugreek Leaves & Garam Masala: Stir in the crushed Kasuri Methi (fenugreek leaves) and the remaining 1 teaspoon of garam masala. These aromatic spices are traditionally added towards the end of the cooking process to preserve their delicate and distinct aromas, which are crucial for authentic Das Butter Chicken flavor. Cook for just another 2-3 minutes.
  4. The Grand Finale – Cream: Remove the pan from the heat. Now, for the signature touch: gently stir in the heavy cream. The cream adds that iconic richness, a beautiful pale orange hue, and mellows the spices, creating the utterly delightful, creamy texture that everyone loves in Das Butter Chicken. Taste the sauce and adjust for salt or sugar if needed. If you’re feeling extra indulgent, stir in an additional knob of butter for an even more decadent finish. This final step transforms your dish into the iconic, irresistible Das Butter Chicken!

Phase 5: Serving Your Delicious Das Butter Chicken

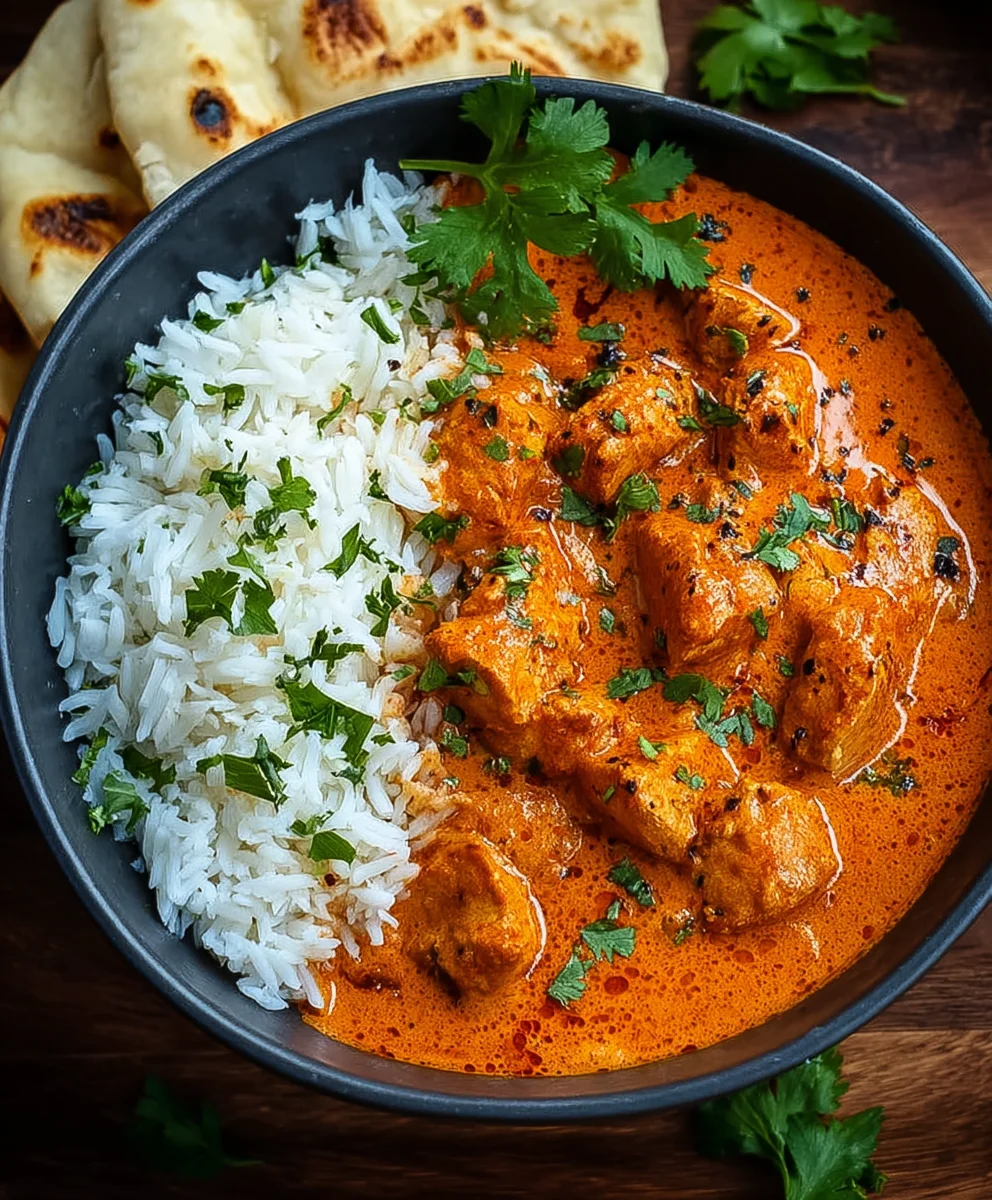
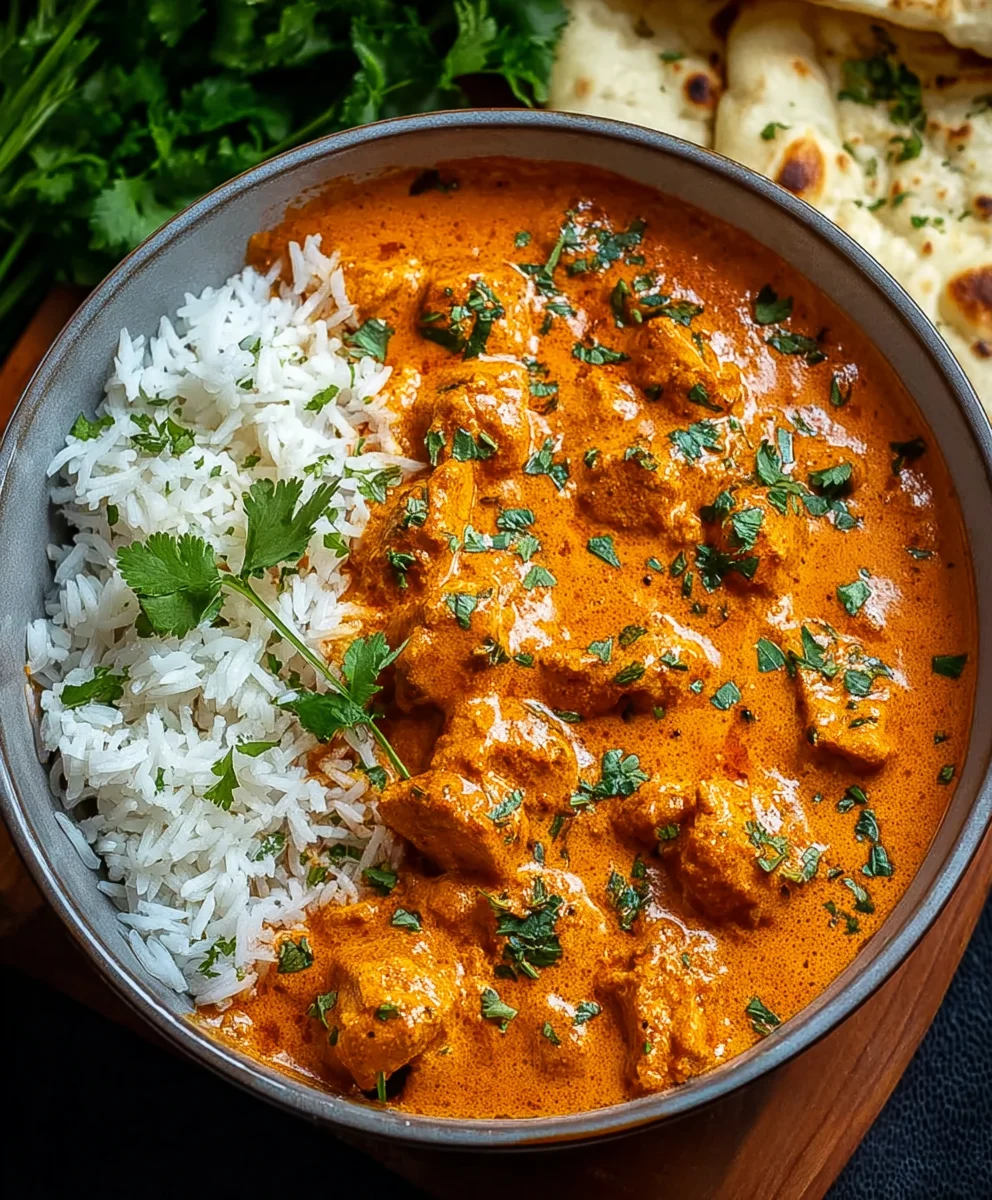
  1. Garnish: Ladle your glorious, aromatic Das Butter Chicken into individual serving bowls. Generously garnish each portion with a sprinkle of fresh chopped cilantro.
  2. Serve Hot: Serve this magnificent Das Butter Chicken immediately! It pairs perfectly with warm, fluffy naan bread (great for soaking up all that incredible sauce!), soft roti, or perfectly steamed basmati rice. For a complete meal, a side of cooling raita (yogurt dip) or a simple cucumber and onion salad can provide a lovely contrast to the richness of the dish. Enjoy every single spoonful of your homemade Das Butter Chicken – you’ve earned it!

Das Butter Chicken: Rich, Creamy Tomato Chicken Recipe

Conclusion:

So, we’ve journeyed through the steps of creating something truly magical in your kitchen, a dish that consistently stands out as a crowd-plepleaser and a personal favorite. If there’s one recipe I urge you to try, it’s this one. This isn’t just any chicken curry; it’s an experience. From the moment the aromatic spices hit the pan to that first spoonful of tender chicken enveloped in a luscious, creamy sauce, you’ll understand why this particular preparation is a culinary masterpiece. I’ve poured my heart into perfecting this version, ensuring that even a novice cook can achieve restaurant-quality results right at home, transforming simple ingredients into an extraordinary meal.

Why This Recipe for Das Butter Chicken is an Absolute Must-Try:

The blend of sweet, tangy, and mildly spicy notes creates a symphony on your palate, a truly comforting and deeply satisfying meal that transcends cultural boundaries. If there’s one dish that consistently brings smiles and ‘oohs’ and ‘aahs’ to my dinner table, it’s Das Butter Chicken. It embodies everything you could want in a comforting meal – warmth, depth of flavor, and an undeniable richness that makes every bite an indulgence. This recipe delivers an authentic taste that often surpasses what you might find at your local takeout, giving you the satisfaction of knowing you crafted this incredible dish with your own hands.

Unforgettable Flavor Profile:

Think succulent chicken pieces, marinated to perfection, seared to lock in juices, and then lovingly simmered in a velvety tomato-based gravy. This gravy, my friends, is where the magic truly happens – a rich blend of pureed tomatoes, ginger, garlic, cashew paste for that signature creaminess, and a delicate balance of spices like garam masala, turmeric, and a hint of red chili powder, all mellowed by a generous swirl of butter and cream. It’s an intoxicating dance of flavors that leaves you craving more, a testament to the power of well-balanced Indian cuisine. The layers of flavor unfold with each mouthful, from the initial tang of tomatoes to the subtle warmth of spices and the luxurious finish of dairy.

Ease and Accessibility:

Despite its sophisticated flavor profile, you’ll be pleasantly surprised at how straightforward the process is. My instructions are designed to guide you effortlessly, ensuring every step is clear and achievable. You don’t need to be a seasoned chef to conquer this dish; just a little patience and a lot of love for good food. The upfront effort in marination and preparing the sauce base pays dividends in the final taste, making the cooking process an enjoyable and rewarding experience rather than a daunting task. It’s a perfect project for a weekend, but also manageable for a special weeknight meal.

Serving Suggestions and Delicious Variations:

Now, let’s talk about enjoying your masterpiece. While it’s utterly divine on its own, I highly recommend pairing your homemade Butter Chicken with some warm, fluffy naan bread – perfect for scooping up every last drop of that incredible sauce. A side of steaming basmati rice, perhaps infused with a few cardamom pods or a sprinkle of saffron, will also be a fantastic accompaniment, offering a neutral canvas against the rich flavors. Don’t forget a sprinkle of fresh cilantro for a burst of color and herbaceous freshness, and perhaps a wedge of lime for an extra zing to brighten the dish.

Creative Twists:

Feeling adventurous? This recipe is incredibly adaptable. For those who prefer a little more heat, don’t hesitate to add an extra pinch of cayenne pepper or a chopped green chili to the sauce. If you’re looking for a vegetarian alternative, paneer (Indian cottage cheese) or even roasted chickpeas make excellent substitutes for chicken, absorbing all the glorious flavors of the sauce beautifully. For a healthier twist, you can reduce the amount of cream slightly or opt for a low-fat version, though I personally believe the full-fat experience is worth every single calorie! You could also experiment with smoking the chicken for an authentic ‘tandoori’ flavor before adding it to the curry, elevating the dish even further. The possibilities are truly endless, allowing you to tailor this classic to your personal taste and dietary preferences, making it a versatile go-to for any occasion.

Your Culinary Adventure Awaits!

I truly hope you take the plunge and try this recipe. There’s an immense satisfaction that comes from creating such a beloved dish from scratch, knowing exactly what ingredients went into it and being able to share that joy with your loved ones. Once you’ve made it, I guarantee it will become a regular feature in your recipe rotation, a dish you’ll be proud to serve again and again. Don’t just eat; experience, create, and share! I’d absolutely love to hear about your culinary journey with this recipe. Did you add a unique twist? What did your family think? Share your photos, your tips, and your experiences in the comments below or tag me on social media. Your feedback fuels my passion for sharing delicious food, and I can’t wait to celebrate your success in the kitchen. Happy cooking, and prepare to fall deeply, madly in love with your own homemade Butter Chicken!

Frequently Asked Questions (FAQs)

Q: Why is my Butter Chicken bland?

A: Often, blandness comes from not enough marination time for the chicken, insufficient ginger-garlic paste, or a lack of proper spice balance in the sauce. Ensure you’re toasting your whole spices first (if applicable) and allowing the sauce to simmer long enough for the flavors to meld and deepen. Don’t skimp on the salt, and consider a tiny pinch of sugar to balance the tomatoes.

Q: What do you eat with Butter Chicken?

A: The most popular accompaniments are warm naan bread (perfect for dipping into the rich sauce!) and fluffy basmati rice. Other excellent options include jeera rice (cumin rice), roti, paratha, a fresh cucumber raita (yogurt dip), or a simple side salad to cut through the richness.

Q: Can I make Butter Chicken vegetarian?

A: Absolutely! Paneer (Indian cottage cheese) is a fantastic substitute for chicken. You can also use roasted chickpeas, mixed vegetables like potatoes and peas, or firm tofu. Simply follow the recipe steps, substituting the chicken with your chosen vegetarian protein, ensuring it’s cooked through before adding to the sauce.

Q: Is Butter Chicken healthy?

A: Traditional Butter Chicken, with its generous amounts of butter, cream, and cashews, is quite rich and calorie-dense. While it offers protein, it’s generally considered an indulgent dish. You can make it healthier by reducing the butter and cream, using low-fat dairy alternatives, increasing the tomato content, and serving with brown rice or whole wheat naan.

Q: How long does Butter Chicken last in the fridge?

A: Properly stored in an airtight container, Butter Chicken can last for 3-4 days in the refrigerator. The flavors often deepen beautifully overnight, making it an excellent meal prep option!

Q: Can you freeze Butter Chicken?

A: Yes, Butter Chicken freezes very well! Allow it to cool completely, then transfer it to freezer-safe containers or bags. It can be frozen for up to 2-3 months. Thaw overnight in the fridge and reheat gently on the stovetop, adding a splash of water or cream if needed to restore consistency.

Q: What makes Butter Chicken red?

A: The characteristic reddish-orange color comes primarily from a combination of ingredients: concentrated tomatoes (especially tomato paste or pureed canned tomatoes), Kashmiri red chili powder (which provides vibrant color with less heat), and sometimes a tiny pinch of food coloring in restaurant versions (though not necessary for homemade). Marinating chicken with turmeric and red chili powder also contributes to the rich hue.

Q: Is Butter Chicken spicy?

A: Traditionally, Butter Chicken is known for its mild, creamy, and slightly sweet flavor profile rather than intense heat. While it contains chili powder (often Kashmiri chili for color), the heat is usually balanced by the cream, butter, and tomatoes. However, the spice level can easily be adjusted to your preference by adding more or less chili powder or fresh green chilies.


Das Butter Chicken: Rich, Creamy Tomato Chicken Recipe

Das Butter Chicken: Rich, Creamy Tomato Chicken Recipe

Das Butter Chicken is an iconic dish featuring succulent chicken, marinated to perfection, gently simmered in a velvety, tomato-based sauce infused with aromatic spices, finished with butter and cream. This harmonious blend creates a symphony of flavors and textures, offering comforting warmth with every spoonful. Originating from Moti Mahal in Delhi during the 1950s, this resourceful innovation quickly evolved into a global phenomenon, celebrated for its rich heritage and irresistible taste.

Prep Time
30 Minutes

Cook Time
30 Minutes

Total Time
30 Minutes

Servings
4 servings

Ingredients

  • 600g boneless, skinless chicken breast, diced
  • 150g plain, full-fat Greek yogurt
  • 1 tbsp fresh lemon juice
  • 2 cloves garlic, minced
  • 1 tbsp fresh ginger, grated
  • 1 tsp turmeric powder
  • 1 tsp sweet paprika powder
  • 1 tsp garam masala
  • 1 tsp cumin powder
  • 1 tsp salt
  • 1 tbsp neutral oil
  • 2 tbsp unsalted butter
  • 1 large onion, finely chopped
  • 1-2 green chilies, slit (optional)
  • 1 can (28 oz / 794g) crushed tomatoes
  • 1/4 cup cashews, soaked in warm water and pureed
  • 1 tsp coriander powder
  • 1 tbsp fenugreek leaves (Kasuri Methi), crushed
  • 1-2 tsp sugar (optional)
  • 1/2 to 1 cup water or chicken stock
  • 1/2 cup heavy cream
  • 1/4 cup fresh cilantro, chopped

Instructions

  1. Step 1
    Pat 600g diced chicken dry. In a large bowl, combine chicken with 150g Greek yogurt, 1 tbsp lemon juice, 2 minced garlic cloves, 1 tbsp grated ginger, 1/2 tsp turmeric, 1/2 tsp sweet paprika, 1/2 tsp garam masala, 1/2 tsp cumin, and 1/2 tsp salt. Mix thoroughly, cover, and refrigerate for at least 30 minutes, or ideally 2-4 hours for best flavor and tenderness.
  2. Step 2
    Heat 1 tbsp neutral oil in a large, heavy-bottomed pan over medium-high heat. Sear marinated chicken in batches for 3-5 minutes per side until deeply browned and slightly caramelized. Remove chicken and set aside.
  3. Step 3
    In the same pan, melt 1 tbsp unsalted butter over medium heat. Sauté 1 finely chopped onion for 8-10 minutes until very soft, translucent, and just beginning to turn golden. Add any remaining minced garlic/grated ginger (if not entirely used in marinade) and 1-2 slit green chilies (if using); cook for 1-2 minutes until fragrant.
  4. Step 4
    Reduce heat to medium-low. Stir in the remaining 1/2 tsp turmeric, 1/2 tsp sweet paprika, 1/2 tsp cumin, and 1 tsp coriander powder. Cook for 30 seconds to 1 minute to bloom the spices. Pour in 1 can crushed tomatoes, 1-2 tsp sugar (optional), and the remaining 1/2 tsp salt. Bring to a gentle simmer, cover, and cook for 15-20 minutes, stirring occasionally, until tomatoes break down and oil separates.
  5. Step 5
    Stir in the pureed 1/4 cup soaked cashews; cook for another 5 minutes, stirring frequently. For an unbelievably smooth, restaurant-quality gravy, carefully transfer the sauce mixture to a blender and blend until absolutely silky. Optionally, push the blended sauce through a fine-mesh sieve back into a clean pan.
  6. Step 6
    Return the seared chicken pieces to the smooth, simmering sauce. Add 1/2 to 1 cup water or chicken stock to adjust consistency. Bring to a gentle simmer, cover, and cook on low heat for 15-20 minutes until the chicken is tender and flavors have melded. Stir in 1 tbsp crushed fenugreek leaves. Remove from heat, then gently stir in the remaining 1 tbsp unsalted butter and 1/2 cup heavy cream. Taste and adjust for salt or sugar if needed.
  7. Step 7
    Ladle your glorious Das Butter Chicken into serving bowls. Garnish generously with fresh chopped cilantro. Serve immediately with warm naan bread, roti, or steamed basmati rice.

Important Information

Nutrition Facts (Per Serving)

It is important to consider this information as approximate and not to use it as definitive health advice.

Allergy Information

Please check ingredients for potential allergens and consult a health professional if in doubt.

« Previous Post
Best Sticky Garlic Chicken Noodles Recipe for Easy Dinner
Next Post »
Best Creamy Spinach And Ricotta Stuffed Shells Recipe

If you enjoyed this…

Christmas Mini Lemon Cheesecake Bites

Christmas Mini Lemon Cheesecake Bites: A Festive Sweet Treat

Sticky Rice Chicken Bowl

Easy Sticky Chicken Rice Bowl – A Flavor-Packed Meal

Cottage Cheese Bread

Cottage Cheese Bread – Soft, Moist & Protein-Packed!

Primary Sidebar

Browse by Diet

BreakfastDinnerLunchDessertAppetizer

Sweet Peach Yogurt Parfait Delight

One of my fondest memories is from a lazy summer afternoon spent at my grandmother’s house. The sun filtered through the kitchen window, casting a warm glow over the table where she would create her culinary magic. It was during one of those blissful moments that I first tasted her Peach Yogurt Parfait with Honey and Granola. The sweet aroma of ripe peaches mingling with creamy yogurt and the crunch of granola was nothing short of heavenly. It felt like summer captured in a bowl, and I still remember the joy of diving in with a spoon, each layer revealing a new burst of flavor.

When I think about that parfait, I can almost hear the gentle hum of the bees outside, reminding me of the floral notes that honey brings to every bite. The vibrant yellows and soft oranges of the peaches contrast beautifully with the creamy white yogurt and the golden crunch of granola. It’s a dish that not only looks delightful but also tastes like a celebration of fresh, wholesome ingredients.

What makes my version of this Peach Yogurt Parfait special is the careful balance of flavors and textures. I use ripe, juicy peaches, drizzled with locally sourced honey, and a homemade granola that’s bursting with nuts and seeds for an extra crunch. It’s a simple dish, but every layer is crafted with love and attention.

Let me show you exactly how to make this delightful parfait, so you can bring a bit of that summer magic into your kitchen!

Sweet Peach Yogurt Parfait Delight

Why You’ll Love This Recipe

  • Delightfully creamy texture from the Greek yogurt, paired with the juicy sweetness of fresh peaches.
  • Ready in under 20 minutes, making it a quick and satisfying breakfast or snack option.
  • Budget-friendly, using common ingredients that you may already have in your pantry.
  • Customizable with your favorite granola and nuts, allowing you to tailor each parfait to your taste.
  • Perfectly balanced flavors with the bright acidity of lemon juice and the sweetness of honey enhancing the peaches.

Ingredients

  • For the Parfait:
  • 2 cups plain Greek yogurt (or vanilla yogurt for a sweeter option)
  • 2 large ripe peaches, diced (about 2 cups)
  • 1 tablespoon fresh lemon juice (to prevent browning of peaches)
  • 2 tablespoons honey (plus more for drizzling)
  • 1 teaspoon vanilla extract (optional for extra flavor)
  • For the Granola:
  • 1 cup granola (store-bought or homemade; see notes for a simple granola recipe)
  • 1/4 cup sliced almonds (optional for added crunch)
  • 1/4 cup shredded coconut (optional for added flavor)

Let’s dive into some key ingredients that make this Peach Yogurt Parfait so delightful! First, the Greek yogurt is not only creamy but also packed with protein, making it a satisfying option for breakfast or a snack. If you’re looking for a sweeter option, you can easily substitute it with vanilla yogurt, though it may alter the overall flavor balance. Next, the ripe peaches are the star of the show; their natural sweetness shines through, so I recommend choosing peaches that yield slightly to pressure, indicating they’re perfectly ripe. If peaches aren’t in season, feel free to use nectarines or even frozen peaches—just thaw them before use. Finally, honey adds a lovely floral sweetness that ties everything together. If you prefer, maple syrup can serve as a delicious substitute.

Step-by-Step Instructions

  1. Start by preparing the peaches. Wash them thoroughly, then slice and dice them into bite-sized pieces. In a medium bowl, toss the diced peaches with 1 tablespoon of fresh lemon juice to prevent browning. Set aside for about 5 minutes while the lemon juice works its magic.
  2. In a separate bowl, combine the Greek yogurt, 2 tablespoons of honey, and 1 teaspoon of vanilla extract if using. Stir the mixture until smooth and thoroughly blended. This should take about a minute. Avoid overmixing to maintain the creaminess of the yogurt.
  3. Now it’s time to layer your parfait. Grab a clear glass or bowl to showcase your beautiful creation. Start with a generous spoonful of the yogurt mixture at the bottom—about 1/4 cup will do. Use a spoon to spread it evenly.
  4. Add a layer of the diced peaches over the yogurt, ensuring they cover the yogurt completely. You might want to use about half of what you have prepared—roughly 1 cup. This layer should be visually appealing, so arrange the peaches neatly.
  5. Sprinkle 1/4 cup of granola over the peaches. This adds a delightful crunch. Make sure to distribute it evenly to ensure every bite has that satisfying texture. Avoid packing it down too tightly, as you want it to maintain its crunch.
  6. Repeat the layers: spoon in another 1/4 cup of yogurt, followed by another cup of peaches, and another sprinkle of granola. You should have at least two layers, but feel free to add more depending on your glass size.
  7. Finish off your parfait with a drizzle of honey on top for added sweetness and a touch of elegance. If you’re using sliced almonds or shredded coconut, sprinkle them on top now. It adds a lovely visual contrast and extra flavor.
  8. Serve immediately or refrigerate for up to 30 minutes before serving to allow the flavors to meld together. However, I recommend enjoying it fresh to maintain the granola’s crunch.

Pro Tips for the Best Peach Yogurt Parfait With Honey And Granola

  • Make sure to choose ripe peaches for the best flavor and texture. A common mistake is using unripe fruit, which can lead to a less enjoyable parfait. Look for peaches that are fragrant and slightly soft to the touch.
  • Use a clear glass to assemble your parfait; this not only makes for a beautiful presentation but also allows you to see the colorful layers, which adds to the enjoyment of eating it.
  • For an even creamier texture, consider whipping the Greek yogurt with a hand mixer for a couple of minutes before layering. This small adjustment makes a huge difference in mouthfeel.
  • Be mindful of the granola-to-yogurt ratio. Too much granola can overwhelm the parfait, while too little can make it feel too creamy. Aim for about 1/4 cup of granola per layer for the perfect balance.
  • If you’re making this for a gathering, consider preparing the yogurt and peaches ahead of time and layering them just before serving. This ensures the granola stays crunchy!

Variations & Serving Ideas

There are so many ways to get creative with your Peach Yogurt Parfait! For a tropical twist, swap out the peaches for mangoes or pineapples and top with coconut flakes. If you prefer a berry flavor, mix in some blueberries or strawberries with the peaches for added color and taste. For a nutty version, incorporate chopped walnuts or pecans instead of almonds.

As for serving ideas, this parfait pairs beautifully with a side of scrambled eggs for a hearty breakfast or fresh fruit salad for a light lunch. You might also enjoy it alongside whole grain toast with almond butter for an energizing snack. The contrast of flavors and textures will elevate your meal experience!

Storage, Make-Ahead & Reheating

The Peach Yogurt Parfait is best enjoyed fresh, but you can prepare some components ahead of time. Store the layered parfait in an airtight container in the refrigerator for up to 24 hours. However, be cautious; the granola may lose its crunch if stored too long. You can freeze the yogurt and peach mixture for up to 2 months; just remember to thaw it in the refrigerator overnight before serving.

If you plan to enjoy this dish the next day, it can taste even better as the flavors meld together. Just remember to add the granola right before serving to keep its delightful crunch!

Frequently Asked Questions

Can I make Peach Yogurt Parfait With Honey And Granola ahead of time?

Yes — in fact, it tastes even better the next day as the flavors meld. However, I recommend waiting to add the granola until just before serving to maintain its crunch.

What can I substitute for Greek yogurt?

If you prefer a lighter option, you can substitute Greek yogurt with regular yogurt or a dairy-free alternative like coconut yogurt. Just remember that this may alter the creaminess and flavor profile slightly.

Can I use frozen peaches for this parfait?

Absolutely! Just make sure to thaw the frozen peaches before using them. They will still add great flavor, though the texture may be slightly softer than fresh peaches.

How do I make the parfait vegan?

To make a vegan version, substitute the Greek yogurt with a plant-based yogurt alternative, and replace honey with maple syrup or agave nectar. This keeps the parfait sweet while adhering to a vegan diet.

What other fruits can I use in this recipe?

You can mix and match fruits based on your preference. Try using strawberries, blueberries, raspberries, or even bananas. Just make sure to adjust the lemon juice as needed to prevent browning.

Sweet Peach Yogurt Parfait Delight

Final Thoughts

The Peach Yogurt Parfait with Honey and Granola is a delightful blend of creamy yogurt, sweet peaches, and crunchy granola that creates a satisfying and nourishing treat. Each layer bursts with flavor, making it a perfect choice for breakfast or a light dessert.

This is the kind of recipe I come back to again and again, especially when I want something refreshing and wholesome to start my day. The harmony of sweet and tart flavors, combined with the delightful crunch, never fails to lift my spirits!

I encourage you to give this parfait a try and indulge in its comforting goodness. Feel free to share your results or even add your own twist—perhaps a sprinkle of cinnamon or a handful of nuts. Enjoy creating your perfect parfait!

Print
clock clock iconcutlery cutlery iconflag flag iconfolder folder iconinstagram instagram iconpinterest pinterest iconfacebook facebook iconprint print iconsquares squares iconheart heart iconheart solid heart solid icon

Peach Yogurt Parfait


  • Author: Lily author
  • Total Time: 15 minutes
  • Yield: 4 servings 1x
Pin Recipe
Print Recipe

Description

This Peach Yogurt Parfait combines creamy Greek yogurt, juicy peaches, and crunchy granola for a delightful treat. It’s a perfect breakfast or snack that captures the essence of summer in every bite.


Ingredients

Scale
  • For the Parfait:
  • 2 cups plain Greek yogurt (or vanilla yogurt for a sweeter option)
  • 2 large ripe peaches, diced (about 2 cups)
  • 1 tablespoon fresh lemon juice (to prevent browning of peaches)
  • 2 tablespoons honey (plus more for drizzling)
  • 1 teaspoon vanilla extract (optional for extra flavor)
  • For the Granola:
  • 1 cup granola (store-bought or homemade; see notes for a simple granola recipe)
  • 1/4 cup sliced almonds (optional for added crunch)
  • 1/4 cup shredded coconut (optional for added flavor)

Instructions

  1. Start by preparing the peaches. Wash them thoroughly, then slice and dice them into bite-sized pieces. In a medium bowl, toss the diced peaches with 1 tablespoon of fresh lemon juice to prevent browning. Set aside for about 5 minutes while the lemon juice works its magic.
  2. In a separate bowl, combine the Greek yogurt, 2 tablespoons of honey, and 1 teaspoon of vanilla extract if using. Stir the mixture until smooth and thoroughly blended. This should take about a minute. Avoid overmixing to maintain the creaminess of the yogurt.
  3. Now it’s time to layer your parfait. Grab a clear glass or bowl to showcase your beautiful creation. Start with a generous spoonful of the yogurt mixture at the bottom—about 1/4 cup will do. Use a spoon to spread it evenly.
  4. Add a layer of the diced peaches over the yogurt, ensuring they cover the yogurt completely. You might want to use about half of what you have prepared—roughly 1 cup. This layer should be visually appealing, so arrange the peaches neatly.
  5. Sprinkle 1/4 cup of granola over the peaches. This adds a delightful crunch. Make sure to distribute it evenly to ensure every bite has that satisfying texture. Avoid packing it down too tightly, as you want it to maintain its crunch.
  6. Repeat the layers: spoon in another 1/4 cup of yogurt, followed by another cup of peaches, and another sprinkle of granola. You should have at least two layers, but feel free to add more depending on your glass size.
  7. Finish off your parfait with a drizzle of honey on top for added sweetness and a touch of elegance. If you’re using sliced almonds or shredded coconut, sprinkle them on top now. It adds a lovely visual contrast and extra flavor.
  8. Serve immediately or refrigerate for up to 30 minutes before serving to allow the flavors to meld together. However, I recommend enjoying it fresh to maintain the granola’s crunch.
  • Prep Time: 15 mins
  • Cook Time: 0 mins
  • Category: Breakfast
  • Method: No-cook
  • Cuisine: American

Nutrition

  • Serving Size: 1 parfait
  • Calories: 250
  • Sugar: 20 g
  • Sodium: 50 mg
  • Fat: 5 g
  • Saturated Fat: 2 g
  • Unsaturated Fat: 3 g
  • Trans Fat: 0 g
  • Carbohydrates: 40 g
  • Fiber: 3 g
  • Protein: 10 g
  • Cholesterol: 10 mg

Keywords: Choose ripe peaches for the best flavor and texture. Use a clear glass for a beautiful presentation. For creaminess, consider whipping the yogurt before layering. Be mindful of the granola-to-yogurt ratio. Prepare yogurt and peaches ahead of time for gatherings, layering just before serving.

Did you make this recipe?

Share a photo and tag us — we can't wait to see what you've made!

Sun-Kissed Frozen Orange Cream Slush

As a child, summer days felt like they lasted forever. I remember the sticky heat wrapping around me as I played outside, my laughter mingling with the sounds of the neighborhood. But nothing could cool me down quite like the moment I’d spot my grandmother, laboring over her blender, whipping up her famous Frozen Orange Creamsicle Slush. That vibrant orange treat, with its frosty texture and sweet citrus aroma, was like a burst of sunshine in a cup. Just one sip, and I could feel the coolness wash over me, sparking pure joy.

This Frozen Orange Creamsicle Slush has a way of making you feel like a kid again. Its creamy, dreamy consistency is a delightful balance of bright orange and soft vanilla, inviting you to dive right in. The refreshing tang of orange dances on your tongue, while the smooth creaminess envelops you in a comforting embrace. It’s a nostalgic treat that’s perfect for hot summer afternoons or anytime you need a little pick-me-up.

What makes my version of this slush stand out is the addition of a hint of vanilla bean, which elevates the flavor and adds an extra layer of richness. Plus, it’s super easy to whip up with just a few simple ingredients that you probably already have on hand! So, if you’re ready to relive those sun-soaked memories, let me show you exactly how to make it.

Sun-Kissed Frozen Orange Cream Slush

Why You’ll Love This Recipe

  • Each slush is a perfect blend of creamy vanilla and zesty orange, creating a nostalgic flavor reminiscent of summer days.
  • This refreshing treat is ready in under 15 minutes, making it an ideal quick dessert for unexpected guests or hot afternoons.
  • With just 8 simple ingredients, it’s budget-friendly, ensuring you don’t have to break the bank to enjoy a delicious slush.
  • The slush has a perfectly smooth texture, thanks to the combination of ice and ice cream, providing a delightful contrast to the bright citrus flavors.
  • It’s highly customizable; you can easily adjust the sweetness and add fresh herbs for a unique twist that suits your taste.

Ingredients

  • 2 cups orange juice (freshly squeezed or store-bought)
  • 1 cup vanilla ice cream
  • 1 cup crushed ice
  • 1/2 cup milk (whole or 2%)
  • 1/4 cup granulated sugar (adjust based on sweetness preference)
  • 1 teaspoon vanilla extract
  • Zest of 1 orange (for added flavor)
  • Fresh orange slices and mint leaves (for garnish)

The star of this Frozen Orange Creamsicle Slush is the orange juice, which provides the vibrant, citrusy base. Freshly squeezed juice will yield the brightest flavor, but store-bought options can be just as convenient. If you’re opting for store-bought, choose 100% pure juice with no added sugars for the best results. Another essential ingredient is the vanilla ice cream; it adds creaminess and sweetness. You can substitute it with dairy-free ice cream if you’re looking for a vegan option. Whole or 2% milk complements the ice cream, creating a smooth blend. If you want a lower-calorie version, almond or oat milk can be good alternatives.

Lastly, the granulated sugar can be adjusted based on your sweetness preference. If you prefer a more natural sweetener, consider using honey or agave syrup. The orange zest enhances the flavor profile, providing an aromatic pop that brings the whole slush together. Don’t skip it! It adds an extra layer of brightness that makes this slush truly special.

Step-by-Step Instructions

  1. Start by preparing your ingredients. Gather 2 cups of orange juice, 1 cup of vanilla ice cream, and 1 cup of crushed ice. Make sure the ice is finely crushed, as larger chunks can make blending difficult.
  2. In a blender, combine the orange juice, vanilla ice cream, crushed ice, and 1/2 cup of milk. Add 1/4 cup of granulated sugar and 1 teaspoon of vanilla extract. If you like a sweeter slush, consider adding a bit more sugar at this stage.
  3. Add the zest of 1 orange to the blender. This step is crucial for enhancing the citrus flavor of your slush. Make sure not to include the bitter white pith—only the flavorful zest.
  4. Blend the mixture on medium-high speed for about 30-45 seconds. Stop once the ingredients are fully combined and the slush has a smooth, even consistency. If you notice large chunks of ice, blend for an additional 10-15 seconds. Avoid over-blending, as this can make the slush too liquidy.
  5. Once blended, taste the slush. If it needs more sweetness, add a little more sugar and blend for a few more seconds. If it’s too thick, you can add a splash of milk to reach your desired consistency.
  6. Pour the slush into glasses. This recipe typically serves 4, but you can easily double it for larger gatherings. Use a spoon to help guide the slush into the glasses if needed.
  7. Garnish each serving with fresh orange slices and mint leaves. The mint not only adds a pop of color but also a refreshing aroma that complements the citrus flavors beautifully.
  8. Serve immediately and enjoy! If you’ve made extra, you can refrigerate it for a short time, but it’s best enjoyed fresh.

Pro Tips for the Best Frozen Orange Creamsicle Slush

  • Don’t skip the orange zest! It’s a game-changer for flavor. Always zest before juicing to make it easier.
  • Use a high-powered blender for the best texture. A standard blender may struggle with ice, leading to uneven consistency. If you have a food processor, that can work too, but ensure the ice is finely crushed.
  • Adjust the ice-to-liquid ratio carefully. If your slush is too thick, it won’t blend well. Start with less ice and add more until you reach your preferred texture.
  • Be cautious with the sugar! Always start with the lower amount, as you can easily add more, but it’s hard to fix an overly sweet slush.
  • For a fun twist, consider adding a splash of coconut milk or a handful of fresh fruit like strawberries or pineapple. This not only enhances the flavor but also adds a beautiful color contrast.

Variations & Serving Ideas

There are countless ways to put a spin on your Frozen Orange Creamsicle Slush. Consider making a tropical version by adding in some pineapple juice or coconut milk for a delightful tropical twist. If you’re feeling adventurous, try incorporating a handful of frozen mango or peach slices for added sweetness. For a lighter version, swap out the vanilla ice cream for Greek yogurt for a creamy yet tangy alternative.

As for serving ideas, this refreshing slush pairs wonderfully with light summer dishes like grilled chicken skewers, fish tacos, or a simple salad topped with citrus vinaigrette. The bright, zesty flavors of the slush complement these dishes perfectly, making them an ideal pairing for a sunny day.

Storage, Make-Ahead & Reheating

This Frozen Orange Creamsicle Slush is best enjoyed fresh, but if you have leftovers, you can store them in an airtight container in the fridge for up to 2 days. Just keep in mind that the slush may lose some of its texture over time as the ice melts. It doesn’t freeze well, as the ice will turn into a solid block. If you must freeze it, blend again after thawing to restore the slushy consistency. This treat is best the day you make it, as the flavors meld together beautifully overnight, enhancing its deliciousness.

Frequently Asked Questions

Can I make Frozen Orange Creamsicle Slush ahead of time?

Yes — in fact, it tastes even better the next day as the flavors meld. However, it’s best to enjoy it fresh, as the texture can change if stored for too long. If you need to prepare it ahead, keep it in the fridge and re-blend before serving.

What kind of orange juice should I use?

For the best flavor, use freshly squeezed orange juice. However, if you’re short on time, opt for 100% pure store-bought juice without added sugars. This will ensure that your slush remains flavorful and refreshing.

Can I substitute the vanilla ice cream?

Absolutely! If you’re looking for a dairy-free option, coconut milk ice cream or a non-dairy vanilla ice cream can work wonderfully. They will still provide the creamy texture and sweetness you desire.

How can I adjust the sweetness of my slush?

You can easily adjust the sweetness by modifying the amount of sugar added. Start with 1/4 cup and taste the mixture before blending. If you prefer it sweeter, add more sugar gradually until it reaches your desired level.

What should I do if my slush is too thick?

If your slush is too thick, simply add a splash of milk or orange juice and blend again. This will help achieve a more drinkable consistency while maintaining the slushy texture. Adjust gradually to reach your preferred thickness.

Sun-Kissed Frozen Orange Cream Slush

Final Thoughts

The Frozen Orange Creamsicle Slush is a delightful blend of refreshing citrus and creamy goodness, making it a perfect treat for warm days or any time you crave a taste of nostalgia. The way the bright orange flavor dances with the creamy texture truly elevates this slush, transforming it into a satisfying escape from the everyday.

This is the kind of recipe I come back to again and again, especially when I’m looking to cool down or impress guests at a summer gathering. It’s simple to make and always brings smiles all around! I encourage you to try this recipe for yourself—don’t hesitate to share your results or even put your own spin on it. Happy slushing!

Print
clock clock iconcutlery cutlery iconflag flag iconfolder folder iconinstagram instagram iconpinterest pinterest iconfacebook facebook iconprint print iconsquares squares iconheart heart iconheart solid heart solid icon

Frozen Orange Creamsicle Slush


  • Author: Lily author
  • Total Time: 15 minutes
  • Yield: 4 servings 1x
Pin Recipe
Print Recipe

Description

This Frozen Orange Creamsicle Slush is a refreshing treat that combines creamy vanilla and zesty orange flavors. Perfect for hot summer days, it brings back nostalgic memories with every sip.


Ingredients

Scale
  • 2 cups orange juice (freshly squeezed or store-bought)
  • 1 cup vanilla ice cream
  • 1 cup crushed ice
  • 1/2 cup milk (whole or 2%)
  • 1/4 cup granulated sugar (adjust based on sweetness preference)
  • 1 teaspoon vanilla extract
  • Zest of 1 orange (for added flavor)
  • Fresh orange slices and mint leaves (for garnish)

Instructions

  1. Start by preparing your ingredients. Gather 2 cups of orange juice, 1 cup of vanilla ice cream, and 1 cup of crushed ice. Make sure the ice is finely crushed, as larger chunks can make blending difficult.
  2. In a blender, combine the orange juice, vanilla ice cream, crushed ice, and 1/2 cup of milk. Add 1/4 cup of granulated sugar and 1 teaspoon of vanilla extract. If you like a sweeter slush, consider adding a bit more sugar at this stage.
  3. Add the zest of 1 orange to the blender. This step is crucial for enhancing the citrus flavor of your slush. Make sure not to include the bitter white pith—only the flavorful zest.
  4. Blend the mixture on medium-high speed for about 30-45 seconds. Stop once the ingredients are fully combined and the slush has a smooth, even consistency. If you notice large chunks of ice, blend for an additional 10-15 seconds. Avoid over-blending, as this can make the slush too liquidy.
  5. Once blended, taste the slush. If it needs more sweetness, add a little more sugar and blend for a few more seconds. If it’s too thick, you can add a splash of milk to reach your desired consistency.
  6. Pour the slush into glasses. This recipe typically serves 4, but you can easily double it for larger gatherings. Use a spoon to help guide the slush into the glasses if needed.
  7. Garnish each serving with fresh orange slices and mint leaves. The mint not only adds a pop of color but also a refreshing aroma that complements the citrus flavors beautifully.
  8. Serve immediately and enjoy! If you’ve made extra, you can refrigerate it for a short time, but it's best enjoyed fresh.
  • Prep Time: 15 min
  • Cook Time: 0 min
  • Category: Dessert
  • Method: Blending
  • Cuisine: American

Nutrition

  • Serving Size: 1 serving
  • Calories: 200
  • Sugar: 30 g
  • Sodium: 50 mg
  • Fat: 5 g
  • Saturated Fat: 3 g
  • Unsaturated Fat: 2 g
  • Trans Fat: 0 g
  • Carbohydrates: 40 g
  • Fiber: 1 g
  • Protein: 2 g
  • Cholesterol: 20 mg

Keywords: Don't skip the orange zest! It's a game-changer for flavor. Always zest before juicing to make it easier.

Did you make this recipe?

Share a photo and tag us — we can't wait to see what you've made!

Zesty Lemon Poppy Seed Delight

One rainy afternoon, I found myself in my grandmother’s cozy kitchen, the kind that always smelled like warmth and love. She was whipping up her famous Lemon Poppy Seed Loaf, a recipe that had been passed down through generations. As the batter came together, the zesty aroma of fresh lemons filled the air, mingling perfectly with the nutty fragrance of poppy seeds. I can still picture her, apron-clad, as she expertly drizzled a vibrant citrus icing over the loaf, creating a glossy, sun-kissed finish that beckoned us to dive in. It was a moment that sparked my own passion for baking, and this recipe has become a cherished staple in my home ever since.

When you take a bite of this Lemon Poppy Seed Loaf, it’s like a burst of sunshine on your palate. The loaf is beautifully golden, with a tender crumb that melts in your mouth. Each slice is speckled with tiny poppy seeds, adding a delightful crunch that contrasts beautifully with the tangy sweetness of the lemon. And that citrus icing? It’s the finishing touch that elevates this loaf from ordinary to extraordinary, with its bright, zesty flavor dancing on your taste buds.

This recipe stands out because it embraces simplicity while delivering on flavor. I’ve added a hint of vanilla to the batter, enhancing the overall taste and making it even more indulgent. Trust me, once you make this Lemon Poppy Seed Loaf With Citrus Icing, it’ll become a go-to in your baking repertoire.

So, let me show you exactly how to make it!

Zesty Lemon Poppy Seed Delight

Why You’ll Love This Recipe

  • Moist and tender crumb that melts in your mouth, thanks to the perfect balance of butter and buttermilk.
  • Bright, zesty lemon flavor paired with crunchy poppy seeds, creating a delightful texture and taste experience.
  • Easy to whip up in just about an hour, perfect for last-minute gatherings or a cozy afternoon treat.
  • Budget-friendly with everyday ingredients, making it an accessible option for all home bakers.
  • The citrus icing adds a sweet tang that elevates the loaf, turning a simple recipe into a showstopper!

Ingredients

  • 1 ½ cups (190g) all-purpose flour
  • 1 teaspoon baking powder
  • ½ teaspoon baking soda
  • ½ teaspoon salt
  • 3 tablespoons poppy seeds
  • ½ cup (115g) unsalted butter, softened to room temperature
  • 1 cup (200g) granulated sugar
  • 2 large eggs
  • 1 teaspoon vanilla extract
  • 1 teaspoon lemon zest (from about 1 medium lemon)
  • ½ cup (120ml) buttermilk
  • 2 tablespoons fresh lemon juice

For the Citrus Icing:

  • 1 cup (120g) powdered sugar
  • 2 tablespoons fresh lemon juice
  • 1 tablespoon orange juice
  • 1 teaspoon lemon zest (for garnish, optional)

Let’s dive into the key ingredients that make this Lemon Poppy Seed Loaf so special. The all-purpose flour provides the structure and base for the loaf, while the baking powder and baking soda ensure it rises perfectly, giving the loaf a light texture. For a gluten-free variation, you could substitute the flour with a gluten-free all-purpose blend. Poppy seeds not only add a delightful crunch but also contribute to the unique flavor profile that pairs well with the citrus notes.

Unsalted butter is crucial for achieving the buttery richness that makes this loaf so moist. If you’re looking for a dairy-free option, coconut oil or a vegan butter can be used instead. The buttermilk is another essential component, providing acidity that activates the baking soda for a fluffy texture. If you don’t have buttermilk on hand, you can easily make a substitute by mixing ½ cup of milk with 1 tablespoon of vinegar or lemon juice and letting it sit for about 5 minutes.

Step-by-Step Instructions

  1. Preheat your oven to 350°F (175°C). Grease a 9×5-inch loaf pan or line it with parchment paper for easy removal later.
  2. In a medium mixing bowl, whisk together 1 ½ cups of all-purpose flour, 1 teaspoon of baking powder, ½ teaspoon of baking soda, ½ teaspoon of salt, and 3 tablespoons of poppy seeds. This helps to evenly distribute the baking agents and ensures a uniform rise.
  3. In a large mixing bowl, cream together ½ cup of softened unsalted butter and 1 cup of granulated sugar using an electric mixer on medium speed for about 3-4 minutes, until the mixture is light and fluffy. Make sure to scrape down the sides of the bowl occasionally.
  4. Add 2 large eggs, 1 teaspoon of vanilla extract, and 1 teaspoon of lemon zest to the creamed butter and sugar, mixing until fully combined. You want a smooth consistency, so ensure there are no lumps of butter.
  5. In a small bowl, combine ½ cup of buttermilk and 2 tablespoons of fresh lemon juice. Alternately add the dry ingredients and buttermilk mixture to the butter mixture, starting and ending with the dry ingredients. Mix just until combined; do not overmix, as this can lead to a dense loaf.
  6. Pour the batter into the prepared loaf pan. Smooth the top with a spatula, ensuring it’s even. Bake in the preheated oven for 50-60 minutes, or until a toothpick inserted in the center comes out clean. The edges should be lightly golden brown, and the center should feel just set.
  7. Once baked, remove the loaf from the oven and allow it to cool in the pan for about 10 minutes. Then, transfer it to a wire rack to cool completely. Resist the urge to slice too soon, as it will be crumbly if it’s still warm.
  8. While the loaf is cooling, prepare the citrus icing. In a medium bowl, whisk together 1 cup of powdered sugar, 2 tablespoons of fresh lemon juice, and 1 tablespoon of orange juice until smooth. If the icing is too thick, you can add a little more juice to reach your desired consistency.
  9. Once the loaf is completely cool, drizzle the citrus icing over the top. If you like, sprinkle with an additional teaspoon of lemon zest for an extra pop of flavor and color.

Pro Tips for the Best Lemon Poppy Seed Loaf With Citrus Icing

  • Be careful not to overmix your batter; this is a common mistake that can lead to a dense loaf. Mix just until the dry ingredients are incorporated for a light and fluffy texture.
  • Use room temperature ingredients, especially the butter and eggs. This helps to create a smoother batter and ensures even baking. Take your eggs out of the fridge about 30 minutes before you start.
  • For a more pronounced lemon flavor, consider adding a little lemon extract in addition to the zest and juice. Just a half teaspoon can elevate the citrus notes significantly.
  • When measuring your flour, spoon it into the measuring cup and level it off with a knife instead of scooping directly from the bag. This prevents packing and ensures you don’t end up with a dry loaf.
  • Invest in a good quality loaf pan; it makes a difference in heat distribution, which ensures even baking. If your pan is dark-coated, reduce the oven temperature by 25°F to prevent over-browning.

Variations & Serving Ideas

For a delightful twist, consider adding blueberries or raspberries to the batter for a fruity burst of flavor. You can also experiment with different citrus fruits—try lime or grapefruit zest and juice for a refreshing change. For a healthier option, substitute half of the all-purpose flour with whole wheat flour for added fiber without compromising too much on texture.

This Lemon Poppy Seed Loaf pairs beautifully with a light salad, such as a mixed greens salad with a vinaigrette, or a cup of tea for a cozy afternoon treat. It also complements a creamy cheese platter, as the acidity of the loaf balances rich cheeses perfectly. Lastly, a scoop of vanilla ice cream on the side creates a delightful contrast of temperatures and flavors!

Storage, Make-Ahead & Reheating

This Lemon Poppy Seed Loaf can be stored at room temperature for up to 3 days if wrapped tightly in plastic wrap. If you want to keep it longer, it freezes well for up to 3 months. To freeze, wrap the loaf tightly in plastic wrap and then in aluminum foil to prevent freezer burn.

When you’re ready to enjoy it again, simply thaw it in the fridge overnight. Reheat individual slices in the microwave for 15-20 seconds or in a toaster oven until warmed through. Interestingly, many people find that this loaf tastes even better the next day, as the flavors have time to meld!

Frequently Asked Questions

Can I make Lemon Poppy Seed Loaf With Citrus Icing ahead of time?

Yes — in fact, it tastes even better the next day! You can make the loaf a day in advance, allowing the flavors to develop. Just be sure to store it in an airtight container to maintain its moisture.

Can I substitute the poppy seeds?

Absolutely! If you don’t have poppy seeds on hand or prefer an alternative, you can use sesame seeds for a similar crunch or omit them entirely for a smooth loaf.

What can I use instead of buttermilk?

If you don’t have buttermilk, you can easily create a substitute by mixing ½ cup of milk (dairy or plant-based) with 1 tablespoon of vinegar or lemon juice. Let it sit for 5 minutes before using in the recipe.

How can I make this recipe gluten-free?

To make a gluten-free version of this Lemon Poppy Seed Loaf, substitute the all-purpose flour with a gluten-free all-purpose flour blend. Just ensure that the blend contains a binding agent like xanthan gum for the best results.

What is the best way to store leftover loaf?

Leftover Lemon Poppy Seed Loaf should be stored in an airtight container at room temperature for up to 3 days. For longer storage, wrap it tightly and freeze for up to 3 months. Thaw it before serving for the best texture.

Zesty Lemon Poppy Seed Delight

Final Thoughts

The Lemon Poppy Seed Loaf with Citrus Icing is truly a delightful treat that brings a burst of brightness to any occasion. The zesty lemon flavor combined with the subtle crunch of poppy seeds creates a satisfying balance, while the citrus icing adds a touch of sweetness that perfectly complements the loaf’s tanginess.

This is the kind of recipe I come back to again and again, especially when I want to brighten up a gloomy day or celebrate a small victory. The aroma that fills the kitchen as it bakes is absolutely heavenly! I encourage you to give this recipe a try; you might just find it becoming a beloved staple in your home. Don’t forget to share your results or even add your own unique twist—I can’t wait to see what you create!

Print
clock clock iconcutlery cutlery iconflag flag iconfolder folder iconinstagram instagram iconpinterest pinterest iconfacebook facebook iconprint print iconsquares squares iconheart heart iconheart solid heart solid icon

Lemon Poppy Seed Loaf


  • Author: Lily author
  • Total Time: 25 minute
  • Yield: 1 loaf 1x
Pin Recipe
Print Recipe

Description

This Lemon Poppy Seed Loaf is a delightful treat that combines zesty lemon flavor with crunchy poppy seeds. Topped with a citrus icing, it’s perfect for any occasion.


Ingredients

Scale
  • 1 ½ cups (190g) all-purpose flour
  • 1 teaspoon baking powder
  • ½ teaspoon baking soda
  • ½ teaspoon salt
  • 3 tablespoons poppy seeds
  • ½ cup (115g) unsalted butter, softened to room temperature
  • 1 cup (200g) granulated sugar
  • 2 large eggs
  • 1 teaspoon vanilla extract
  • 1 teaspoon lemon zest (from about 1 medium lemon)
  • ½ cup (120ml) buttermilk
  • 2 tablespoons fresh lemon juice
  • 1 cup (120g) powdered sugar
  • 2 tablespoons fresh lemon juice
  • 1 tablespoon orange juice
  • 1 teaspoon lemon zest (for garnish, optional)

Instructions

  1. Preheat your oven to 350°F (175°C). Grease a 9×5-inch loaf pan or line it with parchment paper for easy removal later.
  2. In a medium mixing bowl, whisk together 1 ½ cups of all-purpose flour, 1 teaspoon of baking powder, ½ teaspoon of baking soda, ½ teaspoon of salt, and 3 tablespoons of poppy seeds. This helps to evenly distribute the baking agents and ensures a uniform rise.
  3. In a large mixing bowl, cream together ½ cup of softened unsalted butter and 1 cup of granulated sugar using an electric mixer on medium speed for about 3-4 minutes, until the mixture is light and fluffy. Make sure to scrape down the sides of the bowl occasionally.
  4. Add 2 large eggs, 1 teaspoon of vanilla extract, and 1 teaspoon of lemon zest to the creamed butter and sugar, mixing until fully combined. You want a smooth consistency, so ensure there are no lumps of butter.
  5. In a small bowl, combine ½ cup of buttermilk and 2 tablespoons of fresh lemon juice. Alternately add the dry ingredients and buttermilk mixture to the butter mixture, starting and ending with the dry ingredients. Mix just until combined; do not overmix, as this can lead to a dense loaf.
  6. Pour the batter into the prepared loaf pan. Smooth the top with a spatula, ensuring it’s even. Bake in the preheated oven for 50-60 minutes, or until a toothpick inserted in the center comes out clean. The edges should be lightly golden brown, and the center should feel just set.
  7. Once baked, remove the loaf from the oven and allow it to cool in the pan for about 10 minutes. Then, transfer it to a wire rack to cool completely. Resist the urge to slice too soon, as it will be crumbly if it’s still warm.
  8. While the loaf is cooling, prepare the citrus icing. In a medium bowl, whisk together 1 cup of powdered sugar, 2 tablespoons of fresh lemon juice, and 1 tablespoon of orange juice until smooth. If the icing is too thick, you can add a little more juice to reach your desired consistency.
  9. Once the loaf is completely cool, drizzle the citrus icing over the top. If you like, sprinkle with an additional teaspoon of lemon zest for an extra pop of flavor and color.
  • Prep Time: 15 mins
  • Cook Time: 50-60 mins
  • Category: Dessert
  • Method: Baking
  • Cuisine: American

Nutrition

  • Serving Size: 1 slice
  • Calories: 200
  • Sugar: 15 g
  • Sodium: 150 mg
  • Fat: 8 g
  • Saturated Fat: 5 g
  • Unsaturated Fat: 3 g
  • Trans Fat: 0 g
  • Carbohydrates: 30 g
  • Fiber: 1 g
  • Protein: 3 g
  • Cholesterol: 40 mg

Keywords: Be careful not to overmix your batter; this is a common mistake that can lead to a dense loaf. Use room temperature ingredients for a smoother batter and even baking.

Did you make this recipe?

Share a photo and tag us — we can't wait to see what you've made!

  • Privacy Policy
  • Terms Of Service
  • Contact
  • About
  • GDPR

Copyright © 2025 Homesmad