• Skip to primary navigation
  • Skip to main content
  • Skip to primary sidebar
Homesmad

Homesmad

  • Home
  • Breakfast & Brunch
  • Appetizers & Snacks
  • Dinner
  • Dessert
  • About
  • Privacy Policy
  • Contact
Homesmad
  • Home
  • Breakfast & Brunch
  • Appetizers & Snacks
  • Dinner
  • Dessert
  • About
  • Privacy Policy
  • Contact

Creepy-Cute Skewered Beef Salami Eyeballs for Halloween Fun!

September 29, 2025 by Lily author

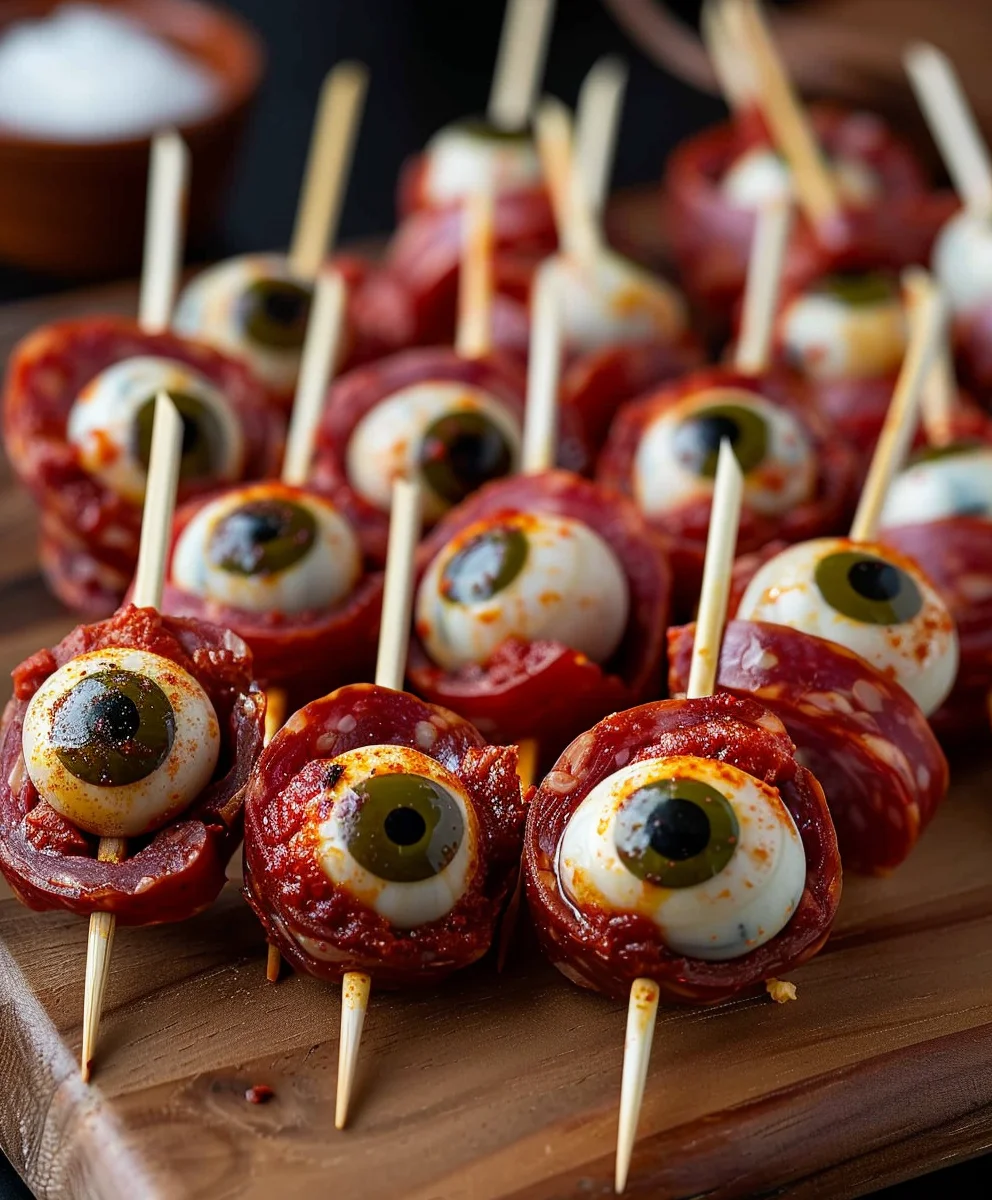
Skewered Beef Salami Eyeballs – yes, the name is intentionally whimsical, designed to pique curiosity and ignite conversation!

Are you ready to transform your appetizer game and present a dish that is as delightful to the palate as it is intriguing to the imagination? I’m incredibly excited to share this unique recipe with you. While the name might conjure playful imagery, rest assured, these “eyeballs” are simply perfectly bite-sized, flavorful morsels, crafted from a robust blend of savory beef and smoky salami, expertly formed and skewered for easy enjoyment.

There isn’t a long, ancient history tied to these particular “eyeballs” as they are a testament to modern culinary creativity, born from a desire to combine beloved flavors into an exciting new format. Their true cultural significance lies in their power to break the ice at any gathering, challenging the perception of what a traditional party snack can be. People adore this dish not just for its clever name, but primarily for its incredible taste. Imagine the rich, umami depth of beef harmoniously mingling with the distinct, spicy notes of salami, all intensified by a quick searing or grilling that imparts a wonderful textural contrast – a slightly crisp exterior giving way to a tender, juicy interior. They are convenient to prepare, utterly delicious, and an absolute triumph as a conversation starter. When you serve these Skewered Beef Salami Eyeballs, you’re not just offering food; you’re offering an experience.

Creepy-Cute Skewered Beef Salami Eyeballs for Halloween Fun! this RECIPE

Ingredients:

  • 18-24 ounces (approximately 500-680 grams) Fresh Bocconcini Mozzarella Balls: I usually opt for the “cherry” size, which are about 1-inch in diameter, as they make for the perfect “eyeball” base. You’ll want to drain them extremely well before use to prevent any excess moisture from making your skewers watery. I find that a good 30 minutes in a colander, perhaps even with a gentle pat-down with paper towels, makes a world of difference. The fresh, milky flavor and soft texture are absolutely essential for our edible eyeballs.
  • 12-16 slices High-Quality Beef Salami: Look for a salami that is thinly sliced, about 2-3 inches in diameter. The beef salami is going to form the “iris” of our eyeballs, so its size and color are quite important for visual impact. I like a robust, slightly smoky flavor here to contrast with the creamy mozzarella. If your slices are larger, you might need to trim them down using a round cookie cutter or a sharp knife to fit proportionately with your bocconcini.
  • 1 can (approximately 6 ounces or 170 grams) Pitted Black Olives: These little gems are going to serve as the “pupils” of our eerie, yet delicious, creations. Make sure they are pitted for convenience and safety. I prefer Kalamata olives for their slightly briny, fruity flavor and deep color, but standard black olives work wonderfully too. You’ll be slicing these thinly, so their firmness matters.
  • 1 can (approximately 6 ounces or 170 grams) Pitted Green Olives (with pimento, optional): For a bit of variety and an even more unsettling effect, a few green olive “pupils” can really change the look! If you can find green olives with pimento, that little red fleck in the center adds another layer of visual interest, almost like a bloodshot effect. Again, pitted is key, and you’ll be slicing these thinly.
  • 24-30 Small Wooden Skewers (4-6 inches long): These are the backbone of our “Skewered Beef Salami Eyeballs.” The smaller appetizer-sized skewers are perfect for individual servings and ease of handling. If you’re using wooden skewers, I always recommend soaking them in water for at least 30 minutes prior to assembly, especially if there’s any chance of them coming into contact with heat, as it prevents splintering and makes the assembly smoother.
  • 1 pint (approximately 2 cups) Cherry or Grape Tomatoes: These will provide a fresh, juicy burst of flavor and a lovely pop of red on our presentation platter, mimicking a subtle “bloody” effect or just adding a complementary color. You can skewer them along with the eyeballs or arrange them artfully around the finished dish.
  • 1/4 cup Fresh Basil Leaves: Picked fresh, these vibrant green leaves will add a delightful aromatic component and a crucial touch of color to each skewer. The sweet, peppery notes of fresh basil pair beautifully with mozzarella and tomato. I like to use smaller leaves, or gently tear larger ones, for a delicate garnish.
  • 2-3 tablespoons High-Quality Balsamic Glaze: This is my secret weapon for adding those wonderfully eerie “bloodshot veins” and a touch of sweet-tart sophistication. The thick, syrupy consistency of balsamic glaze makes it perfect for drizzling without making things too wet. You can find pre-made balsamic glaze at most grocery stores, or you can make your own by simmering balsamic vinegar until it reduces and thickens.
  • 2 tablespoons Extra Virgin Olive Oil: A light drizzle of good quality olive oil just before serving adds a beautiful sheen and a subtle richness that enhances all the flavors. I find it really elevates the overall presentation and taste.
  • Pinch of Sea Salt and Freshly Ground Black Pepper: Even though the salami and olives bring a lot of flavor, a tiny bit of salt and pepper can brighten everything up and tie the flavors together. Always taste as you go!
  • Optional: Sriracha or Red Food Coloring Gel: For those who truly want to lean into the “eyeball” aesthetic, a very tiny dot of sriracha on the olive pupil can give a truly bloodshot appearance, adding a little kick too. Alternatively, a toothpick dipped in red food coloring gel can create delicate “veins” if you’re feeling particularly artistic and want a more dramatic, less savory, visual effect. I usually stick with balsamic glaze for flavor, but these are fun options!

Gathering and Preparing Our Eyeball Components

Alright, my fellow culinary adventurers, let’s get our ingredients ready for their starring roles. This initial phase is all about precision and making sure each component is perfectly prepped to ensure a smooth assembly process and, ultimately, a stunning presentation. Think of it as the artistic groundwork for our “Skewered Beef Salami Eyeballs.”

  1. Drain and Prepare the Bocconcini: First things first, we need to address our mozzarella. These little cheese balls, while delicious, come packed in liquid, and we absolutely do not want that moisture diluting our flavors or making our skewers soggy. So, carefully open your bocconcini container and pour the contents into a fine-mesh colander. Let them drain for at least 30 minutes. I often place the colander over a bowl to catch the liquid and even give them a gentle shake every now and then. For an extra measure, you can lightly pat them dry with a clean paper towel, but be very gentle; we don’t want to squish our perfect spheres. The goal here is firm, dry, and ready-to-be-skewered mozzarella.
  2. Prepare the Beef Salami “Irises”: Now, let’s turn our attention to the beef salami, which will form the vibrant “iris” of our eyeballs. If your salami slices are already perfectly sized, perhaps about 1.5 to 2 inches in diameter, you’re ahead of the game! However, if they are larger, you’ll want to trim them. I find that a small, round cookie cutter (the kind used for canapés or cutting pie crusts) is ideal for creating perfectly uniform circles. If you don’t have one, a sharp paring knife and a steady hand will do the trick. You can use the rim of a small glass or a shot glass as a template. The key here is uniformity – this will make your eyeballs look professional and consistent. Set these beautiful salami rounds aside on a plate.
  3. Slice the Olive “Pupils”: Next up are our pupils! Drain both your black and green olives. I like to pat them dry with a paper towel as well, just to remove any excess brine. Now, with a very sharp knife, carefully slice each olive into thin rounds. Aim for about 1/8-inch thick slices. You’ll likely get 3-4 good slices from each olive. Pay particular attention to getting a clean cut, especially if using pimento-stuffed green olives, as we want that little red center to be visible. Discard the very ends of the olives, as they won’t have that perfect round shape. Keep the black and green olive slices separate for now, as we might want to alternate them for visual interest.
  4. Wash and Prepare Fresh Produce: Give your cherry or grape tomatoes a good rinse under cool water and pat them dry. Similarly, gently wash your fresh basil leaves and carefully pat them dry with a paper towel or spin them in a salad spinner. For the basil, if you have very large leaves, you might want to gently tear them into smaller, more manageable pieces that will fit nicely on a skewer alongside the other components. Small, whole leaves are often the most aesthetically pleasing.
  5. Prepare the Skewers: If you’re using wooden skewers, now is the time to immerse them in a shallow dish or a tall glass of water. Let them soak for at least 30 minutes. This prevents them from splintering when you pierce the ingredients and makes the entire assembly process much smoother. If you’re using bamboo or metal skewers, you can skip this step. This preparation ensures that every element is at its prime, ready for us to transform them into our delightful “Skewered Beef Salami Eyeballs.”

Assembling Our Skewered Beef Salami Eyeballs

This is where the magic truly happens! Assembling these “Skewered Beef Salami Eyeballs” is a creative and somewhat meditative process. I find that once you get into a rhythm, it becomes quite enjoyable. We’re aiming for a balance of visual appeal and structural integrity, so each component needs to be carefully placed. Remember, the friendly first-person perspective is all about sharing my experience and tips with you.

  1. The Mozzarella Base: Pick up one of your pre-soaked skewers. The first item to go on is a drained bocconcini ball. Carefully thread it through the center of the mozzarella ball, pushing it about halfway down the skewer. The mozzarella acts as the “white” of the eye, so we want it to be prominent. Make sure the skewer passes cleanly through the center to keep the bocconcini stable and straight. If it wobbles, it might affect the overall presentation.
  2. Adding the Salami “Iris”: Now, it’s time for the “iris.” Take one of your perfectly cut beef salami rounds. Gently fold it in half, and then in half again, creating a small quadrant. This makes it easier to pierce. Carefully thread the folded salami onto the skewer, pushing it down so it rests snugly against the bocconcini. Once it’s past the tip of the skewer, you can gently unfold it, letting it lie flat against the cheese. You want the salami to sit flush against the bocconcini, creating a distinct “iris” effect. The rich color of the beef salami really starts to bring our eyeball to life!
  3. Positioning the Olive “Pupil”: With the iris in place, it’s time for the “pupil.” Select a single thin slice of either black or green olive. Carefully place it onto the very tip of the skewer, pushing it gently until it rests centered on top of the salami iris. The goal is to make it look like a perfectly round pupil staring out at your guests. If you have any olive slices that are slightly oblong or irregular, save them for snacking! We want only the best, most perfectly round pupils for our eyeballs. I often alternate between black and green olive pupils for a varied and more interesting display.
  4. The Basil Leaf Accent (and securement): To complete the “eyeball” portion and add a touch of freshness, select a small, fresh basil leaf. Gently fold it in half or just slightly cup it, and thread it onto the skewer directly behind the bocconcini. It acts not only as a garnish, providing a lovely splash of green and aromatic lift, but it also helps to slightly secure the bocconcini in place on the skewer, preventing it from sliding too far down. This step truly adds that gourmet touch and a pop of color that contrasts beautifully with the red and white.
  5. Adding the Cherry Tomato (Optional but Recommended): For an extra burst of freshness, color, and a little more substance to our skewer, I love to add a cherry or grape tomato. Thread one directly behind the basil leaf. This not only enhances the visual appeal with its vibrant red hue but also provides a lovely juicy counterpoint to the savory salami and creamy mozzarella. It makes the skewer feel more substantial and complete, turning it into a mini caprese-style bite alongside our spooky eyeball.
  6. Repeat and Arrange: Continue this assembly process, creating as many “Skewered Beef Salami Eyeballs” as you need or as your ingredients allow. As you finish each one, arrange them artfully on a large serving platter. I like to lay them out in rows or in a circular pattern, making them easy for guests to pick up. A large, flat platter or a long rectangular board works best for showcasing these creepy-cute creations. Be sure to leave a little space between each skewer for easier grabbing later. This attention to arrangement makes a big difference in presentation!

Finishing Touches and Presentation

We’re almost there! Once all our “Skewered Beef Salami Eyeballs” are assembled, these final touches are what truly elevate them from simple appetizers to show-stopping party food. This is where we add that last layer of flavor, visual intrigue, and ensure they’re ready to impress. Think of it as painting the final strokes on a masterpiece – every detail counts!

  1. The Balsamic Glaze “Veins”: Now for the most visually impactful step: creating those wonderfully eerie “bloodshot veins” with balsamic glaze. Take your balsamic glaze and, holding it a few inches above the assembled skewers, gently drizzle it in thin, delicate lines over the “eyeballs.” Focus on letting some of the glaze trace over the bocconcini, salami, and olives, creating a marbling effect that truly sells the “eyeball” concept. Don’t overdo it; a little goes a long way. The rich, dark color and slightly viscous texture of the glaze are perfect for this. It not only adds a fantastic sweet-tart flavor but also makes them incredibly striking to look at. If you want to be extra precise, you can use a small spoon or even a squeeze bottle with a fine tip.
  2. A Kiss of Olive Oil: After the balsamic glaze, I like to give the skewers a very light drizzle of extra virgin olive oil. This adds a beautiful, subtle sheen to all the components and a touch of fruity richness that enhances the fresh mozzarella and basil. It’s a very light application, almost a mist, just enough to make them glisten and look even more appetizing. I usually just wave the bottle over the platter, letting a fine stream fall across the skewers.
  3. Seasoning to Perfection: A final whisper of seasoning can tie everything together beautifully. Lightly sprinkle a pinch of sea salt and a tiny dash of freshly ground black pepper over the entire platter. Remember, the salami and olives are already quite savory, so this is just to brighten the fresh mozzarella and tomatoes, enhancing their natural flavors without overpowering them. Taste one yourself to check the balance of flavors!
  4. Final Garnish and Arrangement: If you have any remaining fresh basil leaves or perhaps some very finely chopped fresh parsley or chives, you can sprinkle them around the platter for an added touch of fresh green color. Sometimes I’ll also add a few extra cherry tomatoes or even some whole olives scattered artistically around the skewers to fill out the platter and provide additional elements for visual interest. Arrange the “Skewered Beef Salami Eyeballs” so they are easily accessible for your guests. You might even consider placing a small bowl of toothpicks nearby if you want to make it even easier for guests to grab them.
  5. Serving Suggestions and Storage: These “Skewered Beef Salami Eyeballs” are best served chilled or at room temperature. If you’re making them ahead of time, which I highly recommend for party planning, you can assemble them up to 2-3 hours in advance, cover the platter loosely with plastic wrap, and store them in the refrigerator. Just hold off on the balsamic glaze, olive oil, and final seasoning until just before serving to maintain freshness and prevent sogginess. This ensures the mozzarella stays firm and the basil vibrant. They are perfect for Halloween parties, themed gatherings, or just a fun, conversation-starting appetizer any time of year. Believe me, these will be a truly memorable and delicious addition to any spread! Enjoy watching your guests marvel at these delightfully eerie creations, perhaps even before they realize how truly tasty they are.

Creepy-Cute Skewered Beef Salami Eyeballs for Halloween Fun!

Conclusion:

And there you have it, my friends! We’ve journeyed through the simple steps to create a truly unforgettable appetizer that’s bound to be the talk of any gathering. I genuinely believe that this recipe for our delightful Skewered Beef Salami Eyeballs isn’t just another dish; it’s an experience. It’s an opportunity to transform humble ingredients into something visually spectacular and surprisingly delicious. What truly makes this recipe a must-try, in my honest opinion, is its unparalleled ability to blend playful presentation with a robust, satisfying flavor profile. You get that wonderful savory punch from the beef salami, complemented by the subtle tang of the cream cheese, and the briny pop from the olive, all in one perfectly balanced bite. It’s a testament to the idea that sometimes, the most impressive dishes are also the most straightforward to prepare.

I can tell you from personal experience, the moment these skewers hit the serving platter, eyes light up – often with a mix of curiosity and slight apprehension – quickly followed by delighted surprise once tasted. It’s a guaranteed conversation starter, a centerpiece that practically begs for compliments, and a testament to your culinary creativity without demanding hours in the kitchen. Forget slaving away; this recipe is all about maximizing impact with minimal fuss, making it ideal for busy hosts who still want to wow their guests. Whether you’re planning a Halloween bash, a spooky movie night, or simply looking for an appetizer that breaks away from the ordinary, these “eyeballs” fit the bill perfectly. Their unique aesthetic ensures they stand out on any buffet, tempting even the most hesitant of eaters to take a closer look and, inevitably, a bite.

Now, when it comes to serving these fantastic creations, the possibilities are delightfully open. For a casual gathering, arranging them artfully on a large platter alongside some crisp crackers or toasted baguette slices is always a winning move. Consider pairing them with a variety of dipping sauces to cater to different palates. A classic stone-ground mustard offers a delightful zing that cuts through the richness of the salami beautifully. For those who enjoy a little heat, a sriracha-mayo dip or a smoky chipotle aioli would add an exciting kick. If you’re aiming for a more elegant presentation, a drizzle of high-quality balsamic glaze over the platter just before serving can add a touch of sophistication and a lovely sweet-tart counterpoint. For beverages, these pair wonderfully with a robust craft beer, a crisp, dry white wine, or even a spiced cider if you’re leaning into the autumnal vibes.

But why stop there? This recipe is incredibly adaptable, encouraging you to play around with variations.

Fancy a different flavor profile?

Try using a spicier Calabrese salami for an extra kick, or a milder Genoa salami for a more subtle taste. You could even experiment with different types of cheese fillings – perhaps a herbed cream cheese, or a sharp cheddar spread for a more intense flavor. For the “pupil,” while black olives are classic, consider using small capers, a sliver of pimento, or even a tiny piece of blue cheese to create different visual effects and flavor combinations. And if you want to extend the skewer, intersperse the “eyeballs” with cherry tomatoes, small cubes of mozzarella, or even a marinated artichoke heart for added texture and taste. The beauty of this dish lies in its flexibility, allowing you to tailor it precisely to your preferences and the occasion.

So, my culinary comrades, I wholeheartedly urge you to roll up your sleeves and give these Skewered Beef Salami Eyeballs a try. Don’t be shy! Embrace the fun, enjoy the process, and prepare to bask in the glow of your guests’ admiration. I truly believe you’ll be thrilled with the results – both in taste and in the sheer delight they bring to those who try them. Once you’ve whipped up your batch, please, please, please come back and tell me all about your experience! I absolutely love hearing how recipes turn out in your kitchens. Share your photos, your serving suggestions, or any clever variations you came up with in the comments below or on social media. Your insights and creativity inspire me and other readers. Let’s build a community of adventurous home cooks who aren’t afraid to have a little fun with their food. Happy cooking, and I can’t wait to hear from you!


Creepy-Cute Skewered Beef Salami Eyeballs

Creepy-Cute Skewered Beef Salami Eyeballs

Transform your appetizer game with these whimsical Skewered Beef Salami Eyeballs! Perfectly bite-sized, flavorful morsels crafted from savory beef salami and creamy mozzarella, topped with olive pupils and drizzled with balsamic glaze for a spooky yet delicious Halloween treat or conversation-starting party snack.

Prep Time
1 Hours

Cook Time
PT0S

Total Time
1 Hours

Servings
24-30 skewers

Ingredients

  • 18-24 oz (500-680g) Fresh Bocconcini Mozzarella Balls, cherry-sized, well-drained
  • 12-16 slices High-Quality Beef Salami, thinly sliced (2-3 inches diameter)
  • 1 can (6 oz / 170g) Pitted Black Olives, thinly sliced
  • 1 can (6 oz / 170g) Pitted Green Olives (with pimento, optional), thinly sliced
  • 24-30 Small Wooden Skewers (4-6 inches long), soaked if wooden
  • 1 pint (2 cups) Cherry or Grape Tomatoes, rinsed and dried
  • 1/4 cup Fresh Basil Leaves, washed and dried
  • 2-3 tbsp High-Quality Balsamic Glaze
  • 2 tbsp Extra Virgin Olive Oil
  • Pinch of Sea Salt
  • Pinch of Freshly Ground Black Pepper
  • Optional: Sriracha or Red Food Coloring Gel for extra detail

Instructions

  1. Step 1
    Drain bocconcini for at least 30 minutes, gently pat dry. If salami slices are large, trim them to 1.5-2 inches diameter. Thinly slice both black and green pitted olives into rounds (approx. 1/8-inch thick). Wash and dry tomatoes and basil. Soak wooden skewers in water for at least 30 minutes.
  2. Step 2
    Thread a drained bocconcini ball about halfway down a skewer. Fold a salami round in half twice, then thread it onto the skewer, unfolding it to lie flat against the bocconcini, creating the ‘iris’.
  3. Step 3
    Select a thin olive slice (black or green) and gently push it onto the very tip of the skewer, centering it on the salami ‘iris’ to form the ‘pupil’.
  4. Step 4
    Place a small fresh basil leaf behind the bocconcini on the skewer, followed by a cherry or grape tomato (optional but recommended for color and substance).
  5. Step 5
    Repeat steps 2-4 to assemble all skewers. Arrange them artfully on a serving platter.
  6. Step 6
    Drizzle balsamic glaze gently over the ‘eyeballs’ to create ‘bloodshot veins’. Lightly drizzle with extra virgin olive oil. Season with a pinch of sea salt and freshly ground black pepper. Optionally, add a tiny dot of sriracha or red food coloring gel to the olive pupils for more dramatic ‘bloodshot’ effect.
  7. Step 7
    Serve chilled or at room temperature. Can be assembled 2-3 hours in advance; add glaze, oil, and seasoning just before serving for best results. Garnish with extra basil or tomatoes if desired.

Important Information

Nutrition Facts (Per Serving)

It is important to consider this information as approximate and not to use it as definitive health advice.

Allergy Information

Please check ingredients for potential allergens and consult a health professional if in doubt.

« Previous Post
Skellington Cheese Ball: Easy Halloween Appetizer Recipe
Next Post »
Delicious Easy Lasagna Soup Recipe - Family Favorite Dinner

If you enjoyed this…

Halloween Mummy Hot Dogs: Spooky Fun Food Recipe

Crispy Air Fryer Pizza Cheese Bread Twists Recipe

Meaty Texas Trash Dip: Ultimate Game Day Beef Dip!

Primary Sidebar

Browse by Diet

BreakfastDinnerLunchDessertAppetizer

Sweet Peach Yogurt Parfait Delight

One of my fondest memories is from a lazy summer afternoon spent at my grandmother’s house. The sun filtered through the kitchen window, casting a warm glow over the table where she would create her culinary magic. It was during one of those blissful moments that I first tasted her Peach Yogurt Parfait with Honey and Granola. The sweet aroma of ripe peaches mingling with creamy yogurt and the crunch of granola was nothing short of heavenly. It felt like summer captured in a bowl, and I still remember the joy of diving in with a spoon, each layer revealing a new burst of flavor.

When I think about that parfait, I can almost hear the gentle hum of the bees outside, reminding me of the floral notes that honey brings to every bite. The vibrant yellows and soft oranges of the peaches contrast beautifully with the creamy white yogurt and the golden crunch of granola. It’s a dish that not only looks delightful but also tastes like a celebration of fresh, wholesome ingredients.

What makes my version of this Peach Yogurt Parfait special is the careful balance of flavors and textures. I use ripe, juicy peaches, drizzled with locally sourced honey, and a homemade granola that’s bursting with nuts and seeds for an extra crunch. It’s a simple dish, but every layer is crafted with love and attention.

Let me show you exactly how to make this delightful parfait, so you can bring a bit of that summer magic into your kitchen!

Sweet Peach Yogurt Parfait Delight

Why You’ll Love This Recipe

  • Delightfully creamy texture from the Greek yogurt, paired with the juicy sweetness of fresh peaches.
  • Ready in under 20 minutes, making it a quick and satisfying breakfast or snack option.
  • Budget-friendly, using common ingredients that you may already have in your pantry.
  • Customizable with your favorite granola and nuts, allowing you to tailor each parfait to your taste.
  • Perfectly balanced flavors with the bright acidity of lemon juice and the sweetness of honey enhancing the peaches.

Ingredients

  • For the Parfait:
  • 2 cups plain Greek yogurt (or vanilla yogurt for a sweeter option)
  • 2 large ripe peaches, diced (about 2 cups)
  • 1 tablespoon fresh lemon juice (to prevent browning of peaches)
  • 2 tablespoons honey (plus more for drizzling)
  • 1 teaspoon vanilla extract (optional for extra flavor)
  • For the Granola:
  • 1 cup granola (store-bought or homemade; see notes for a simple granola recipe)
  • 1/4 cup sliced almonds (optional for added crunch)
  • 1/4 cup shredded coconut (optional for added flavor)

Let’s dive into some key ingredients that make this Peach Yogurt Parfait so delightful! First, the Greek yogurt is not only creamy but also packed with protein, making it a satisfying option for breakfast or a snack. If you’re looking for a sweeter option, you can easily substitute it with vanilla yogurt, though it may alter the overall flavor balance. Next, the ripe peaches are the star of the show; their natural sweetness shines through, so I recommend choosing peaches that yield slightly to pressure, indicating they’re perfectly ripe. If peaches aren’t in season, feel free to use nectarines or even frozen peaches—just thaw them before use. Finally, honey adds a lovely floral sweetness that ties everything together. If you prefer, maple syrup can serve as a delicious substitute.

Step-by-Step Instructions

  1. Start by preparing the peaches. Wash them thoroughly, then slice and dice them into bite-sized pieces. In a medium bowl, toss the diced peaches with 1 tablespoon of fresh lemon juice to prevent browning. Set aside for about 5 minutes while the lemon juice works its magic.
  2. In a separate bowl, combine the Greek yogurt, 2 tablespoons of honey, and 1 teaspoon of vanilla extract if using. Stir the mixture until smooth and thoroughly blended. This should take about a minute. Avoid overmixing to maintain the creaminess of the yogurt.
  3. Now it’s time to layer your parfait. Grab a clear glass or bowl to showcase your beautiful creation. Start with a generous spoonful of the yogurt mixture at the bottom—about 1/4 cup will do. Use a spoon to spread it evenly.
  4. Add a layer of the diced peaches over the yogurt, ensuring they cover the yogurt completely. You might want to use about half of what you have prepared—roughly 1 cup. This layer should be visually appealing, so arrange the peaches neatly.
  5. Sprinkle 1/4 cup of granola over the peaches. This adds a delightful crunch. Make sure to distribute it evenly to ensure every bite has that satisfying texture. Avoid packing it down too tightly, as you want it to maintain its crunch.
  6. Repeat the layers: spoon in another 1/4 cup of yogurt, followed by another cup of peaches, and another sprinkle of granola. You should have at least two layers, but feel free to add more depending on your glass size.
  7. Finish off your parfait with a drizzle of honey on top for added sweetness and a touch of elegance. If you’re using sliced almonds or shredded coconut, sprinkle them on top now. It adds a lovely visual contrast and extra flavor.
  8. Serve immediately or refrigerate for up to 30 minutes before serving to allow the flavors to meld together. However, I recommend enjoying it fresh to maintain the granola’s crunch.

Pro Tips for the Best Peach Yogurt Parfait With Honey And Granola

  • Make sure to choose ripe peaches for the best flavor and texture. A common mistake is using unripe fruit, which can lead to a less enjoyable parfait. Look for peaches that are fragrant and slightly soft to the touch.
  • Use a clear glass to assemble your parfait; this not only makes for a beautiful presentation but also allows you to see the colorful layers, which adds to the enjoyment of eating it.
  • For an even creamier texture, consider whipping the Greek yogurt with a hand mixer for a couple of minutes before layering. This small adjustment makes a huge difference in mouthfeel.
  • Be mindful of the granola-to-yogurt ratio. Too much granola can overwhelm the parfait, while too little can make it feel too creamy. Aim for about 1/4 cup of granola per layer for the perfect balance.
  • If you’re making this for a gathering, consider preparing the yogurt and peaches ahead of time and layering them just before serving. This ensures the granola stays crunchy!

Variations & Serving Ideas

There are so many ways to get creative with your Peach Yogurt Parfait! For a tropical twist, swap out the peaches for mangoes or pineapples and top with coconut flakes. If you prefer a berry flavor, mix in some blueberries or strawberries with the peaches for added color and taste. For a nutty version, incorporate chopped walnuts or pecans instead of almonds.

As for serving ideas, this parfait pairs beautifully with a side of scrambled eggs for a hearty breakfast or fresh fruit salad for a light lunch. You might also enjoy it alongside whole grain toast with almond butter for an energizing snack. The contrast of flavors and textures will elevate your meal experience!

Storage, Make-Ahead & Reheating

The Peach Yogurt Parfait is best enjoyed fresh, but you can prepare some components ahead of time. Store the layered parfait in an airtight container in the refrigerator for up to 24 hours. However, be cautious; the granola may lose its crunch if stored too long. You can freeze the yogurt and peach mixture for up to 2 months; just remember to thaw it in the refrigerator overnight before serving.

If you plan to enjoy this dish the next day, it can taste even better as the flavors meld together. Just remember to add the granola right before serving to keep its delightful crunch!

Frequently Asked Questions

Can I make Peach Yogurt Parfait With Honey And Granola ahead of time?

Yes — in fact, it tastes even better the next day as the flavors meld. However, I recommend waiting to add the granola until just before serving to maintain its crunch.

What can I substitute for Greek yogurt?

If you prefer a lighter option, you can substitute Greek yogurt with regular yogurt or a dairy-free alternative like coconut yogurt. Just remember that this may alter the creaminess and flavor profile slightly.

Can I use frozen peaches for this parfait?

Absolutely! Just make sure to thaw the frozen peaches before using them. They will still add great flavor, though the texture may be slightly softer than fresh peaches.

How do I make the parfait vegan?

To make a vegan version, substitute the Greek yogurt with a plant-based yogurt alternative, and replace honey with maple syrup or agave nectar. This keeps the parfait sweet while adhering to a vegan diet.

What other fruits can I use in this recipe?

You can mix and match fruits based on your preference. Try using strawberries, blueberries, raspberries, or even bananas. Just make sure to adjust the lemon juice as needed to prevent browning.

Sweet Peach Yogurt Parfait Delight

Final Thoughts

The Peach Yogurt Parfait with Honey and Granola is a delightful blend of creamy yogurt, sweet peaches, and crunchy granola that creates a satisfying and nourishing treat. Each layer bursts with flavor, making it a perfect choice for breakfast or a light dessert.

This is the kind of recipe I come back to again and again, especially when I want something refreshing and wholesome to start my day. The harmony of sweet and tart flavors, combined with the delightful crunch, never fails to lift my spirits!

I encourage you to give this parfait a try and indulge in its comforting goodness. Feel free to share your results or even add your own twist—perhaps a sprinkle of cinnamon or a handful of nuts. Enjoy creating your perfect parfait!

Print
clock clock iconcutlery cutlery iconflag flag iconfolder folder iconinstagram instagram iconpinterest pinterest iconfacebook facebook iconprint print iconsquares squares iconheart heart iconheart solid heart solid icon

Peach Yogurt Parfait


  • Author: Lily author
  • Total Time: 15 minutes
  • Yield: 4 servings 1x
Pin Recipe
Print Recipe

Description

This Peach Yogurt Parfait combines creamy Greek yogurt, juicy peaches, and crunchy granola for a delightful treat. It’s a perfect breakfast or snack that captures the essence of summer in every bite.


Ingredients

Scale
  • For the Parfait:
  • 2 cups plain Greek yogurt (or vanilla yogurt for a sweeter option)
  • 2 large ripe peaches, diced (about 2 cups)
  • 1 tablespoon fresh lemon juice (to prevent browning of peaches)
  • 2 tablespoons honey (plus more for drizzling)
  • 1 teaspoon vanilla extract (optional for extra flavor)
  • For the Granola:
  • 1 cup granola (store-bought or homemade; see notes for a simple granola recipe)
  • 1/4 cup sliced almonds (optional for added crunch)
  • 1/4 cup shredded coconut (optional for added flavor)

Instructions

  1. Start by preparing the peaches. Wash them thoroughly, then slice and dice them into bite-sized pieces. In a medium bowl, toss the diced peaches with 1 tablespoon of fresh lemon juice to prevent browning. Set aside for about 5 minutes while the lemon juice works its magic.
  2. In a separate bowl, combine the Greek yogurt, 2 tablespoons of honey, and 1 teaspoon of vanilla extract if using. Stir the mixture until smooth and thoroughly blended. This should take about a minute. Avoid overmixing to maintain the creaminess of the yogurt.
  3. Now it’s time to layer your parfait. Grab a clear glass or bowl to showcase your beautiful creation. Start with a generous spoonful of the yogurt mixture at the bottom—about 1/4 cup will do. Use a spoon to spread it evenly.
  4. Add a layer of the diced peaches over the yogurt, ensuring they cover the yogurt completely. You might want to use about half of what you have prepared—roughly 1 cup. This layer should be visually appealing, so arrange the peaches neatly.
  5. Sprinkle 1/4 cup of granola over the peaches. This adds a delightful crunch. Make sure to distribute it evenly to ensure every bite has that satisfying texture. Avoid packing it down too tightly, as you want it to maintain its crunch.
  6. Repeat the layers: spoon in another 1/4 cup of yogurt, followed by another cup of peaches, and another sprinkle of granola. You should have at least two layers, but feel free to add more depending on your glass size.
  7. Finish off your parfait with a drizzle of honey on top for added sweetness and a touch of elegance. If you’re using sliced almonds or shredded coconut, sprinkle them on top now. It adds a lovely visual contrast and extra flavor.
  8. Serve immediately or refrigerate for up to 30 minutes before serving to allow the flavors to meld together. However, I recommend enjoying it fresh to maintain the granola’s crunch.
  • Prep Time: 15 mins
  • Cook Time: 0 mins
  • Category: Breakfast
  • Method: No-cook
  • Cuisine: American

Nutrition

  • Serving Size: 1 parfait
  • Calories: 250
  • Sugar: 20 g
  • Sodium: 50 mg
  • Fat: 5 g
  • Saturated Fat: 2 g
  • Unsaturated Fat: 3 g
  • Trans Fat: 0 g
  • Carbohydrates: 40 g
  • Fiber: 3 g
  • Protein: 10 g
  • Cholesterol: 10 mg

Keywords: Choose ripe peaches for the best flavor and texture. Use a clear glass for a beautiful presentation. For creaminess, consider whipping the yogurt before layering. Be mindful of the granola-to-yogurt ratio. Prepare yogurt and peaches ahead of time for gatherings, layering just before serving.

Did you make this recipe?

Share a photo and tag us — we can't wait to see what you've made!

Sun-Kissed Frozen Orange Cream Slush

As a child, summer days felt like they lasted forever. I remember the sticky heat wrapping around me as I played outside, my laughter mingling with the sounds of the neighborhood. But nothing could cool me down quite like the moment I’d spot my grandmother, laboring over her blender, whipping up her famous Frozen Orange Creamsicle Slush. That vibrant orange treat, with its frosty texture and sweet citrus aroma, was like a burst of sunshine in a cup. Just one sip, and I could feel the coolness wash over me, sparking pure joy.

This Frozen Orange Creamsicle Slush has a way of making you feel like a kid again. Its creamy, dreamy consistency is a delightful balance of bright orange and soft vanilla, inviting you to dive right in. The refreshing tang of orange dances on your tongue, while the smooth creaminess envelops you in a comforting embrace. It’s a nostalgic treat that’s perfect for hot summer afternoons or anytime you need a little pick-me-up.

What makes my version of this slush stand out is the addition of a hint of vanilla bean, which elevates the flavor and adds an extra layer of richness. Plus, it’s super easy to whip up with just a few simple ingredients that you probably already have on hand! So, if you’re ready to relive those sun-soaked memories, let me show you exactly how to make it.

Sun-Kissed Frozen Orange Cream Slush

Why You’ll Love This Recipe

  • Each slush is a perfect blend of creamy vanilla and zesty orange, creating a nostalgic flavor reminiscent of summer days.
  • This refreshing treat is ready in under 15 minutes, making it an ideal quick dessert for unexpected guests or hot afternoons.
  • With just 8 simple ingredients, it’s budget-friendly, ensuring you don’t have to break the bank to enjoy a delicious slush.
  • The slush has a perfectly smooth texture, thanks to the combination of ice and ice cream, providing a delightful contrast to the bright citrus flavors.
  • It’s highly customizable; you can easily adjust the sweetness and add fresh herbs for a unique twist that suits your taste.

Ingredients

  • 2 cups orange juice (freshly squeezed or store-bought)
  • 1 cup vanilla ice cream
  • 1 cup crushed ice
  • 1/2 cup milk (whole or 2%)
  • 1/4 cup granulated sugar (adjust based on sweetness preference)
  • 1 teaspoon vanilla extract
  • Zest of 1 orange (for added flavor)
  • Fresh orange slices and mint leaves (for garnish)

The star of this Frozen Orange Creamsicle Slush is the orange juice, which provides the vibrant, citrusy base. Freshly squeezed juice will yield the brightest flavor, but store-bought options can be just as convenient. If you’re opting for store-bought, choose 100% pure juice with no added sugars for the best results. Another essential ingredient is the vanilla ice cream; it adds creaminess and sweetness. You can substitute it with dairy-free ice cream if you’re looking for a vegan option. Whole or 2% milk complements the ice cream, creating a smooth blend. If you want a lower-calorie version, almond or oat milk can be good alternatives.

Lastly, the granulated sugar can be adjusted based on your sweetness preference. If you prefer a more natural sweetener, consider using honey or agave syrup. The orange zest enhances the flavor profile, providing an aromatic pop that brings the whole slush together. Don’t skip it! It adds an extra layer of brightness that makes this slush truly special.

Step-by-Step Instructions

  1. Start by preparing your ingredients. Gather 2 cups of orange juice, 1 cup of vanilla ice cream, and 1 cup of crushed ice. Make sure the ice is finely crushed, as larger chunks can make blending difficult.
  2. In a blender, combine the orange juice, vanilla ice cream, crushed ice, and 1/2 cup of milk. Add 1/4 cup of granulated sugar and 1 teaspoon of vanilla extract. If you like a sweeter slush, consider adding a bit more sugar at this stage.
  3. Add the zest of 1 orange to the blender. This step is crucial for enhancing the citrus flavor of your slush. Make sure not to include the bitter white pith—only the flavorful zest.
  4. Blend the mixture on medium-high speed for about 30-45 seconds. Stop once the ingredients are fully combined and the slush has a smooth, even consistency. If you notice large chunks of ice, blend for an additional 10-15 seconds. Avoid over-blending, as this can make the slush too liquidy.
  5. Once blended, taste the slush. If it needs more sweetness, add a little more sugar and blend for a few more seconds. If it’s too thick, you can add a splash of milk to reach your desired consistency.
  6. Pour the slush into glasses. This recipe typically serves 4, but you can easily double it for larger gatherings. Use a spoon to help guide the slush into the glasses if needed.
  7. Garnish each serving with fresh orange slices and mint leaves. The mint not only adds a pop of color but also a refreshing aroma that complements the citrus flavors beautifully.
  8. Serve immediately and enjoy! If you’ve made extra, you can refrigerate it for a short time, but it’s best enjoyed fresh.

Pro Tips for the Best Frozen Orange Creamsicle Slush

  • Don’t skip the orange zest! It’s a game-changer for flavor. Always zest before juicing to make it easier.
  • Use a high-powered blender for the best texture. A standard blender may struggle with ice, leading to uneven consistency. If you have a food processor, that can work too, but ensure the ice is finely crushed.
  • Adjust the ice-to-liquid ratio carefully. If your slush is too thick, it won’t blend well. Start with less ice and add more until you reach your preferred texture.
  • Be cautious with the sugar! Always start with the lower amount, as you can easily add more, but it’s hard to fix an overly sweet slush.
  • For a fun twist, consider adding a splash of coconut milk or a handful of fresh fruit like strawberries or pineapple. This not only enhances the flavor but also adds a beautiful color contrast.

Variations & Serving Ideas

There are countless ways to put a spin on your Frozen Orange Creamsicle Slush. Consider making a tropical version by adding in some pineapple juice or coconut milk for a delightful tropical twist. If you’re feeling adventurous, try incorporating a handful of frozen mango or peach slices for added sweetness. For a lighter version, swap out the vanilla ice cream for Greek yogurt for a creamy yet tangy alternative.

As for serving ideas, this refreshing slush pairs wonderfully with light summer dishes like grilled chicken skewers, fish tacos, or a simple salad topped with citrus vinaigrette. The bright, zesty flavors of the slush complement these dishes perfectly, making them an ideal pairing for a sunny day.

Storage, Make-Ahead & Reheating

This Frozen Orange Creamsicle Slush is best enjoyed fresh, but if you have leftovers, you can store them in an airtight container in the fridge for up to 2 days. Just keep in mind that the slush may lose some of its texture over time as the ice melts. It doesn’t freeze well, as the ice will turn into a solid block. If you must freeze it, blend again after thawing to restore the slushy consistency. This treat is best the day you make it, as the flavors meld together beautifully overnight, enhancing its deliciousness.

Frequently Asked Questions

Can I make Frozen Orange Creamsicle Slush ahead of time?

Yes — in fact, it tastes even better the next day as the flavors meld. However, it’s best to enjoy it fresh, as the texture can change if stored for too long. If you need to prepare it ahead, keep it in the fridge and re-blend before serving.

What kind of orange juice should I use?

For the best flavor, use freshly squeezed orange juice. However, if you’re short on time, opt for 100% pure store-bought juice without added sugars. This will ensure that your slush remains flavorful and refreshing.

Can I substitute the vanilla ice cream?

Absolutely! If you’re looking for a dairy-free option, coconut milk ice cream or a non-dairy vanilla ice cream can work wonderfully. They will still provide the creamy texture and sweetness you desire.

How can I adjust the sweetness of my slush?

You can easily adjust the sweetness by modifying the amount of sugar added. Start with 1/4 cup and taste the mixture before blending. If you prefer it sweeter, add more sugar gradually until it reaches your desired level.

What should I do if my slush is too thick?

If your slush is too thick, simply add a splash of milk or orange juice and blend again. This will help achieve a more drinkable consistency while maintaining the slushy texture. Adjust gradually to reach your preferred thickness.

Sun-Kissed Frozen Orange Cream Slush

Final Thoughts

The Frozen Orange Creamsicle Slush is a delightful blend of refreshing citrus and creamy goodness, making it a perfect treat for warm days or any time you crave a taste of nostalgia. The way the bright orange flavor dances with the creamy texture truly elevates this slush, transforming it into a satisfying escape from the everyday.

This is the kind of recipe I come back to again and again, especially when I’m looking to cool down or impress guests at a summer gathering. It’s simple to make and always brings smiles all around! I encourage you to try this recipe for yourself—don’t hesitate to share your results or even put your own spin on it. Happy slushing!

Print
clock clock iconcutlery cutlery iconflag flag iconfolder folder iconinstagram instagram iconpinterest pinterest iconfacebook facebook iconprint print iconsquares squares iconheart heart iconheart solid heart solid icon

Frozen Orange Creamsicle Slush


  • Author: Lily author
  • Total Time: 15 minutes
  • Yield: 4 servings 1x
Pin Recipe
Print Recipe

Description

This Frozen Orange Creamsicle Slush is a refreshing treat that combines creamy vanilla and zesty orange flavors. Perfect for hot summer days, it brings back nostalgic memories with every sip.


Ingredients

Scale
  • 2 cups orange juice (freshly squeezed or store-bought)
  • 1 cup vanilla ice cream
  • 1 cup crushed ice
  • 1/2 cup milk (whole or 2%)
  • 1/4 cup granulated sugar (adjust based on sweetness preference)
  • 1 teaspoon vanilla extract
  • Zest of 1 orange (for added flavor)
  • Fresh orange slices and mint leaves (for garnish)

Instructions

  1. Start by preparing your ingredients. Gather 2 cups of orange juice, 1 cup of vanilla ice cream, and 1 cup of crushed ice. Make sure the ice is finely crushed, as larger chunks can make blending difficult.
  2. In a blender, combine the orange juice, vanilla ice cream, crushed ice, and 1/2 cup of milk. Add 1/4 cup of granulated sugar and 1 teaspoon of vanilla extract. If you like a sweeter slush, consider adding a bit more sugar at this stage.
  3. Add the zest of 1 orange to the blender. This step is crucial for enhancing the citrus flavor of your slush. Make sure not to include the bitter white pith—only the flavorful zest.
  4. Blend the mixture on medium-high speed for about 30-45 seconds. Stop once the ingredients are fully combined and the slush has a smooth, even consistency. If you notice large chunks of ice, blend for an additional 10-15 seconds. Avoid over-blending, as this can make the slush too liquidy.
  5. Once blended, taste the slush. If it needs more sweetness, add a little more sugar and blend for a few more seconds. If it’s too thick, you can add a splash of milk to reach your desired consistency.
  6. Pour the slush into glasses. This recipe typically serves 4, but you can easily double it for larger gatherings. Use a spoon to help guide the slush into the glasses if needed.
  7. Garnish each serving with fresh orange slices and mint leaves. The mint not only adds a pop of color but also a refreshing aroma that complements the citrus flavors beautifully.
  8. Serve immediately and enjoy! If you’ve made extra, you can refrigerate it for a short time, but it's best enjoyed fresh.
  • Prep Time: 15 min
  • Cook Time: 0 min
  • Category: Dessert
  • Method: Blending
  • Cuisine: American

Nutrition

  • Serving Size: 1 serving
  • Calories: 200
  • Sugar: 30 g
  • Sodium: 50 mg
  • Fat: 5 g
  • Saturated Fat: 3 g
  • Unsaturated Fat: 2 g
  • Trans Fat: 0 g
  • Carbohydrates: 40 g
  • Fiber: 1 g
  • Protein: 2 g
  • Cholesterol: 20 mg

Keywords: Don't skip the orange zest! It's a game-changer for flavor. Always zest before juicing to make it easier.

Did you make this recipe?

Share a photo and tag us — we can't wait to see what you've made!

Zesty Lemon Poppy Seed Delight

One rainy afternoon, I found myself in my grandmother’s cozy kitchen, the kind that always smelled like warmth and love. She was whipping up her famous Lemon Poppy Seed Loaf, a recipe that had been passed down through generations. As the batter came together, the zesty aroma of fresh lemons filled the air, mingling perfectly with the nutty fragrance of poppy seeds. I can still picture her, apron-clad, as she expertly drizzled a vibrant citrus icing over the loaf, creating a glossy, sun-kissed finish that beckoned us to dive in. It was a moment that sparked my own passion for baking, and this recipe has become a cherished staple in my home ever since.

When you take a bite of this Lemon Poppy Seed Loaf, it’s like a burst of sunshine on your palate. The loaf is beautifully golden, with a tender crumb that melts in your mouth. Each slice is speckled with tiny poppy seeds, adding a delightful crunch that contrasts beautifully with the tangy sweetness of the lemon. And that citrus icing? It’s the finishing touch that elevates this loaf from ordinary to extraordinary, with its bright, zesty flavor dancing on your taste buds.

This recipe stands out because it embraces simplicity while delivering on flavor. I’ve added a hint of vanilla to the batter, enhancing the overall taste and making it even more indulgent. Trust me, once you make this Lemon Poppy Seed Loaf With Citrus Icing, it’ll become a go-to in your baking repertoire.

So, let me show you exactly how to make it!

Zesty Lemon Poppy Seed Delight

Why You’ll Love This Recipe

  • Moist and tender crumb that melts in your mouth, thanks to the perfect balance of butter and buttermilk.
  • Bright, zesty lemon flavor paired with crunchy poppy seeds, creating a delightful texture and taste experience.
  • Easy to whip up in just about an hour, perfect for last-minute gatherings or a cozy afternoon treat.
  • Budget-friendly with everyday ingredients, making it an accessible option for all home bakers.
  • The citrus icing adds a sweet tang that elevates the loaf, turning a simple recipe into a showstopper!

Ingredients

  • 1 ½ cups (190g) all-purpose flour
  • 1 teaspoon baking powder
  • ½ teaspoon baking soda
  • ½ teaspoon salt
  • 3 tablespoons poppy seeds
  • ½ cup (115g) unsalted butter, softened to room temperature
  • 1 cup (200g) granulated sugar
  • 2 large eggs
  • 1 teaspoon vanilla extract
  • 1 teaspoon lemon zest (from about 1 medium lemon)
  • ½ cup (120ml) buttermilk
  • 2 tablespoons fresh lemon juice

For the Citrus Icing:

  • 1 cup (120g) powdered sugar
  • 2 tablespoons fresh lemon juice
  • 1 tablespoon orange juice
  • 1 teaspoon lemon zest (for garnish, optional)

Let’s dive into the key ingredients that make this Lemon Poppy Seed Loaf so special. The all-purpose flour provides the structure and base for the loaf, while the baking powder and baking soda ensure it rises perfectly, giving the loaf a light texture. For a gluten-free variation, you could substitute the flour with a gluten-free all-purpose blend. Poppy seeds not only add a delightful crunch but also contribute to the unique flavor profile that pairs well with the citrus notes.

Unsalted butter is crucial for achieving the buttery richness that makes this loaf so moist. If you’re looking for a dairy-free option, coconut oil or a vegan butter can be used instead. The buttermilk is another essential component, providing acidity that activates the baking soda for a fluffy texture. If you don’t have buttermilk on hand, you can easily make a substitute by mixing ½ cup of milk with 1 tablespoon of vinegar or lemon juice and letting it sit for about 5 minutes.

Step-by-Step Instructions

  1. Preheat your oven to 350°F (175°C). Grease a 9×5-inch loaf pan or line it with parchment paper for easy removal later.
  2. In a medium mixing bowl, whisk together 1 ½ cups of all-purpose flour, 1 teaspoon of baking powder, ½ teaspoon of baking soda, ½ teaspoon of salt, and 3 tablespoons of poppy seeds. This helps to evenly distribute the baking agents and ensures a uniform rise.
  3. In a large mixing bowl, cream together ½ cup of softened unsalted butter and 1 cup of granulated sugar using an electric mixer on medium speed for about 3-4 minutes, until the mixture is light and fluffy. Make sure to scrape down the sides of the bowl occasionally.
  4. Add 2 large eggs, 1 teaspoon of vanilla extract, and 1 teaspoon of lemon zest to the creamed butter and sugar, mixing until fully combined. You want a smooth consistency, so ensure there are no lumps of butter.
  5. In a small bowl, combine ½ cup of buttermilk and 2 tablespoons of fresh lemon juice. Alternately add the dry ingredients and buttermilk mixture to the butter mixture, starting and ending with the dry ingredients. Mix just until combined; do not overmix, as this can lead to a dense loaf.
  6. Pour the batter into the prepared loaf pan. Smooth the top with a spatula, ensuring it’s even. Bake in the preheated oven for 50-60 minutes, or until a toothpick inserted in the center comes out clean. The edges should be lightly golden brown, and the center should feel just set.
  7. Once baked, remove the loaf from the oven and allow it to cool in the pan for about 10 minutes. Then, transfer it to a wire rack to cool completely. Resist the urge to slice too soon, as it will be crumbly if it’s still warm.
  8. While the loaf is cooling, prepare the citrus icing. In a medium bowl, whisk together 1 cup of powdered sugar, 2 tablespoons of fresh lemon juice, and 1 tablespoon of orange juice until smooth. If the icing is too thick, you can add a little more juice to reach your desired consistency.
  9. Once the loaf is completely cool, drizzle the citrus icing over the top. If you like, sprinkle with an additional teaspoon of lemon zest for an extra pop of flavor and color.

Pro Tips for the Best Lemon Poppy Seed Loaf With Citrus Icing

  • Be careful not to overmix your batter; this is a common mistake that can lead to a dense loaf. Mix just until the dry ingredients are incorporated for a light and fluffy texture.
  • Use room temperature ingredients, especially the butter and eggs. This helps to create a smoother batter and ensures even baking. Take your eggs out of the fridge about 30 minutes before you start.
  • For a more pronounced lemon flavor, consider adding a little lemon extract in addition to the zest and juice. Just a half teaspoon can elevate the citrus notes significantly.
  • When measuring your flour, spoon it into the measuring cup and level it off with a knife instead of scooping directly from the bag. This prevents packing and ensures you don’t end up with a dry loaf.
  • Invest in a good quality loaf pan; it makes a difference in heat distribution, which ensures even baking. If your pan is dark-coated, reduce the oven temperature by 25°F to prevent over-browning.

Variations & Serving Ideas

For a delightful twist, consider adding blueberries or raspberries to the batter for a fruity burst of flavor. You can also experiment with different citrus fruits—try lime or grapefruit zest and juice for a refreshing change. For a healthier option, substitute half of the all-purpose flour with whole wheat flour for added fiber without compromising too much on texture.

This Lemon Poppy Seed Loaf pairs beautifully with a light salad, such as a mixed greens salad with a vinaigrette, or a cup of tea for a cozy afternoon treat. It also complements a creamy cheese platter, as the acidity of the loaf balances rich cheeses perfectly. Lastly, a scoop of vanilla ice cream on the side creates a delightful contrast of temperatures and flavors!

Storage, Make-Ahead & Reheating

This Lemon Poppy Seed Loaf can be stored at room temperature for up to 3 days if wrapped tightly in plastic wrap. If you want to keep it longer, it freezes well for up to 3 months. To freeze, wrap the loaf tightly in plastic wrap and then in aluminum foil to prevent freezer burn.

When you’re ready to enjoy it again, simply thaw it in the fridge overnight. Reheat individual slices in the microwave for 15-20 seconds or in a toaster oven until warmed through. Interestingly, many people find that this loaf tastes even better the next day, as the flavors have time to meld!

Frequently Asked Questions

Can I make Lemon Poppy Seed Loaf With Citrus Icing ahead of time?

Yes — in fact, it tastes even better the next day! You can make the loaf a day in advance, allowing the flavors to develop. Just be sure to store it in an airtight container to maintain its moisture.

Can I substitute the poppy seeds?

Absolutely! If you don’t have poppy seeds on hand or prefer an alternative, you can use sesame seeds for a similar crunch or omit them entirely for a smooth loaf.

What can I use instead of buttermilk?

If you don’t have buttermilk, you can easily create a substitute by mixing ½ cup of milk (dairy or plant-based) with 1 tablespoon of vinegar or lemon juice. Let it sit for 5 minutes before using in the recipe.

How can I make this recipe gluten-free?

To make a gluten-free version of this Lemon Poppy Seed Loaf, substitute the all-purpose flour with a gluten-free all-purpose flour blend. Just ensure that the blend contains a binding agent like xanthan gum for the best results.

What is the best way to store leftover loaf?

Leftover Lemon Poppy Seed Loaf should be stored in an airtight container at room temperature for up to 3 days. For longer storage, wrap it tightly and freeze for up to 3 months. Thaw it before serving for the best texture.

Zesty Lemon Poppy Seed Delight

Final Thoughts

The Lemon Poppy Seed Loaf with Citrus Icing is truly a delightful treat that brings a burst of brightness to any occasion. The zesty lemon flavor combined with the subtle crunch of poppy seeds creates a satisfying balance, while the citrus icing adds a touch of sweetness that perfectly complements the loaf’s tanginess.

This is the kind of recipe I come back to again and again, especially when I want to brighten up a gloomy day or celebrate a small victory. The aroma that fills the kitchen as it bakes is absolutely heavenly! I encourage you to give this recipe a try; you might just find it becoming a beloved staple in your home. Don’t forget to share your results or even add your own unique twist—I can’t wait to see what you create!

Print
clock clock iconcutlery cutlery iconflag flag iconfolder folder iconinstagram instagram iconpinterest pinterest iconfacebook facebook iconprint print iconsquares squares iconheart heart iconheart solid heart solid icon

Lemon Poppy Seed Loaf


  • Author: Lily author
  • Total Time: 25 minute
  • Yield: 1 loaf 1x
Pin Recipe
Print Recipe

Description

This Lemon Poppy Seed Loaf is a delightful treat that combines zesty lemon flavor with crunchy poppy seeds. Topped with a citrus icing, it’s perfect for any occasion.


Ingredients

Scale
  • 1 ½ cups (190g) all-purpose flour
  • 1 teaspoon baking powder
  • ½ teaspoon baking soda
  • ½ teaspoon salt
  • 3 tablespoons poppy seeds
  • ½ cup (115g) unsalted butter, softened to room temperature
  • 1 cup (200g) granulated sugar
  • 2 large eggs
  • 1 teaspoon vanilla extract
  • 1 teaspoon lemon zest (from about 1 medium lemon)
  • ½ cup (120ml) buttermilk
  • 2 tablespoons fresh lemon juice
  • 1 cup (120g) powdered sugar
  • 2 tablespoons fresh lemon juice
  • 1 tablespoon orange juice
  • 1 teaspoon lemon zest (for garnish, optional)

Instructions

  1. Preheat your oven to 350°F (175°C). Grease a 9×5-inch loaf pan or line it with parchment paper for easy removal later.
  2. In a medium mixing bowl, whisk together 1 ½ cups of all-purpose flour, 1 teaspoon of baking powder, ½ teaspoon of baking soda, ½ teaspoon of salt, and 3 tablespoons of poppy seeds. This helps to evenly distribute the baking agents and ensures a uniform rise.
  3. In a large mixing bowl, cream together ½ cup of softened unsalted butter and 1 cup of granulated sugar using an electric mixer on medium speed for about 3-4 minutes, until the mixture is light and fluffy. Make sure to scrape down the sides of the bowl occasionally.
  4. Add 2 large eggs, 1 teaspoon of vanilla extract, and 1 teaspoon of lemon zest to the creamed butter and sugar, mixing until fully combined. You want a smooth consistency, so ensure there are no lumps of butter.
  5. In a small bowl, combine ½ cup of buttermilk and 2 tablespoons of fresh lemon juice. Alternately add the dry ingredients and buttermilk mixture to the butter mixture, starting and ending with the dry ingredients. Mix just until combined; do not overmix, as this can lead to a dense loaf.
  6. Pour the batter into the prepared loaf pan. Smooth the top with a spatula, ensuring it’s even. Bake in the preheated oven for 50-60 minutes, or until a toothpick inserted in the center comes out clean. The edges should be lightly golden brown, and the center should feel just set.
  7. Once baked, remove the loaf from the oven and allow it to cool in the pan for about 10 minutes. Then, transfer it to a wire rack to cool completely. Resist the urge to slice too soon, as it will be crumbly if it’s still warm.
  8. While the loaf is cooling, prepare the citrus icing. In a medium bowl, whisk together 1 cup of powdered sugar, 2 tablespoons of fresh lemon juice, and 1 tablespoon of orange juice until smooth. If the icing is too thick, you can add a little more juice to reach your desired consistency.
  9. Once the loaf is completely cool, drizzle the citrus icing over the top. If you like, sprinkle with an additional teaspoon of lemon zest for an extra pop of flavor and color.
  • Prep Time: 15 mins
  • Cook Time: 50-60 mins
  • Category: Dessert
  • Method: Baking
  • Cuisine: American

Nutrition

  • Serving Size: 1 slice
  • Calories: 200
  • Sugar: 15 g
  • Sodium: 150 mg
  • Fat: 8 g
  • Saturated Fat: 5 g
  • Unsaturated Fat: 3 g
  • Trans Fat: 0 g
  • Carbohydrates: 30 g
  • Fiber: 1 g
  • Protein: 3 g
  • Cholesterol: 40 mg

Keywords: Be careful not to overmix your batter; this is a common mistake that can lead to a dense loaf. Use room temperature ingredients for a smoother batter and even baking.

Did you make this recipe?

Share a photo and tag us — we can't wait to see what you've made!

  • Privacy Policy
  • Terms Of Service
  • Contact
  • About
  • GDPR

Copyright © 2025 Homesmad