Best Witch Hat Halloween Cookies are more than just a sweet treat; they’re an essential part of the spooky season’s charm, bringing a touch of whimsical magic to any celebration. As the air turns crisp and thoughts turn to costumes and jack-o’-lanterns, there’s nothing quite like gathering in the kitchen to craft these delightful edible decorations. For generations, themed treats have been a cornerstone of Halloween festivities, transforming simple ingredients into fun, festive creations that capture the imagination. These iconic cookies, with their distinctive pointed hats, instantly evoke the playful spirit of witches and wizards, making them a beloved staple for parties and trick-or-treaters alike.
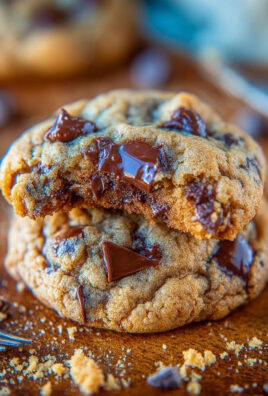
What makes these particular Witch Hat Halloween Cookies so incredibly popular? It’s a delightful combination of their irresistible taste – a perfect balance of a buttery, crisp cookie base and a decadent chocolate hat – and their undeniable visual appeal. They are surprisingly simple to assemble, offering a rewarding baking experience that even novice decorators can master. Whether you’re planning a grand Halloween bash or simply looking for a fun activity with the kids, these festive cookies are sure to be a showstopper, disappearing almost as quickly as you can conjure them up. Get ready to enchant your guests and create lasting memories with every delicious bite.

Ingredients:
-
For the Sugar Cookies (My Favorite Base!):
- 3 cups (360g) all-purpose flour, plus more for dusting
- 1 teaspoon baking powder
- ½ teaspoon salt
- 1 cup (226g) unsalted butter, softened to room temperature
- 1 cup (200g) granulated sugar
- 1 large egg, also at room temperature
- 1 teaspoon pure vanilla extract
-
For the Royal Icing (The Witchy Embellishments):
- 4 cups (480g) powdered sugar, sifted
- 3 tablespoons meringue powder
- ½ cup (120ml) warm water, plus more as needed
- ½ teaspoon clear vanilla extract (to keep colors vibrant!)
- Gel food coloring: black, orange, purple, green (or your favorite Halloween hues!)
-
For Assembling the Best Witch Hat Halloween Cookies:
- 1 batch prepared and cooled sugar cookies (cut into 2-inch circles)
- 1 package Fudge Striped Cookies (the round ones with the chocolate on one side!)
- 1 bag Hershey’s Kisses (or similar cone-shaped chocolates)
- Assorted Halloween sprinkles (sparkly stars, bat shapes, jimmies – let your imagination run wild!)
Preparing the Sugar Cookies: The Foundation for the Best Witch Hat Halloween Cookies
Making the perfect sugar cookie base is absolutely crucial for these enchanting treats. I always start with a reliable, sturdy recipe that holds its shape beautifully and tastes divine. You’ll want your butter and egg to be at room temperature for the creamiest, most cohesive dough.
- First things first, let’s get our dry ingredients ready. In a medium bowl, I like to whisk together the 3 cups of all-purpose flour, 1 teaspoon of baking powder, and ½ teaspoon of salt. Give it a good whisk to ensure everything is evenly distributed. This helps with the texture of our cookies later on.
- Now, onto the wet ingredients! In a large bowl, using either a stand mixer fitted with the paddle attachment or a hand mixer, cream together the softened 1 cup of unsalted butter and 1 cup of granulated sugar. You’re aiming for a light and fluffy consistency here, which usually takes about 2-3 minutes on medium speed. Scrape down the sides of the bowl often to make sure everything is incorporated. This step is key for that tender, melt-in-your-mouth cookie texture.
- Once your butter and sugar are beautifully creamed, it’s time to add the egg. Beat in the 1 large egg until it’s just combined. Don’t overmix here! Then, stir in the 1 teaspoon of pure vanilla extract. The vanilla really brings out the sweetness in these cookies, making them truly irresistible.
- With the mixer on low speed, gradually add the dry ingredients from step 1 to the wet ingredients. Add them in about three additions, mixing just until combined after each addition. It’s very important not to overmix the dough once the flour is added, as this can develop the gluten too much and lead to tough cookies. As soon as you see no dry streaks of flour, stop the mixer.
- Now for the chilling! Divide your dough into two equal portions. Flatten each portion into a disk, wrap tightly in plastic wrap, and refrigerate for at least 1-2 hours. My preference is always two hours, or even overnight if I have the time. This chilling process is absolutely essential. It not only makes the dough much easier to handle when rolling, but it also helps prevent the cookies from spreading too much in the oven, ensuring your 2-inch circles stay perfectly round for our witch hats.
- When you’re ready to bake, preheat your oven to 375°F (190°C). Line your baking sheets with parchment paper or silicone baking mats. I always recommend this to prevent sticking and ensure even baking.
- On a lightly floured surface, unwrap one disk of chilled dough. Roll it out to about ¼-inch thickness. My secret for even thickness is to use rolling pin guides! Using a 2-inch round cookie cutter, cut out as many circles as you can. Gather the scraps, gently re-roll them, and cut out more circles until all the dough is used.
- Carefully transfer the cut cookie circles to your prepared baking sheets, leaving about an inch between each cookie.
- Bake for 8-10 minutes, or until the edges are lightly golden. The centers should still look soft. Keep a close eye on them, as oven temperatures can vary! Once baked, let the cookies cool on the baking sheet for 5 minutes before transferring them to a wire rack to cool completely. They must be completely cool before we start decorating with royal icing, otherwise, your icing will melt!
Crafting the Royal Icing: Adding the Magic to Our Witch Hats
Royal icing is my go-to for decorating these Best Witch Hat Halloween Cookies because it dries hard and creates a beautiful, smooth finish. We’ll need two consistencies: a stiffer “outline” consistency and a thinner “flood” consistency. This might sound intimidating, but I promise it’s quite manageable!
- In a large bowl, again using your stand mixer with the whisk attachment or a hand mixer, combine the 4 cups of sifted powdered sugar and 3 tablespoons of meringue powder. Give these dry ingredients a quick mix to combine them.
- Next, slowly add ½ cup of warm water and ½ teaspoon of clear vanilla extract. Begin mixing on low speed until everything is incorporated, then increase the speed to medium-high. Beat for about 7-10 minutes, or until the icing is very thick and glossy, forming stiff peaks. When you lift the whisk, a peak should stand upright without drooping. This is your thick, outline consistency.
- Now, we need to divide this icing and thin some of it for flooding. I usually divide the icing into several bowls – one for black, one for orange, one for purple, and perhaps a small amount of green for tiny details.
- For the outline consistency, if your icing is already stiff (as described in step 2), it’s perfect. This consistency should be like toothpaste – when you pull a spoon through it, the line stays distinct and doesn’t melt back into itself. If it’s too thick, add water a tiny drop at a time until you reach this stage. Place your outline icing into piping bags fitted with a small round tip (like a Wilton #2 or #3).
- For the flood consistency, take a portion of your outline icing and add water, a very small amount at a time (like ¼ teaspoon), mixing well after each addition. You’re looking for an icing that, when you drop a spoonful back into the bowl, the line disappears into the rest of the icing within 10-15 seconds. This is often called “10-15 second icing.” If it disappears faster, it’s too thin; if slower, it’s too thick. This takes a little practice to get just right, but it’s worth it for that smooth, even flood. Place your flood icing into piping bags (you can just snip a small hole at the end, or use a larger round tip like a #3 or #4).
- Now, let’s color our icing! Add your gel food colorings to each bowl of icing. Gel colors are best because they are concentrated and won’t thin out your icing like liquid food coloring can. Mix thoroughly until you achieve your desired vibrant Halloween shades. Remember, the color can deepen slightly as it dries.
Assembling the Best Witch Hat Halloween Cookies: Bringing the Magic to Life!
This is where the real fun begins! We’re going to transform our simple sugar cookies and candies into adorable, spooky witch hats. This part is incredibly satisfying and yields truly eye-catching results that are sure to impress all your Halloween guests!
- Ensure all your sugar cookies are completely cool. If they’re even slightly warm, your royal icing will not set correctly.
- Take your cooled 2-inch round sugar cookies. Using your outline consistency icing (I love using black or purple for this step), pipe a thin border around the edge of each sugar cookie. This creates a dam for your flood icing.
- Immediately after outlining, take your flood consistency icing in the same color and pipe it into the center of the cookie, filling it completely within the outline. Use a toothpick or a small scribe tool to gently push the icing to the edges and pop any air bubbles. This creates a smooth, flat base for our witch hats.
- Allow these bases to dry for at least 30 minutes to an hour, or until the flood icing has formed a light crust. If you’re patient, an hour is better. You want it somewhat set before adding more weight.
- Once the base is somewhat set, it’s time to add our “hat brim.” Take a Fudge Striped Cookie. These are perfect because they already have a chocolate-coated side! Flip the Fudge Striped Cookie so the chocolate side is facing down. Pipe a small dot or ring of your outline consistency icing (I often use black here for a classic look) onto the center of your royal-iced sugar cookie base.
- Carefully center and place the Fudge Striped Cookie (chocolate side down) onto the dot of icing on your sugar cookie base. Press gently to secure. The icing acts like a glue.
- Next, we’ll create the peak of the witch hat. Take a Hershey’s Kiss. Pipe another small dot or ring of outline consistency icing onto the center of the chocolate-coated side of the Fudge Striped Cookie.
- Gently place the Hershey’s Kiss onto this icing, point-side up, pressing slightly to adhere. You should now have a fully formed witch hat structure!
- Now for the decoration! This is where you can truly make these the Best Witch Hat Halloween Cookies. With your outline consistency icing, you can add details to your witch hats.
- For the Hat Band: Use a contrasting color, like orange or purple. Pipe a thin band around the base of the Hershey’s Kiss where it meets the Fudge Striped Cookie.
- For Buckles: While the band is still wet, pipe a small square or rectangle over the band to create a buckle.
- For Stripes or Dots: You can pipe stripes or polka dots directly onto the Hershey’s Kiss with a contrasting color.
- For Spiderwebs: If you’re feeling adventurous, pipe a spiral onto the flat part of the Fudge Striped Cookie (the non-chocolate side) and use a toothpick to drag lines from the center outwards, creating a spiderweb effect.
- Add Sprinkles: While any of these decorative icing details are still wet, sprinkle on your chosen Halloween sprinkles! Little bat shapes, stars, or even just some festive jimmies look absolutely wonderful and add that extra sparkle.
- Allow your decorated Witch Hat Halloween Cookies to dry completely. This is perhaps the most important step for durability. Depending on the humidity in your kitchen, this can take anywhere from 4-8 hours, or even overnight. I usually leave mine on a wire rack uncovered for at least 6 hours. Once the icing is completely hard to the touch, your Witch Hat Halloween Cookies are ready to be packaged or served! They look absolutely magical on a Halloween dessert table and are sure to be a conversation starter. Enjoy these truly bewitching treats!

Conclusion:
And there you have it, my dear fellow bakers! We’ve journeyed through the enchanting process of creating a truly special treat, and I sincerely hope you’re as excited as I am about the results. These aren’t just any Halloween cookies; they’re a delightful blend of whimsical charm, festive spirit, and undeniable deliciousness that promises to elevate your spooky season celebrations. I truly believe that once you taste them and see the smiles they bring, you’ll agree these are the Best Witch Hat Halloween Cookies you could possibly conjure up. Their tender, buttery cookie base provides the perfect canvas for the rich, creamy frosting, creating a harmonious symphony of textures and flavors that will captivate both young and old. It’s the kind of cookie that makes you want to reach for another, and then another, making them incredibly hard to resist. Beyond their irresistible taste, there’s an immense joy in the crafting of these little edible masterpieces, a therapeutic and fun activity that transforms simple ingredients into something truly magical.
What makes this recipe a non-negotiable addition to your autumn baking list? It’s the sheer joy of creation coupled with the guaranteed “wow” factor. Imagine plates piled high with these adorable, pointy-hatted confections, gleaming under the party lights, drawing admiring glances from every guest. They’re not just a dessert; they’re a conversation starter, a centerpiece, and a testament to your holiday spirit. The simple steps we’ve followed ensure that even novice bakers can achieve stunning, bakery-quality results, making the process stress-free and enjoyable. I’ve poured my heart into perfecting this recipe to ensure it delivers on every front: ease, visual appeal, and, most importantly, unforgettable flavor. Every bite is a delightful combination of sweet cookie and creamy frosting, perfectly balanced to avoid being overly sugary. The rich, deep color of the frosting contrasting with the lighter cookie base makes them visually pop, making them perfect for Instagram-worthy party spreads or simply as a charming treat for your family.
Now, let’s talk about making these treats even more versatile! While they shine brightly as a standalone snack, imagine serving them alongside a steaming mug of spiced apple cider or a rich, dark hot cocoa for the ultimate cozy autumn evening. For a fun party spread, arrange them artfully on a tiered serving platter, perhaps surrounded by other Halloween goodies like candy corn or ghostly meringues. Don’t be afraid to experiment with the frosting colors for the hats; while classic black is iconic, deep purples, vibrant oranges, or even shimmering greens can add a fantastic personal touch. You could also sprinkle a tiny bit of edible glitter on the hats for an extra magical sparkle, or add small candy details like edible eyes to the base of the hat to give them even more character. If you’re feeling adventurous, try making a batch with a chocolate cookie base for an even richer flavor profile, or even try a hint of almond extract in the frosting for a subtle flavor twist. They also make fantastic edible gifts when individually wrapped and tied with a festive ribbon, spreading holiday cheer one delicious cookie at a time.
So, what are you waiting for? This Halloween, bypass the store-bought options and dive into the heartwarming, fun-filled world of homemade baking. Trust me, whipping up these charming witch hats will be an experience you’ll cherish, and the smiles they bring will be your sweetest reward. I wholeheartedly encourage you to roll up your sleeves, gather your ingredients, and embark on this delightful baking adventure. Once you’ve created your batch of these enchanting cookies, I would absolutely love to hear about your experience! Please don’t hesitate to share your photos, your triumphs, and any fun variations you tried in the comments section below. Your feedback and creativity inspire me, and I can’t wait to see all the incredible creations you come up with. Let’s make this Halloween the most deliciously spooky one yet, one perfect cookie at a time! Happy baking, everyone!
Best Witch Hat Halloween Cookies
These delightful Witch Hat Halloween Cookies feature a rich peanut butter cookie base, topped with a chocolate kiss and festive purple-tinted peanut butter decoration, making them a fun and spooky treat for any Halloween celebration.
Ingredients
-
1 1/2 cups all-purpose flour
-
2 tsp cornstarch
-
1/2 tsp baking soda
-
1/4 tsp baking powder
-
1/8 tsp fine sea salt
-
1/2 cup unsalted butter, softened
-
1 cup white sugar
-
1 large egg
-
3/4 cup smooth peanut butter
-
1 tsp vanilla extract
-
Purple gel food coloring
-
Halloween sprinkles or purple sanding sugar
-
33 chocolate kisses or Hugs candies, unwrapped
Instructions
-
Step 1
Whisk flour, cornstarch, baking soda, baking powder, and fine sea salt in a medium bowl. In a large bowl, cream softened butter and white sugar until light and fluffy. Beat in the large egg, smooth peanut butter, and vanilla extract until well combined. Gradually add the dry ingredients to the wet ingredients, mixing on low speed until just combined. Do not overmix. -
Step 2
Divide the dough into two equal portions. Flatten each portion into a disk, wrap tightly in plastic wrap, and refrigerate for at least 1 to 2 hours. Chilling is essential for easier handling and to prevent spreading. -
Step 3
Preheat your oven to 375°F (190°C). Line baking sheets with parchment paper. On a lightly floured surface, roll out one disk of chilled dough to about ¼-inch thickness. Use a 2-inch round cookie cutter to cut out circles. Transfer cookies to prepared baking sheets, leaving about an inch between each. Bake for 8-10 minutes, or until edges are lightly golden. Let cookies cool on the baking sheet for 5 minutes before transferring to a wire rack to cool completely. -
Step 4
In a small bowl, take about 1/4 cup of the smooth peanut butter (from the 3/4 cup total) and mix it thoroughly with purple gel food coloring until you achieve your desired vibrant Halloween hue and a smooth, spreadable consistency. If your peanut butter is stiff, warm it gently in the microwave for a few seconds to soften it for easier application. -
Step 5
Once the cookies are completely cool, spread a thin layer of the tinted purple peanut butter onto each cookie. Gently press one unwrapped chocolate kiss or Hug candy onto the center of each cookie, point-side up, to form the peak of the witch hat. The peanut butter will act as ‘glue’. -
Step 6
While the purple peanut butter is still soft, sprinkle Halloween sprinkles or purple sanding sugar around the base of the chocolate kiss or along the edge of the cookie. Allow the decorated Witch Hat Halloween Cookies to sit for at least 30 minutes, or until the peanut butter decoration has set slightly, before serving or storing.
Important Information
Nutrition Facts (Per Serving)
It is important to consider this information as approximate and not to use it as definitive health advice.
Allergy Information
Please check ingredients for potential allergens and consult a health professional if in doubt.