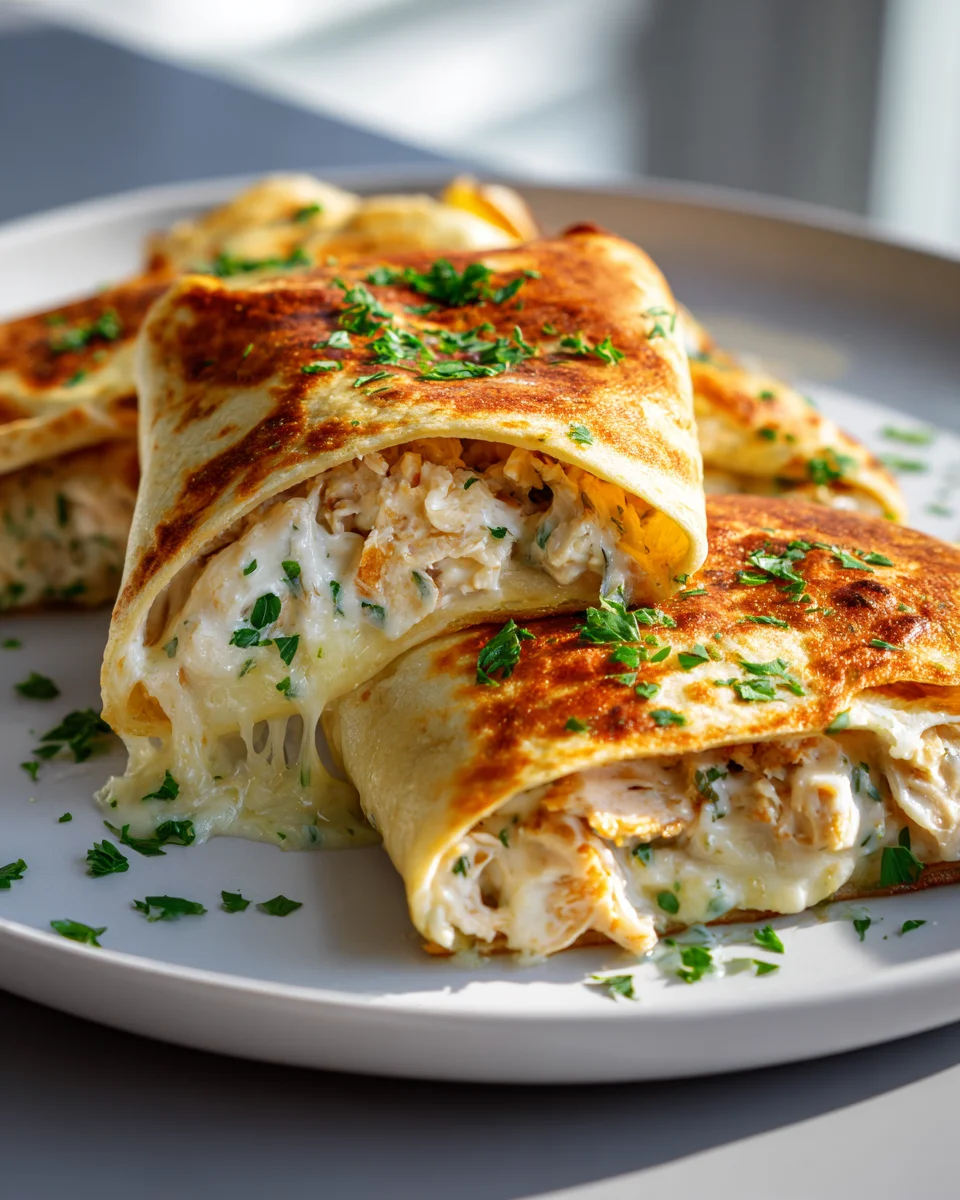
Cheesy Garlic Chicken Wraps
Get ready to meet your new favorite weeknight savior: Cheesy Garlic Chicken Wraps! I honestly believe this recipe is going to quickly become a staple in your home. What makes these wraps so incredibly special, you ask? It’s that irresistible combination of tender, juicy chicken, infused with a rich, aromatic garlic flavor, all enveloped in a gooey, melted cheese sauce. It’s pure comfort food that somehow manages to be both incredibly satisfying and delightfully easy to put together.
You are absolutely going to love these wraps because they deliver big on flavor without demanding hours in the kitchen. They’re perfect for those busy evenings when you want something homemade and delicious but are short on time. Imagine succulent pieces of chicken coated in a creamy, garlicky, cheesy sauce, tucked into a warm, soft tortilla. It’s savory, it’s comforting, and it hits all the right notes for a fantastic lunch or a super speedy dinner. Trust me, one bite and you’ll be hooked on the magic that is Cheesy Garlic Chicken Wraps!

Ingredient Notes
Hello there, fellow food lover! Let’s dive into the heart of our Cheesy Garlic Chicken Wraps recipe – the ingredients. I always find that a good understanding of what goes in and why truly elevates the cooking experience. For this dish, we’re focusing on fresh, flavorful components that come together beautifully.
Chicken
- Boneless, Skinless Chicken Breasts or Thighs: I prefer using boneless, skinless chicken breasts for their lean quality, but thighs offer a richer flavor and stay incredibly moist. You’ll want about 1 to 1.5 pounds. We’ll be cooking and shredding or finely dicing this chicken, so either works perfectly.
- Substitution Tip: If chicken isn’t your preference, thinly sliced or ground beef can be a fantastic alternative. Simply cook it through and season well before combining with the cheesy garlic sauce. Cooked turkey or even plant-based chicken substitutes would also work wonderfully here for a different twist.
The Cheesy Goodness
- Shredded Cheese Blend: This is where the magic happens! I highly recommend a good melting cheese blend like Monterey Jack, mild cheddar, or a pre-shredded “Mexican blend.” Mozzarella is also a great choice for its fantastic melt and mild flavor. About 1.5 to 2 cups will give us that perfect ooey-gooey texture.
- Cream Cheese (Optional but Recommended): Adding a couple of tablespoons of softened cream cheese to your sauce can provide an extra layer of richness and creaminess that makes the filling incredibly luxurious.
- Substitution Tip: Feel free to experiment with other cheeses like Colby Jack, Fontina, or even a touch of smoked gouda for a deeper flavor profile.
Garlic & Aromatics
- Fresh Garlic: This is non-negotiable for “Cheesy Garlic Chicken Wraps”! You’ll need about 4-6 cloves, minced. Fresh garlic provides that pungent, aromatic kick we’re after.
- Butter: For sautéing the garlic and creating the roux for our creamy sauce. Unsalted butter gives you more control over the seasoning.
- Onion (Optional): A quarter cup of finely diced yellow onion can add another layer of savory depth if you like. Sauté it with the garlic.
The Creamy Base
- All-Purpose Flour: About 2 tablespoons, used to create a light roux with the butter, which thickens our sauce to a perfect consistency.
- Milk: Whole milk or 2% milk works best for a creamy sauce. You’ll need about 1.5 cups.
- Chicken Broth: A quarter cup of low-sodium chicken broth can be added for extra flavor and to thin the sauce slightly if needed.
- Substitution Tip: For a dairy-free option, unsweetened almond milk or oat milk can be used, though the texture might be slightly different. Vegetable broth is also a great alternative to chicken broth.
Wraps & Seasoning
- Flour Tortillas: I typically use medium-sized (8-inch) flour tortillas, about 8-10 of them, as they are pliable and hold the filling well.
- Salt and Black Pepper: To taste, essential for bringing out all the flavors.
- Fresh Parsley or Chives (Optional Garnish): A sprinkle of fresh herbs after assembly adds a lovely pop of color and freshness.
Step-by-Step Instructions
Alright, let’s get cooking! These Cheesy Garlic Chicken Wraps come together quite easily, and I’m going to walk you through each step to ensure your success. The key is building layers of flavor, so pay attention to seasoning as we go.
Step 1: Prepare the Chicken
- First things first, we need to cook our chicken. I usually place 1 to 1.5 pounds of boneless, skinless chicken breasts or thighs in a pot, cover them with water or chicken broth, and bring it to a boil. Reduce the heat and simmer for 15-20 minutes, or until the chicken is cooked through and reaches an internal temperature of 165°F (74°C).
- Once cooked, remove the chicken from the liquid and let it cool slightly. Then, using two forks, shred the chicken into bite-sized pieces. Alternatively, you can dice it finely. Season the shredded chicken lightly with a pinch of salt and pepper. Set aside.
- Time-Saving Tip: If you’re short on time, a rotisserie chicken works beautifully here! Just shred the meat and you’re good to go.
Step 2: Craft the Cheesy Garlic Sauce
- In a large skillet or saucepan, melt 2 tablespoons of butter over medium heat. Add your minced garlic (and diced onion if using) and sauté for about 1 minute, just until fragrant. Be careful not to burn the garlic, as it can turn bitter.
- Sprinkle in 2 tablespoons of all-purpose flour over the melted butter and garlic. Whisk constantly for 1-2 minutes to create a roux. This will help thicken our sauce.
- Gradually pour in 1.5 cups of milk, whisking continuously to prevent lumps. Continue to whisk as the mixture comes to a gentle simmer and starts to thicken, which usually takes about 3-5 minutes.
- Reduce the heat to low. Stir in 1.5 to 2 cups of your shredded cheese blend (and 2 tablespoons of cream cheese if using) a handful at a time, whisking until each addition is fully melted and smooth before adding more.
- Once all the cheese is incorporated and the sauce is creamy, season it with salt and freshly ground black pepper to taste. If the sauce is too thick, you can whisk in a tablespoon or two of chicken broth or milk until it reaches your desired consistency.
Step 3: Combine Chicken and Sauce
- Add your prepared shredded chicken to the cheesy garlic sauce in the skillet. Stir gently until the chicken is thoroughly coated and warmed through. This is your delicious filling! Give it a taste and adjust any seasonings if necessary.
Step 4: Warm the Tortillas
- To make your tortillas pliable and less likely to crack when rolled, warm them slightly. You can do this by placing them in a microwave for 15-20 seconds, wrapping them in foil and heating in a 300°F (150°C) oven for 5-7 minutes, or quickly heating them on a dry skillet over medium heat for about 15-20 seconds per side.
Step 5: Assemble the Wraps
- Lay a warm tortilla flat on a clean surface. Spoon about 1/3 to 1/2 cup of the cheesy garlic chicken filling onto the center of the tortilla, leaving a border around the edges.
- To fold, first, fold in the sides of the tortilla over the filling. Then, starting from the bottom (the edge closest to you), tightly roll the tortilla upwards, encasing the filling securely.
- Repeat with the remaining tortillas and filling.
Step 6: Serve and Enjoy!
- Serve your Cheesy Garlic Chicken Wraps immediately while they are warm and the cheese is still wonderfully gooey. A sprinkle of fresh parsley or chives on top makes for a lovely presentation. Enjoy your creation!
Tips & Suggestions
I love sharing little secrets and tricks that can make a recipe even better or more convenient. These Cheesy Garlic Chicken Wraps are already fantastic, but with these tips, you can truly make them your own and enhance the experience!
Chicken Preparation Hacks
- Rotisserie Chicken is Your Friend: As I mentioned in the instructions, a store-bought rotisserie chicken is a huge time-saver. It’s already cooked and seasoned, so just shred it and mix it into the sauce.
- Meal Prep Ahead: Cook and shred your chicken a day or two in advance. Store it in the refrigerator, and then all you have to do is whip up the sauce and assemble.
Flavor Boosters for Your Filling
- A Hint of Heat: If you enjoy a little kick, a pinch of red pepper flakes added to the garlic while sautéing will give your wraps a subtle warmth without overpowering the cheesy goodness.
- Fresh Herbs: Don’t underestimate the power of fresh herbs! Mixing a tablespoon of finely chopped fresh parsley, chives, or even a tiny bit of dill into your chicken and cheese mixture can brighten up the flavors significantly.
- Tangy Twist: A tiny squeeze of fresh lemon juice (about half a teaspoon) stirred into the finished cheesy garlic sauce just before adding the chicken can add a wonderful brightness and cut through the richness.
Customizing Your Wraps
- Veggies Welcome: Want to sneak in some extra vegetables? Sauté finely diced bell peppers (any color!), spinach, or mushrooms with the garlic and onion before adding the flour for the sauce. Cooked corn kernels or black beans can also be a nice addition.
- Make it a Burrito-Style: If you prefer a larger, heartier wrap, use burrito-sized tortillas and add extra fillings like shredded lettuce, diced tomatoes, or a dollop of sour cream or Greek yogurt after filling.
- Crispy Edges: For an extra layer of texture and flavor, after assembling the wraps, lightly pan-fry them in a dry skillet or a little butter for 1-2 minutes per side until lightly golden and crispy. This also helps seal the wrap!
Serving Suggestions
- Perfect Pairing: These wraps are quite hearty on their own, but they pair wonderfully with a light side salad dressed with a vinaigrette, a cup of tomato soup, or some simple vegetable sticks with a ranch dip.
- Dipping Delight: Offer a side of extra cheesy garlic sauce, ranch dressing, or even a mild salsa for dipping. My family loves having a little extra sauce on the side!
Kid-Friendly Adjustments
- Mild Cheese: If you have picky eaters, stick to milder cheeses like mozzarella or a mild cheddar.
- Finely Shredded Chicken: Ensure the chicken is very finely shredded or diced to make it easier for little ones to chew and enjoy.
Storage
Planning ahead or dealing with leftovers is always a consideration for home cooks, and I want to make sure you have all the information you need to keep your Cheesy Garlic Chicken Wraps delicious for as long as possible. Proper storage is key to maintaining quality and freshness.
Storing Leftover Assembled Wraps
- Refrigeration: If you have any fully assembled wraps leftover, I recommend wrapping each one tightly in plastic wrap or aluminum foil, or placing them in an airtight container. They will keep well in the refrigerator for up to 2-3 days.
- Reheating:
- Microwave: This is the quickest option. Remove the wrap from its packaging and microwave on medium power for 1-2 minutes, or until heated through. Be aware that the tortilla might become a bit soft in the microwave.
- Oven/Toaster Oven: For a crisper tortilla, preheat your oven to 350°F (175°C). Place the wrapped or unwrapped wraps on a baking sheet and heat for 10-15 minutes, or until warmed through. This method often yields better texture.
- Skillet: My personal favorite for reheating! Heat a dry non-stick skillet over medium heat. Place the wrap seam-side down and cook for 2-3 minutes per side until lightly golden and heated through. This method helps to crisp up the tortilla beautifully.
Storing the Chicken Filling (Make-Ahead Option)
- Refrigeration: The cheesy garlic chicken filling itself can be made ahead of time and stored separately. Transfer the cooled filling to an airtight container and refrigerate for up to 3-4 days. This is an excellent meal prep strategy!
- Reheating the Filling: When you’re ready to make your wraps, simply reheat the filling gently in a saucepan over low heat, stirring occasionally, until it’s warmed through. You might need to add a splash of milk or broth if it has thickened too much in the fridge. Then, warm your tortillas and assemble as usual.
Freezing (for the Filling Only)
- Freezing the Filling: While I don’t recommend freezing fully assembled wraps (the tortillas can become soggy and lose their texture upon thawing), the cheesy garlic chicken filling freezes quite well.
- Allow the filling to cool completely after cooking.
- Transfer it to a freezer-safe airtight container or a heavy-duty freezer bag, making sure to remove as much air as possible to prevent freezer burn.
- It can be frozen for up to 2-3 months.
- Thawing and Reheating Frozen Filling:
- When you’re ready to use it, thaw the filling overnight in the refrigerator.
- Reheat it gently in a saucepan over low heat, stirring frequently. You will likely need to add a tablespoon or two of milk or chicken broth to restore its creamy consistency as it reheats.
- Once warmed through, proceed with warming your tortillas and assembling your fresh wraps!
Final Thoughts
Well, there you have it! I truly hope you give these Cheesy Garlic Chicken Wraps a try. They are more than just a quick meal; they’re a burst of flavor that hits all the right notes – savory chicken, rich garlic, and that irresistible melted cheese, all tucked into a soft wrap.
What I love most about these Cheesy Garlic Chicken Wraps is how effortlessly they come together, yet deliver such a satisfying and comforting experience. Whether you’re looking for a speedy weeknight dinner, a fantastic lunch option, or something delightful to share with your family and friends, I promise you won’t be disappointed.
Get ready to add these incredible Cheesy Garlic Chicken Wraps to your regular meal rotation. I’m confident they’ll become a beloved staple in your kitchen!

Amazing Cheesy Garlic Chicken Wraps – Easy Weeknight Meal
- Total Time: 45 minutes
- Yield: 4 servings 1x
Description
Get ready to meet your new favorite weeknight savior: Cheesy Garlic Chicken Wraps! This recipe combines tender chicken with a rich garlic flavor, all enveloped in gooey, melted cheese sauce for a comforting meal.
Ingredients
- 1 to 1.5 pounds Boneless, Skinless Chicken Breasts or Thighs
- 2 tablespoons Butter
- 4–6 cloves Fresh Garlic, minced
- 1/4 cup finely diced Yellow Onion (Optional)
- 2 tablespoons All-Purpose Flour
- 1.5 cups Whole Milk or 2% Milk
- 1/4 cup low-sodium Chicken Broth
- 1.5 to 2 cups Shredded Cheese Blend (Monterey Jack, mild cheddar, or Mexican blend)
- 2 tablespoons Cream Cheese (Optional but Recommended)
- Salt and Black Pepper, to taste
- 8–10 medium-sized (8-inch) Flour Tortillas
- Fresh Parsley or Chives (Optional Garnish)
Instructions
- Cook the chicken by placing 1 to 1.5 pounds of boneless, skinless chicken breasts or thighs in a pot, covering them with water or chicken broth, and bringing it to a boil. Reduce the heat and simmer for 15-20 minutes, or until the chicken is cooked through and reaches an internal temperature of 165°F (74°C).
- Once cooked, remove the chicken from the liquid and let it cool slightly. Shred the chicken into bite-sized pieces using two forks or dice it finely. Season lightly with salt and pepper and set aside.
- In a large skillet or saucepan, melt 2 tablespoons of butter over medium heat. Add the minced garlic (and diced onion if using) and sauté for about 1 minute until fragrant.
- Sprinkle in 2 tablespoons of all-purpose flour over the melted butter and garlic. Whisk constantly for 1-2 minutes to create a roux.
- Gradually pour in 1.5 cups of milk, whisking continuously to prevent lumps. Continue to whisk as the mixture comes to a gentle simmer and starts to thicken, about 3-5 minutes.
- Reduce the heat to low. Stir in 1.5 to 2 cups of shredded cheese blend (and 2 tablespoons of cream cheese if using) a handful at a time, whisking until each addition is fully melted and smooth.
- Once all the cheese is incorporated and the sauce is creamy, season it with salt and freshly ground black pepper to taste.
- Add the prepared shredded chicken to the cheesy garlic sauce in the skillet and stir gently until the chicken is thoroughly coated and warmed through.
- Warm the tortillas slightly in the microwave for 15-20 seconds, in a 300°F (150°C) oven for 5-7 minutes, or on a dry skillet over medium heat for about 15-20 seconds per side.
- Lay a warm tortilla flat on a clean surface. Spoon about 1/3 to 1/2 cup of the cheesy garlic chicken filling onto the center of the tortilla, leaving a border around the edges.
- Fold in the sides of the tortilla over the filling, then tightly roll the tortilla upwards, encasing the filling securely.
- Repeat with the remaining tortillas and filling.
- Serve the Cheesy Garlic Chicken Wraps immediately while warm, garnished with fresh parsley or chives if desired.
- Prep Time: 15 mins
- Cook Time: 30 mins
- Category: Dinner
- Method: Cooking
- Cuisine: American
Nutrition
- Serving Size: 1 wrap
- Calories: 450
- Sugar: 3 g
- Sodium: 800 mg
- Fat: 25 g
- Saturated Fat: 12 g
- Unsaturated Fat: 10 g
- Trans Fat: 0 g
- Carbohydrates: 35 g
- Fiber: 2 g
- Protein: 30 g
- Cholesterol: 80 mg
Keywords: For a dairy-free option, use unsweetened almond milk or oat milk. Rotisserie chicken can save time, and adding vegetables like bell peppers or spinach can enhance the dish.