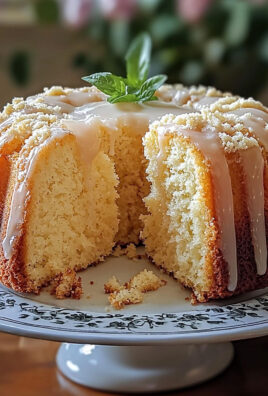
Bee Sting Sheet Cake With Caramel Almond Topping
Oh, prepare yourselves, because I am absolutely thrilled to introduce you to my take on a true masterpiece: Bee Sting Sheet Cake With Caramel Almond Topping! This isn’t just a dessert; it’s an experience, and I promise you, it’s one you’re going to want to repeat again and again. Forget everything you thought you knew about sheet cakes, because this one elevates the game to a whole new level of deliciousness.
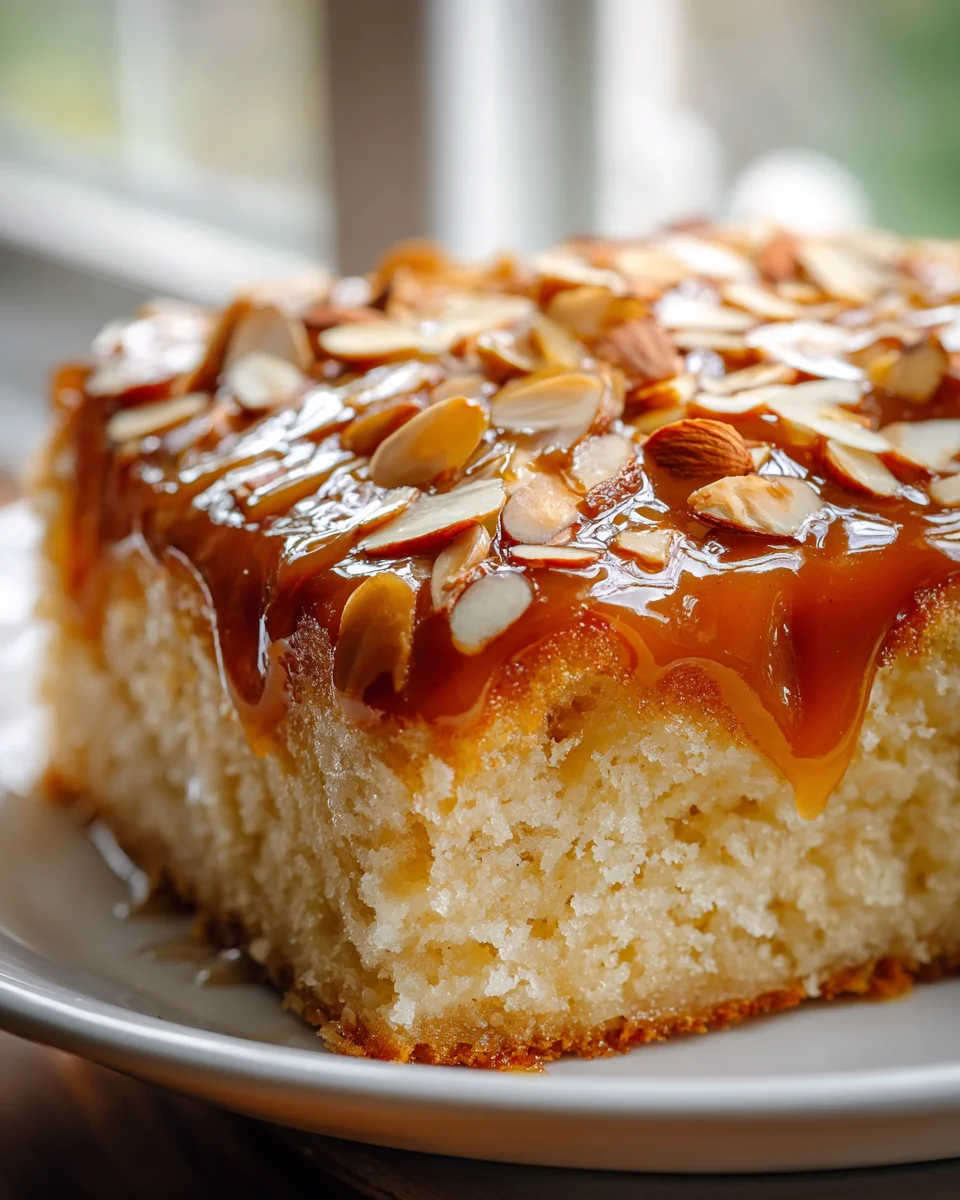
What makes this Bee Sting Sheet Cake so incredibly special, you ask? Well, it’s a symphony of textures and flavors that dance on your palate. We start with a wonderfully tender, moist vanilla cake base – not too sweet, just perfect. But the real magic begins when we generously fill that cake with a dreamy, luscious, and oh-so-creamy pastry cream that literally melts in your mouth. And then, for the showstopper: a golden-brown, crisp, and utterly addictive caramel almond topping that gives the cake its signature “bee sting” crunch and a rich, nutty sweetness. It’s a classic German dessert, reimagined as an easy-to-serve sheet cake.
You’ll fall in love with this recipe because it takes a beloved, impressive dessert and makes it utterly approachable for your home kitchen. It’s perfect for feeding a crowd, fantastic for potlucks, and guaranteed to impress at any gathering. Everyone will be asking for the recipe, and honestly, who wouldn’t want to bring such a show-stopping, yet comforting, dessert? Get ready to bake something truly extraordinary!
Ingredient Notes
When I set out to bake my Bee Sting Sheet Cake, I always think about what makes it truly special. It’s a delightful balance between a soft, moist cake and that irresistible, crunchy caramel almond topping. Here are the key ingredients I rely on and some tips for making them work their magic.
- All-Purpose Flour: This is my go-to for the cake base. It provides a good balance of structure and tenderness. If you want an even finer, more delicate crumb, you could substitute up to a quarter of the all-purpose flour with cake flour, but it’s not strictly necessary for a fantastic result.
- Granulated Sugar: Essential for both the cake batter and the caramel topping. For the cake, it sweetens and helps with moisture. In the topping, it forms the base of our golden caramel.
- Unsalted Butter: I always use unsalted butter so I can control the salt content precisely. For the cake, make sure it’s softened to room temperature – this is crucial for creaming it properly with the sugar, leading to a light and airy batter. For the topping, it’s melted down with other ingredients to create that luscious sauce.
- Eggs: Large eggs, also at room temperature, help to emulsify the batter and provide richness and structure. If your eggs are cold, a quick warm bath in their shells for a few minutes will do the trick.
- Milk: Whole milk is my preference for the cake base as it adds richness and moisture. You can use 2% milk, but I find whole milk gives the best texture. For a dairy-free option, unsweetened almond milk or soy milk can work, though the cake’s richness might be slightly altered.
- Vanilla Extract: A good quality vanilla extract enhances all the other flavors in the cake. Don’t skimp here! Pure vanilla extract is always worth it.
- Sliced Almonds: These are the star of the topping! Sliced almonds toast beautifully and provide that signature crunch. You really can’t substitute these with other nuts if you want the authentic “bee sting” experience. If you only have slivered or chopped almonds, they’ll work in a pinch for flavor, but the aesthetic and texture will be slightly different.
- Honey: This is what gives the caramel topping its distinctive “bee sting” sweetness and a slight floral note. While you can substitute with corn syrup or maple syrup for chewiness and shine, honey provides the most authentic flavor for this particular recipe.
- Heavy Cream: Essential for the caramel topping to create a smooth, rich, and creamy sauce that coats the almonds beautifully. Do not substitute with lighter creams or milk here, as the fat content is crucial for the caramel’s texture and stability.
- Baking Powder & Salt: These leavening agents and flavor enhancers are vital. Baking powder gives the cake its lift, and a touch of salt balances the sweetness and brings out the other flavors.
Step-by-Step Instructions
Baking this Bee Sting Sheet Cake is a truly rewarding experience, and I’ve broken it down into simple steps to ensure your success. We’ll conquer the cake base first, then move on to that glorious caramel almond topping.
For the Cake Base:
- Prepare Your Pan: First things first, preheat your oven to 350°F (175°C). Then, generously grease and flour a 9×13 inch (approx. 23×33 cm) sheet cake pan, or line it with parchment paper for easy removal. I always make sure the parchment extends a little over the sides to create “handles.”
- Whisk Dry Ingredients: In a medium bowl, I whisk together my all-purpose flour, baking powder, and salt. Set this aside for a moment.
- Cream Butter and Sugar: In a large mixing bowl, using an electric mixer, I cream together the softened unsalted butter and granulated sugar on medium speed until the mixture is light, fluffy, and pale in color. This usually takes about 3-5 minutes. Don’t rush this step; it’s key for a tender cake!
- Add Eggs and Vanilla: Now, I beat in the eggs one at a time, making sure each egg is fully incorporated before adding the next. Scrape down the sides of the bowl as needed. Once the eggs are in, I mix in the vanilla extract.
- Alternate Wet and Dry: With the mixer on low speed, I gradually add the dry ingredient mixture to the wet ingredients, alternating with the milk. I start and end with the dry ingredients. Be careful not to overmix here; stop mixing as soon as the last streaks of flour disappear. Overmixing can lead to a tough cake.
- Bake the Cake: Pour the batter evenly into your prepared sheet cake pan. Smooth the top with a spatula. Bake for 25-30 minutes, or until a wooden skewer inserted into the center comes out clean. The cake should be golden brown and spring back when lightly touched.
- Cool Slightly: Once baked, remove the cake from the oven and let it cool in the pan on a wire rack for about 10-15 minutes. This is important because we’ll be adding the warm topping soon!
For the Caramel Almond Topping:
- Melt Ingredients: While the cake is cooling, I combine the unsalted butter, granulated sugar, honey, and heavy cream in a medium saucepan. I melt these ingredients over medium heat, stirring occasionally, until the sugar has dissolved and the mixture comes to a gentle simmer.
- Add Almonds: Once simmering, I stir in the sliced almonds. Continue to cook for another 2-3 minutes, stirring constantly, allowing the mixture to thicken slightly and the almonds to become coated. Be careful not to burn the caramel.
- Apply Topping: Pour the warm caramel almond topping evenly over the slightly cooled cake in the pan. Gently spread it to the edges with a spatula if needed.
- Broil (Optional but Recommended) or Bake Again: For that truly golden, slightly toasted almond crunch, I pop the cake back into the oven under the broiler for 1-3 minutes. WATCH IT LIKE A HAWK! Caramel can burn very quickly. Alternatively, you can bake it at 350°F (175°C) for another 8-10 minutes until the topping is bubbly and golden brown.
- Cool Completely: Remove the cake from the oven and let it cool completely on a wire rack before slicing and serving. This allows the caramel to set properly, making for cleaner cuts and a perfect texture.
Tips & Suggestions
I’ve made this Bee Sting Sheet Cake countless times, and I’ve picked up a few tricks along the way to ensure it turns out perfectly every time. Here are my top tips and some fun suggestions:
- Room Temperature Ingredients are Key: I can’t stress this enough for the cake batter! Softened butter and room temperature eggs and milk emulsify better, leading to a smoother batter and a more tender, even crumb. Plan ahead and take them out an hour or two before you start baking.
- Don’t Overmix the Batter: Once you add the dry ingredients to the wet, mix only until just combined. Overmixing develops the gluten in the flour too much, which can result in a dense, tough cake. A few small lumps are perfectly fine!
- Watch the Topping Carefully: When you put the cake back in to set the topping, especially if you’re using the broiler, do not walk away! Caramel can go from perfectly golden to burnt in a matter of seconds. Keep your oven light on and your eyes on the prize.
- Warm Cake, Warm Topping: Applying the warm caramel almond topping to a slightly warm cake helps it meld beautifully with the cake base, rather than sitting on top as a separate layer.
- Clean Slices: For the neatest slices, make sure the cake has cooled completely. If you’re impatient (like I sometimes am!), you can pop it in the fridge for about 30 minutes to help the caramel set more quickly. A sharp, warm knife (wiped clean between cuts) also helps.
- Enhance the Flavor: If you’re feeling adventurous, a tiny pinch of flaky sea salt sprinkled over the warm topping just before it sets can really elevate the flavors and cut through the sweetness beautifully.
- Serving Suggestions: This cake is absolutely delicious on its own, but I sometimes like to serve a slice with a dollop of unsweetened whipped cream or a scoop of vanilla bean ice cream to balance the richness.
Storage
One of the best things about a sheet cake, especially this Bee Sting version, is how well it keeps (if there’s any left!). Here’s how I store mine to keep it fresh and delicious:
- Room Temperature: For up to 2-3 days, I store the Bee Sting Sheet Cake in an airtight container at room temperature. The caramel topping actually helps to seal in the moisture of the cake, keeping it wonderfully fresh. Make sure it’s fully cooled before covering to prevent condensation.
- Refrigeration: If you need to keep it longer, or if your kitchen is particularly warm, I recommend refrigerating the cake in an airtight container. It will last for up to 5 days this way. The caramel topping will firm up considerably in the fridge, so I like to let slices come to room temperature for about 30 minutes before serving, or even warm them gently in the microwave for 10-15 seconds for a softer caramel.
- Freezing: Yes, you can freeze this cake! I often bake a full sheet and freeze individual slices. I wrap each slice tightly in plastic wrap, then place them in an airtight freezer-safe container or bag. It will keep well for up to 1-2 months. To thaw, simply unwrap a slice and let it come to room temperature, or warm it gently in the microwave. The topping might lose a tiny bit of its crispness, but the flavor remains fantastic.

Final Thoughts
There you have it! I truly hope you’re as excited as I am about this incredible dessert. The Bee Sting Sheet Cake With Caramel Almond Topping isn’t just another cake; it’s an experience.
It masterfully combines a wonderfully tender, moist cake base with an utterly irresistible, crunchy, and buttery caramel almond topping that truly elevates every single bite. The balance of textures and the rich, sweet flavors make it absolutely unforgettable.
Whether you’re looking for a show-stopping dessert for a special occasion, a comforting treat for a family gathering, or simply want to indulge in something truly spectacular, this Bee Sting Sheet Cake With Caramel Almond Topping is a guaranteed crowd-pleaser. Trust me, once you try a slice, you’ll understand why it’s destined to become a new favorite in your baking repertoire. Happy baking, and enjoy every delicious moment!
Delicious Bee Sting Sheet Cake: Caramel Almond Topping
- Total Time: 1 hour
- Yield: 12 servings 1x
Description
Experience the delightful combination of a tender vanilla cake filled with creamy pastry cream and topped with a crunchy caramel almond layer. This Bee Sting Sheet Cake is perfect for any gathering and will leave everyone asking for more.
Ingredients
- 2 cups All-Purpose Flour
- 1 cup Granulated Sugar
- 1/2 cup Unsalted Butter, softened
- 3 large Eggs, at room temperature
- 1 cup Whole Milk
- 2 teaspoons Vanilla Extract
- 1 tablespoon Baking Powder
- 1/2 teaspoon Salt
- 1/2 cup Sliced Almonds
- 1/2 cup Granulated Sugar (for caramel topping)
- 1/4 cup Honey
- 1/4 cup Heavy Cream
- 1/4 cup Unsalted Butter (for caramel topping)
Instructions
- Preheat your oven to 350°F (175°C) and grease and flour a 9×13 inch sheet cake pan.
- In a medium bowl, whisk together the all-purpose flour, baking powder, and salt. Set aside.
- In a large mixing bowl, cream together the softened unsalted butter and granulated sugar on medium speed until light and fluffy, about 3-5 minutes.
- Beat in the eggs one at a time, ensuring each is fully incorporated before adding the next. Mix in the vanilla extract.
- With the mixer on low speed, gradually add the dry ingredients to the wet ingredients, alternating with the milk. Start and end with the dry ingredients, mixing until just combined.
- Pour the batter into the prepared pan and smooth the top. Bake for 25-30 minutes, or until a wooden skewer comes out clean.
- Let the cake cool in the pan on a wire rack for 10-15 minutes.
- In a medium saucepan, combine the unsalted butter, granulated sugar, honey, and heavy cream. Melt over medium heat, stirring until the sugar dissolves and the mixture simmers.
- Stir in the sliced almonds and cook for another 2-3 minutes until the mixture thickens slightly.
- Pour the warm caramel almond topping over the slightly cooled cake and spread it to the edges.
- Broil the cake for 1-3 minutes or bake at 350°F (175°C) for 8-10 minutes until the topping is bubbly and golden brown.
- Let the cake cool completely on a wire rack before slicing and serving.
- Prep Time: 30 mins
- Cook Time: 30 mins
- Category: Dessert
- Method: Baking
- Cuisine: German
Nutrition
- Serving Size: 1 slice
- Calories: 350
- Sugar: 25 g
- Sodium: 150 mg
- Fat: 15 g
- Saturated Fat: 8 g
- Unsaturated Fat: 5 g
- Trans Fat: 0 g
- Carbohydrates: 45 g
- Fiber: 1 g
- Protein: 5 g
- Cholesterol: 50 mg
Keywords: Ensure all ingredients are at room temperature for the best results. Watch the caramel topping closely to prevent burning, especially if broiling.