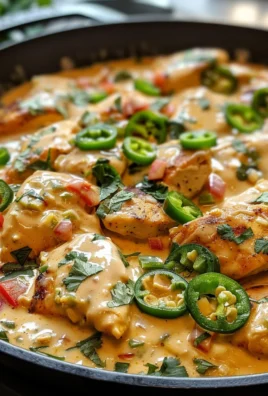
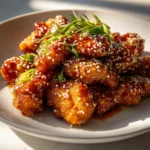
Sesame Chicken
I don’t know about you, but when I’m craving something truly satisfying, my mind often drifts to the crispy, saucy goodness of Sesame Chicken. It’s that magical combination of tender chicken, perfectly crisp on the outside, enveloped in a rich, glossy sauce that’s sweet, savory, and bursting with toasted sesame flavor. What makes my homemade version truly special is how it perfectly captures that beloved takeout experience, but with the added satisfaction of knowing exactly what went into it.
You, my friend, are going to absolutely adore this recipe. Why? Because it delivers on all fronts: it’s incredibly flavorful, surprisingly easy to whip up in your own kitchen, and utterly addictive. Imagine biting into succulent pieces of chicken, each morsel coated in a thick, sticky, amber-hued sauce, generously sprinkled with sesame seeds. It’s comfort food at its finest, a dish that pleases every palate and always leaves you wanting just one more bite. Forget the delivery app; get ready to make your new favorite meal right now!

Ingredient Notes
Creating delicious homemade Sesame Chicken truly begins with selecting and understanding your key ingredients. I’ve found that a few thoughtful choices can make all the difference in achieving that perfect balance of crispy texture and savory-sweet sauce.
The Chicken
- Chicken Thighs: My absolute favorite for Sesame Chicken! Thighs are incredibly forgiving, remaining juicy and tender even after frying and simmering in the sauce. I usually cut them into bite-sized 1-inch pieces.
- Chicken Breast: If you prefer white meat, chicken breast works wonderfully too. Just be mindful not to overcook it, as it can dry out more easily. Cut it into similar 1-inch pieces.
The Sesame Elements
- Toasted Sesame Oil: This isn’t just any oil; it’s a flavor powerhouse. A little goes a long way, adding that unmistakable nutty, aromatic depth to your sauce. Don’t use it for frying; it’s best added at the end for maximum impact.
- Sesame Seeds: Primarily for garnish, but they also contribute a lovely visual appeal and a subtle textural crunch. I like to toast them lightly in a dry pan for a minute or two before sprinkling, enhancing their nutty flavor.
The Sauce Essentials
- Soy Sauce: The backbone of our savory sauce. I typically reach for low-sodium soy sauce to have better control over the saltiness, but regular works too.
- Sweetener: Brown sugar is my go-to for its rich, molasses-like notes that complement the soy sauce beautifully. Honey or maple syrup are also excellent alternatives if you prefer.
- Rice Vinegar: Adds a crucial tanginess that cuts through the richness and balances the sweetness. Don’t skip it!
- Garlic & Ginger: Freshly minced garlic and grated ginger are non-negotiable for their aromatic punch. They elevate the sauce from good to fantastic.
- Cornstarch: This is our secret weapon for thickening the sauce to that perfect glossy consistency that clings to the chicken.
- Non-Alcohol Alternative: Many traditional recipes call for a cooking wine, but a splash of chicken broth or even a little apple cider vinegar diluted with water can provide a similar depth and acidity without any alcohol.
Other Important Ingredients
- Oil for Frying: A neutral-flavored oil with a high smoke point, like vegetable oil, canola oil, or peanut oil, is essential for getting that golden, crispy chicken.
- Cornstarch for Coating: Beyond the sauce, a light coating of cornstarch (or a mix of cornstarch and flour) is what gives the chicken its signature crispy crust.
Substitutions I Recommend
- For the Chicken: While I don’t use beef in this recipe, if you were making a similar dish, lean cuts of beef could be substituted. For Sesame Chicken, stick to chicken for the authentic experience.
- Gluten-Free: Use tamari instead of soy sauce, and ensure any cornstarch is pure.
- Added Veggies: Feel free to toss in some broccoli florets, bell peppers, or snap peas during the last few minutes of cooking the sauce or stir-fry them briefly before combining with the chicken and sauce.
Step-by-Step Instructions
Making Sesame Chicken at home is incredibly rewarding, and I promise you it’s simpler than you might think! Follow these steps to achieve a flavorful, crispy, and saucy dish that rivals your favorite takeout.
- Prep the Chicken: Start by patting your chicken pieces (thighs or breast, cut into 1-inch chunks) thoroughly dry with paper towels. This is a crucial step for achieving crispiness. In a medium bowl, season the chicken with a pinch of salt and black pepper. In a separate shallow dish, whisk together about ½ cup of cornstarch (or ¼ cup cornstarch and ¼ cup all-purpose flour). Dredge each piece of chicken in the cornstarch mixture, ensuring it’s evenly coated, then shake off any excess. Set aside.
- Make the Sauce: While the chicken is ready, let’s get that fantastic sauce going. In a medium bowl, whisk together ½ cup low-sodium soy sauce, ½ cup brown sugar (or honey/maple syrup), ¼ cup rice vinegar, 2 tablespoons of your chosen non-alcohol alternative (like chicken broth or diluted apple cider vinegar), 1 tablespoon grated fresh ginger, 2 cloves minced garlic, and 1 tablespoon toasted sesame oil. In a small separate bowl, whisk 1 tablespoon of cornstarch with 2 tablespoons of cold water to create a slurry. Set both aside.
- Cook the Chicken: Heat 2-3 inches of neutral oil (vegetable, canola, or peanut oil) in a large heavy-bottomed pot or Dutch oven over medium-high heat until it reaches about 350-375°F (175-190°C). Carefully add the coated chicken pieces in batches, making sure not to overcrowd the pot. Fry for 4-6 minutes, turning occasionally, until golden brown and cooked through (internal temperature of 165°F or 74°C). Use a slotted spoon to transfer the cooked chicken to a wire rack set over a baking sheet to drain any excess oil. If you want extra crispy chicken, you can perform a second fry for 1-2 minutes at a higher temperature (375-400°F or 190-205°C) just before serving.
- Thicken the Sauce: Carefully pour off most of the oil from your pot, leaving only about 1 tablespoon. Return the pot to medium heat. Pour in your prepared sauce mixture and bring it to a gentle simmer, stirring frequently. Once simmering, slowly whisk in the cornstarch slurry. Continue to whisk for 1-2 minutes until the sauce thickens to a glossy, syrupy consistency that coats the back of a spoon. Taste and adjust seasonings if needed – a little more soy for savory, sugar for sweet, or vinegar for tang.
- Combine and Serve: Add the crispy chicken pieces directly into the thickened sauce. Toss gently to coat every piece evenly. Remove from heat immediately to prevent the chicken from losing its crispness. Serve hot, garnished generously with toasted sesame seeds and sliced green onions. I love serving it over steamed white or brown rice, with a side of blanched broccoli.
Tips & Suggestions
I’ve learned a few tricks over the years that truly elevate homemade Sesame Chicken. These tips are all about maximizing flavor, texture, and convenience so you can consistently create a dish that’s even better than takeout!
- Achieving Ultimate Crispy Chicken: The key to truly crispy chicken lies in two main things. First, patting the chicken completely dry before coating. Moisture is the enemy of crispiness. Second, consider a double-fry method. Fry the chicken once until cooked through, remove it, and then just before combining with the sauce, fry it again for 1-2 minutes at a slightly higher temperature (around 375-400°F or 190-205°C). This second fry expels more moisture and creates an incredibly crisp exterior.
- Balancing the Sauce Flavors: The perfect sesame chicken sauce is a delicate balance of sweet, savory, and tangy. Don’t be afraid to taste and adjust! If it’s too sweet, add a splash more rice vinegar or soy sauce. Too salty? A tiny bit more sugar can help. A little squeeze of fresh lime juice at the end can also brighten the flavors beautifully.
- Healthier Alternatives: If you’re looking to cut down on frying, you can bake or air-fry the chicken instead. Toss the coated chicken pieces with 1-2 tablespoons of oil before baking at 400°F (200°C) for 15-20 minutes, or air-frying at 375°F (190°C) for 10-15 minutes, flipping halfway, until golden and cooked through. While it won’t be quite as crispy as deep-fried, it’s still delicious!
- Prepping Ahead: You can prepare the chicken coating and the sauce components ahead of time. Cut the chicken and keep it seasoned in the fridge. Whisk together all the sauce ingredients (except the cornstarch slurry) and store it in an airtight container. When you’re ready to cook, it’s just a matter of frying the chicken and quickly thickening the sauce.
- Serving Suggestions: Sesame Chicken is fantastic served over a bed of fluffy white or brown rice. I often pair it with steamed broccoli, blanched green beans, or a simple side salad to add some fresh vegetables and balance the meal. Egg noodles or even quinoa also make great accompaniments.
- Adding a Kick: If you like a bit of heat, I suggest adding ¼ to ½ teaspoon of red pepper flakes to the sauce mixture. You can also garnish with thinly sliced fresh red chilies or a drizzle of chili oil right before serving.
Storage
Proper storage is essential to enjoy your delicious homemade Sesame Chicken even after the initial meal. While it’s best served fresh, leftovers can be a fantastic treat with a few simple guidelines.
Refrigeration
Once your Sesame Chicken has cooled completely to room temperature (usually within 1-2 hours after cooking), transfer it to an airtight container. I recommend placing a paper towel at the bottom of the container to help absorb any excess moisture and placing another on top before sealing. This helps prevent the chicken from becoming soggy.
- How long: Leftover Sesame Chicken can be safely stored in the refrigerator for up to 3-4 days.
- Note on Texture: While the flavor will remain excellent, the crispy coating on the chicken will inevitably soften in the refrigerator as it absorbs moisture from the sauce. This is normal and doesn’t affect its deliciousness.
Freezing
Freezing Sesame Chicken is definitely an option if you want to extend its shelf life, though I find the texture of the chicken can suffer a bit more than with simple refrigeration.
- How to Freeze: Allow the cooked chicken and sauce to cool completely. Transfer it to a freezer-safe airtight container or heavy-duty freezer bags. If using a bag, press out as much air as possible to prevent freezer burn.
- How long: It can be stored in the freezer for up to 2-3 months.
- Thawing: When you’re ready to enjoy it, transfer the frozen chicken to the refrigerator and let it thaw overnight.
Reheating
Reheating is where you can try to bring back some of that delightful texture. I have a preferred method for the best results.
- Oven or Air Fryer (Recommended for best texture): This is my top choice for reheating as it helps crisp up the chicken again.
- Preheat your oven to 350°F (175°C) or your air fryer to 325°F (160°C).
- Spread the chicken in a single layer on a baking sheet lined with parchment paper or in the air fryer basket.
- Heat for 10-15 minutes in the oven, or 5-8 minutes in the air fryer, flipping halfway through, until heated through and the chicken starts to crisp up again.
- Keep an eye on it to prevent burning the sauce.
- Microwave: While convenient, the microwave will not bring back any crispiness to the chicken. It will heat it thoroughly, but the texture will remain soft.
- Place the chicken in a microwave-safe dish.
- Heat on medium power for 1-2 minutes, stirring halfway, until warmed through.

Final Thoughts
Well, there you have it! My absolute favorite recipe for Sesame Chicken. I truly believe this dish is a game-changer for anyone looking to bring the magic of their favorite takeout right into their own kitchen. The perfect balance of tender chicken, crispy coating, and that irresistible sweet and savory sesame sauce is just heavenly. I promise you, once you try making Sesame Chicken at home with this recipe, you’ll wonder why you ever ordered out. It’s incredibly satisfying, surprisingly straightforward, and guaranteed to put a smile on everyone’s face. So go ahead, give it a try – I know you’re going to love it!
Easy Sesame Chicken: Better Than Takeout in Mins!
- Total Time: 45 minutes
- Yield: 4 servings
Description
This Easy Sesame Chicken recipe captures the crispy, saucy goodness of takeout with the satisfaction of homemade cooking. Enjoy tender chicken coated in a rich, glossy sauce that’s sweet, savory, and bursting with toasted sesame flavor.
Ingredients
- Chicken Thighs, cut into 1-inch pieces
- Chicken Breast, cut into 1-inch pieces
- Toasted Sesame Oil
- Sesame Seeds
- Low-sodium Soy Sauce
- Brown Sugar or Honey or Maple Syrup
- Rice Vinegar
- Fresh Garlic, minced
- Fresh Ginger, grated
- Cornstarch
- Non-Alcohol Alternative (like chicken broth or diluted apple cider vinegar)
- Oil for Frying (vegetable oil, canola oil, or peanut oil)
- Cornstarch for Coating (or a mix of cornstarch and flour)
Instructions
- Prep the Chicken: Start by patting your chicken pieces (thighs or breast, cut into 1-inch chunks) thoroughly dry with paper towels. In a medium bowl, season the chicken with a pinch of salt and black pepper. In a separate shallow dish, whisk together about ½ cup of cornstarch (or ¼ cup cornstarch and ¼ cup all-purpose flour). Dredge each piece of chicken in the cornstarch mixture, ensuring it's evenly coated, then shake off any excess. Set aside.
- Make the Sauce: In a medium bowl, whisk together ½ cup low-sodium soy sauce, ½ cup brown sugar (or honey/maple syrup), ¼ cup rice vinegar, 2 tablespoons of your chosen non-alcohol alternative (like chicken broth or diluted apple cider vinegar), 1 tablespoon grated fresh ginger, 2 cloves minced garlic, and 1 tablespoon toasted sesame oil. In a small separate bowl, whisk 1 tablespoon of cornstarch with 2 tablespoons of cold water to create a slurry. Set both aside.
- Cook the Chicken: Heat 2-3 inches of neutral oil (vegetable, canola, or peanut oil) in a large heavy-bottomed pot or Dutch oven over medium-high heat until it reaches about 350-375°F (175-190°C). Carefully add the coated chicken pieces in batches, making sure not to overcrowd the pot. Fry for 4-6 minutes, turning occasionally, until golden brown and cooked through (internal temperature of 165°F or 74°C). Use a slotted spoon to transfer the cooked chicken to a wire rack set over a baking sheet to drain any excess oil.
- Thicken the Sauce: Carefully pour off most of the oil from your pot, leaving only about 1 tablespoon. Return the pot to medium heat. Pour in your prepared sauce mixture and bring it to a gentle simmer, stirring frequently. Once simmering, slowly whisk in the cornstarch slurry. Continue to whisk for 1-2 minutes until the sauce thickens to a glossy, syrupy consistency that coats the back of a spoon.
- Combine and Serve: Add the crispy chicken pieces directly into the thickened sauce. Toss gently to coat every piece evenly. Remove from heat immediately to prevent the chicken from losing its crispness. Serve hot, garnished generously with toasted sesame seeds and sliced green onions.
- Prep Time: 15 mins
- Cook Time: 30 mins
- Category: Dinner
- Method: Frying
- Cuisine: Asian
Nutrition
- Serving Size: 1 bowl
- Calories: 400
- Sugar: 15 g
- Sodium: 800 mg
- Fat: 20 g
- Saturated Fat: 3 g
- Unsaturated Fat: 15 g
- Trans Fat: 0 g
- Carbohydrates: 40 g
- Fiber: 2 g
- Protein: 25 g
- Cholesterol: 70 mg
Keywords: For the best crispy chicken, pat the chicken completely dry before coating and consider a double-fry method. You can also prepare the chicken coating and sauce components ahead of time for convenience.