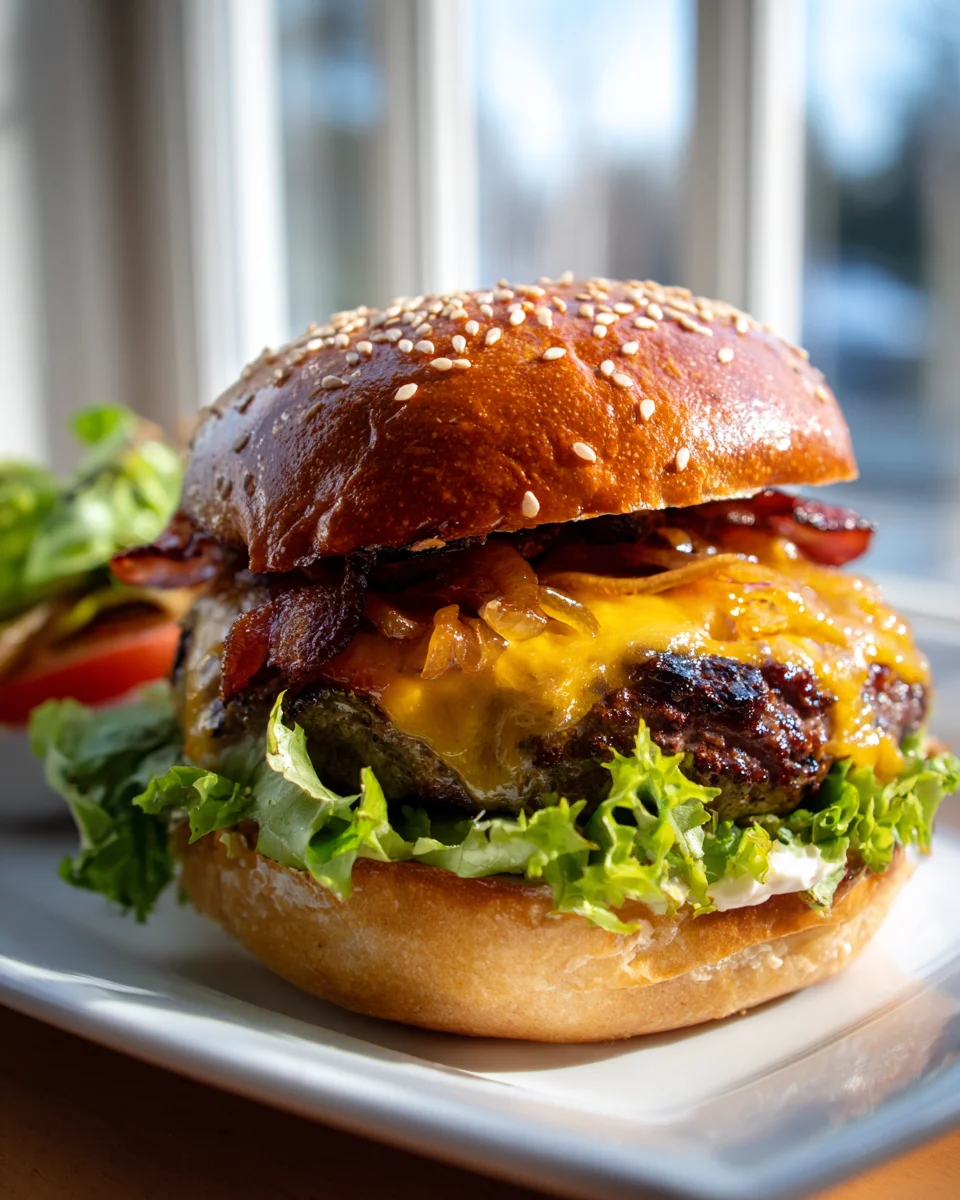
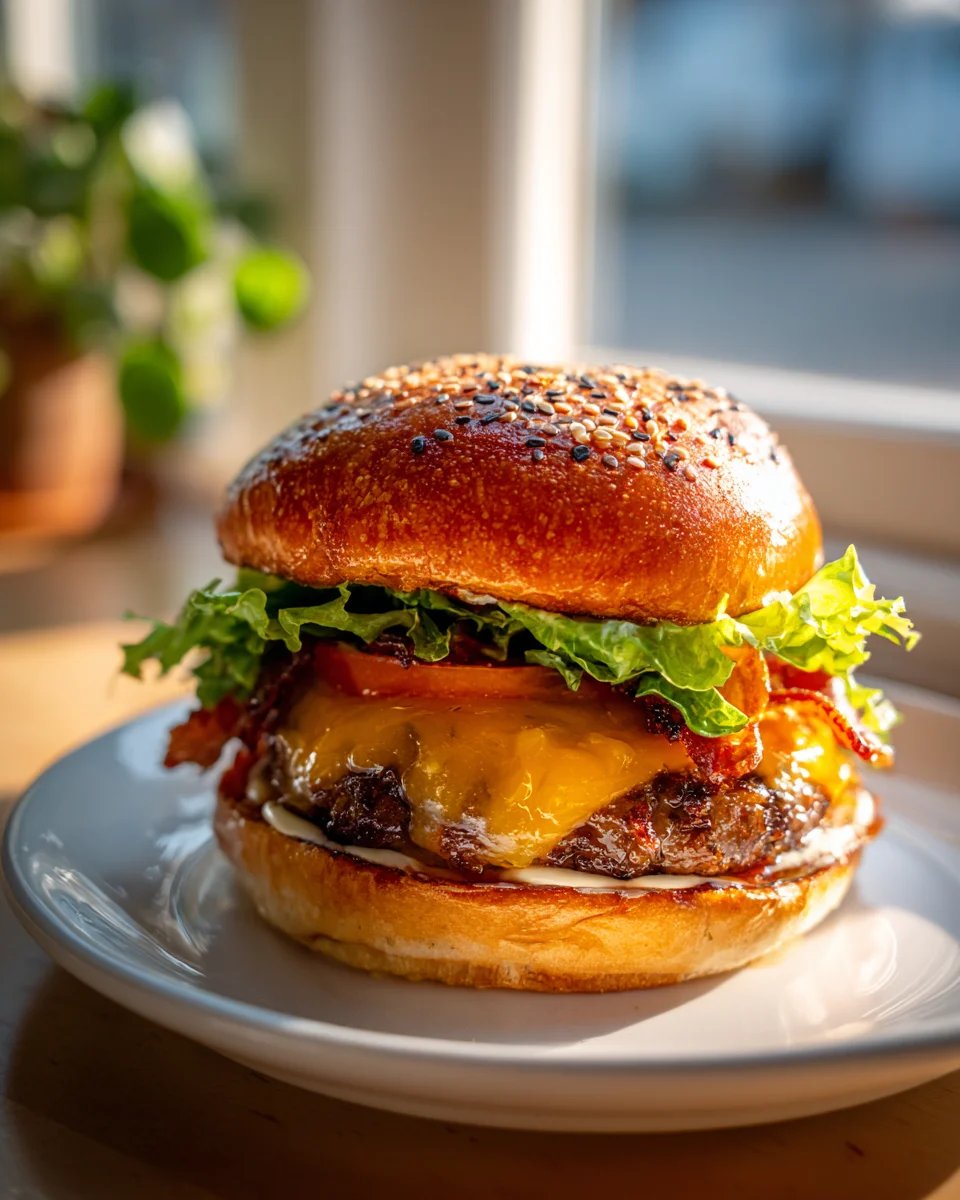
Beef Bacon Cheeseburgers With Caramelized Onions
Oh boy, do I have a treat for you today! We’re not just talking about any old burger here; we’re diving headfirst into the glorious, mouth-watering world of the Beef Bacon Cheeseburgers With Caramelized Onions. This isn’t just a meal; it’s an experience, a symphony of rich textures and deep flavors that will make your taste buds sing with delight. What makes this particular recipe so incredibly special, you ask? Well, imagine a perfectly cooked, juicy beef patty, layered generously with crisp, savory beef bacon – yes, beef bacon! – and blanketed in a luscious layer of melty, glorious cheese. But we don’t stop there. The true magic happens with the slow-cooked, deeply sweet, and jammy caramelized onions that add an irresistible depth and a touch of gourmet elegance that transforms a simple burger into something truly extraordinary. You’re going to absolutely love how this dish elevates classic comfort food, delivering a satisfyingly rich, savory, and subtly sweet bite in every single mouthful. It’s perfect for turning a regular weeknight into a special occasion, and I promise you, this burger will impress!
Ingredient Notes
Crafting the ultimate Beef Bacon Cheeseburger with Caramelized Onions starts with understanding the star players in our ingredient list. Every component contributes to that mouthwatering symphony of flavors and textures, so let’s get into the specifics.
- Ground Beef: For truly juicy and flavorful burger patties, I always recommend using ground beef with an 80/20 lean-to-fat ratio. This balance ensures your burgers stay moist and flavorful without being overly greasy. If you prefer a leaner burger, an 85/15 blend can work, but you might want to add a touch more seasoning or a dab of butter to the pan to compensate for less natural fat. Avoid anything too lean, as it can result in dry, crumbly patties.
- Beef Bacon: This is a key distinguishing factor for our recipe! Beef bacon offers a unique smoky, savory profile that complements the beef patty beautifully. Look for thinly sliced beef bacon for optimal crispiness. If you can’t find beef bacon, you could opt for thinly sliced cured beef pastrami or even a very lean, finely diced beef jerky that’s briefly sautéed to crisp it up, though the texture and flavor will be quite different.
- Cheese: When it comes to cheeseburgers, you can never go wrong with a classic. My go-to is sharp cheddar for its robust flavor and excellent melting properties. However, feel free to experiment! Provolone offers a milder, stretchier melt, while Swiss adds a nutty complexity. American cheese is fantastic for that classic gooey diner-style melt. Feel free to use your favorite sliceable cheese that melts well.
- Onions: For perfect caramelized onions, you need the right kind of onion and plenty of patience. Sweet onions (like Vidalia) or yellow onions are ideal. They have a higher sugar content which helps them caramelize beautifully, developing a deep, sweet, and slightly tangy flavor. Red onions can be used in a pinch, but they tend to have a stronger, sharper flavor even when caramelized.
- Burger Buns: A good bun is the foundation of any great burger. I love using brioche buns for their soft texture, slight sweetness, and ability to hold up to all the juicy fillings. Potato buns are another excellent choice, offering a tender chew. You could also opt for classic sesame seed buns, whole wheat buns for a healthier twist, or even gluten-free buns if needed. Lightly toasting them is non-negotiable!
- Seasonings: For the patties, a simple blend of salt, black pepper, and garlic powder is often all you need to enhance the natural beef flavor. For the caramelized onions, a pinch of salt and a tiny splash of a non-alcoholic cooking alternative (like a dash of balsamic vinegar or beef broth) towards the end can really deepen their flavor.
- Condiments: Beyond the core ingredients, think about what you love on your burger. Ketchup, mustard (Dijon or yellow), mayonnaise, or even a special burger sauce will elevate your creation.
Step-by-Step Instructions
Let’s get cooking! Follow these steps to assemble your incredible Beef Bacon Cheeseburgers with Caramelized Onions. Remember, patience is a virtue, especially with those onions!
- Caramelize the Onions (Start Here First!):
- Thinly slice 2-3 large yellow or sweet onions. Aim for uniform slices.
- In a large, heavy-bottomed pan or Dutch oven, melt 1-2 tablespoons of butter or a neutral oil (like olive or avocado oil) over medium-low heat.
- Add the sliced onions to the pan. Season with a pinch of salt.
- Cook, stirring occasionally, for 30-45 minutes. This is where patience comes in! The onions will gradually soften, release their moisture, and turn a rich, golden-brown color. If they start to stick, add a tiny splash of water or beef broth to deglaze the pan. Towards the very end, if desired, you can add a small dash of balsamic vinegar for an extra layer of sweetness and tang.
- Once deeply golden and soft, remove them from the pan and set aside.
- Cook the Beef Bacon:
- While the onions are caramelizing, or after they’re done, cook your beef bacon.
- Lay the slices of beef bacon in a cold pan (this helps prevent sticking and promotes even cooking).
- Cook over medium heat, flipping occasionally, until crispy and golden brown to your liking. This usually takes 8-12 minutes depending on thickness.
- Remove the crispy beef bacon and place it on a paper towel-lined plate to drain any excess fat.
- Prepare the Beef Patties:
- Divide 1.5-2 pounds of ground beef (80/20 recommended) into 4-6 equal portions, depending on your desired burger size.
- Gently form each portion into a patty, slightly wider than your bun, as they will shrink during cooking. Avoid overworking the meat, which can make the burgers tough.
- Press a shallow indentation (a “thumbprint”) into the center of each patty. This helps prevent the burgers from puffing up into a dome shape.
- Season both sides generously with salt, black pepper, and a touch of garlic powder right before cooking.
- Cook the Burgers:
- Heat a large skillet (cast iron works wonderfully) or a grill over medium-high heat. Add a tiny bit of oil if using a skillet, or if your beef is very lean.
- Place the seasoned patties in the hot pan/on the grill. Do not overcrowd the pan.
- Cook for 3-5 minutes per side for medium-rare, or longer for your desired doneness. Resist the urge to press down on the patties with a spatula; this squeezes out all the delicious juices.
- During the last minute of cooking, place a slice of cheese on top of each patty. Cover the pan (if using a skillet) or close the grill lid for 30-60 seconds to help the cheese melt perfectly.
- Remove the cheeseburgers from the heat and let them rest for a minute or two.
- Toast the Buns:
- While the burgers are cooking or resting, lightly butter the cut sides of your burger buns.
- Place them cut-side down in a clean, hot skillet (or on the grill) for 1-2 minutes until golden brown and lightly toasted. This adds texture and prevents the buns from getting soggy.
- Assemble Your Burgers:
- Spread your preferred condiments on the top and bottom halves of the toasted buns.
- Place a cheesy burger patty on the bottom bun.
- Top generously with a mound of your sweet caramelized onions.
- Add 2-3 slices of crispy beef bacon.
- Place the top bun on, gently pressing down.
- Serve immediately and enjoy your masterpiece!
Tips & Suggestions
To truly elevate your Beef Bacon Cheeseburgers with Caramelized Onions from good to absolutely phenomenal, here are a few extra tips I’ve picked up along the way:
- Mastering Caramelized Onions:
- Low and Slow is Key: I cannot stress this enough. Rushing caramelized onions will result in burnt or unevenly cooked onions, not the sweet, jammy goodness we’re aiming for. Keep the heat low and be patient.
- Deglaze for Flavor: If the onions start to stick or brown too quickly, add a tablespoon of water or beef broth to the pan. Scrape up any browned bits from the bottom – those are flavor bombs!
- A Touch of Sweetness: For an even deeper caramelization, you can add a tiny pinch of sugar or a splash of balsamic vinegar (non-alcoholic) in the last 10 minutes of cooking.
- Perfect Patties Every Time:
- Don’t Overmix: When forming patties, handle the ground beef as little as possible. Overworking the meat can lead to tough burgers.
- Thumbprint Trick: Always make that shallow indentation in the center of the patty. It truly helps the burger cook evenly and keeps it from puffing up, ensuring a flatter, more stable surface for toppings.
- Season Just Before Cooking: Salt draws out moisture, so I recommend seasoning your patties right before they hit the heat to keep them as juicy as possible.
- Rest Your Burgers: Just like steak, letting your cooked burgers rest for a minute or two off the heat allows the juices to redistribute, resulting in a more tender and juicy bite.
- Crispy Beef Bacon Brilliance:
- Start Cold: Laying beef bacon in a cold pan and then gradually heating it allows the fat to render slowly and evenly, resulting in crispier bacon.
- Don’t Overcrowd: Cook the bacon in batches if necessary to ensure even cooking and crispiness. Overcrowding lowers the pan’s temperature and can steam the bacon instead of frying it.
- Bun Care:
- Toasting is Essential: Always toast your buns! It adds a fantastic textural element and creates a barrier against the burger juices, preventing a soggy bun disaster. A little butter on the cut sides before toasting adds extra flavor.
- Serving Suggestions:
- These burgers are rich and satisfying on their own, but they pair wonderfully with classic sides like crispy fries, a fresh green salad, or even some homemade coleslaw.
Storage
While beef bacon cheeseburgers are truly best enjoyed fresh off the grill or stove, sometimes you might have leftovers or want to get a head start on meal prep. Here’s how I approach storage to maintain quality:
- Assembled Burgers: Not Recommended. I strongly advise against storing fully assembled burgers. The buns will inevitably become soggy from the juices and condiments, and the textures of the various components will degrade significantly.
- Caramelized Onions: These are fantastic for meal prep!
- Let the caramelized onions cool completely.
- Store them in an airtight container in the refrigerator for up to 5 days.
- They can also be frozen for up to 3 months. Portion them into smaller amounts in freezer-safe bags or containers. Thaw in the refrigerator overnight before reheating gently in a pan or microwave.
- Cooked Beef Bacon:
- Once cooked and cooled, store crispy beef bacon in an airtight container in the refrigerator for up to 3-4 days.
- To reheat, place them on a baking sheet and warm in a preheated oven at 350°F (175°C) for a few minutes until crispy again, or briefly in a skillet. Avoid the microwave if you want to retain crispiness.
- Cooked Burger Patties:
- Allow the cooked patties to cool completely.
- Store them in an airtight container in the refrigerator for up to 3 days.
- To reheat, you can gently warm them in a skillet over medium-low heat until heated through, or pop them in the microwave for a minute or two (though they might not be as juicy). If reheating in a skillet, you can add another slice of cheese to melt on top.
- Uncooked Burger Patties:
- If you’ve prepared extra patties but not cooked them, they can be stored raw in an airtight container in the refrigerator for 1-2 days. Separate them with parchment paper to prevent sticking.
- For longer storage, freeze individual raw patties (separated by parchment paper) in a freezer-safe bag or container for up to 3-4 months. Thaw in the refrigerator before cooking.
By storing components separately, you can enjoy delicious beef bacon cheeseburgers with caramelized onions even on a busy weeknight, with just a quick reheat and assembly!
Final Thoughts
I genuinely believe you’re in for an absolute treat with these incredible Beef Bacon Cheeseburgers With Caramelized Onions. The magic truly happens when the rich, savory beef patty meets that unique, crispy beef bacon and gooey, melted cheese, all crowned by those wonderfully sweet and jammy caramelized onions. It’s a combination that elevates a classic burger to something truly special, a symphony of textures and flavors that will have everyone asking for seconds.
There’s just something so comforting and undeniably delicious about every single bite, from the hearty beef to the unique crunch of the beef bacon, perfectly complemented by the sweet whisper of the onions. It’s not just a burger; it’s an experience, a moment of pure culinary delight. So go ahead, treat yourself and your loved ones to the unforgettable taste of these Beef Bacon Cheeseburgers With Caramelized Onions. I promise, you won’t regret it!
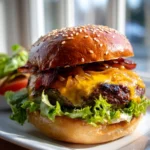
Irresistible Beef Bacon Cheeseburgers & Caramelized Onions
- Total Time: 1 hour
- Yield: 4-6 servings 1x
Description
Dive into the delicious world of Beef Bacon Cheeseburgers with Caramelized Onions, where juicy beef patties meet crispy beef bacon and sweet, jammy onions. This recipe transforms a classic burger into a gourmet experience that will impress your taste buds.
Ingredients
- 1.5–2 pounds ground beef (80/20 recommended)
- 2–3 large yellow or sweet onions
- 1–2 tablespoons butter or neutral oil (like olive or avocado oil)
- Thinly sliced beef bacon
- Sharp cheddar cheese (or your favorite sliceable cheese that melts well)
- Burger buns (brioche, potato, sesame seed, whole wheat, or gluten-free)
- Salt
- Black pepper
- Garlic powder
- A tiny splash of balsamic vinegar or beef broth (optional)
- Condiments (ketchup, mustard, mayonnaise, or special burger sauce)
Instructions
- Thinly slice 2-3 large yellow or sweet onions. Aim for uniform slices.
- In a large, heavy-bottomed pan or Dutch oven, melt 1-2 tablespoons of butter or a neutral oil over medium-low heat.
- Add the sliced onions to the pan. Season with a pinch of salt.
- Cook, stirring occasionally, for 30-45 minutes until the onions are golden-brown. If they start to stick, add a tiny splash of water or beef broth.
- Once deeply golden and soft, remove the onions from the pan and set aside.
- While the onions are caramelizing, cook your beef bacon in a cold pan over medium heat until crispy and golden brown, about 8-12 minutes.
- Remove the crispy beef bacon and place it on a paper towel-lined plate to drain excess fat.
- Divide 1.5-2 pounds of ground beef into 4-6 equal portions and form each portion into a patty, slightly wider than your bun.
- Press a shallow indentation into the center of each patty and season both sides with salt, black pepper, and garlic powder.
- Heat a large skillet or grill over medium-high heat. Add a tiny bit of oil if using a skillet.
- Place the seasoned patties in the hot pan/on the grill and cook for 3-5 minutes per side for medium-rare, or longer for desired doneness.
- During the last minute of cooking, place a slice of cheese on top of each patty and cover the pan or close the grill lid for 30-60 seconds to melt the cheese.
- While the burgers are cooking or resting, lightly butter the cut sides of your burger buns and toast them cut-side down in a hot skillet or on the grill for 1-2 minutes.
- Spread your preferred condiments on the toasted buns, place a cheesy burger patty on the bottom bun, top with caramelized onions, add crispy beef bacon, and place the top bun on.
- Serve immediately and enjoy your masterpiece!
- Prep Time: 15 mins
- Cook Time: 45 mins
- Category: Dinner
- Method: Grilling or Pan-Frying
- Cuisine: American
Nutrition
- Serving Size: 1 burger
- Calories: 700
- Sugar: 5 g
- Sodium: 900 mg
- Fat: 45 g
- Saturated Fat: 18 g
- Unsaturated Fat: 20 g
- Trans Fat: 0 g
- Carbohydrates: 30 g
- Fiber: 2 g
- Protein: 40 g
- Cholesterol: 120 mg
Keywords: For perfect caramelized onions, cook them low and slow. Don't overcrowd the pan when cooking bacon to ensure crispiness. Always toast your buns to prevent sogginess.