• Skip to primary navigation
  • Skip to main content
  • Skip to primary sidebar
Homesmad

Homesmad

  • Home
  • Breakfast & Brunch
  • Appetizers & Snacks
  • Dinner
  • Dessert
  • About
  • Privacy Policy
  • Contact
Homesmad
  • Home
  • Breakfast & Brunch
  • Appetizers & Snacks
  • Dinner
  • Dessert
  • About
  • Privacy Policy
  • Contact

Zesty Pepper Jelly Cream Cheese Dip: Quick Appetizer

November 10, 2025 by Lily author

Quick Pepper Jelly Cream Cheese Appetizer Dip And Bites is truly the ultimate secret weapon for anyone looking to impress guests with minimal effort and maximum flavor. We’ve all been there, wishing for an appetizer that disappears almost as quickly as we can set it out, leaving everyone asking for the recipe. Well, look no further!

This delightful creation, deeply rooted in Southern hospitality, takes humble ingredients and transforms them into something extraordinary. Pepper jelly itself has a fascinating history, evolving from a simple way to preserve peppers into a beloved condiment. Its pairing with rich, cool cream cheese quickly became a staple at potlucks, garden parties, and holiday gatherings across the United States. It’s a testament to how simple combinations can yield spectacular results.

We absolutely adore this dish because of its incredible versatility and utterly addictive taste.

The Perfect Blend of Sweet, Spicy, and Creamy

The vibrant kick of the pepper jelly, balanced beautifully by the smooth, tangy cream cheese, creates a symphony of flavors that is truly unforgettable. It’s not just delicious; it’s also wonderfully convenient, requiring no cooking and minimal prep time. Whether you serve it as an elegant dip for crackers and pretzels or transform it into individual bites for a more refined presentation, this Quick Pepper Jelly Cream Cheese Appetizer Dip And Bites is guaranteed to be a crowd-pleaser every single time. Get ready for rave reviews!

Zesty Pepper Jelly Cream Cheese Dip: Quick Appetizer this RECIPE

Ingredients:

Hello, fellow food lovers! This recipe for a Quick Pepper Jelly Cream Cheese Appetizer Dip And Bites is truly one of my all-time favorites for entertaining because it’s effortlessly elegant and incredibly delicious. The beauty lies in its simplicity, but I’ve got some fantastic tips and tricks to make it absolutely shine. Let’s gather what we need!

  • Cream Cheese: You’ll need two (8-ounce) blocks of full-fat cream cheese. I always recommend full-fat for the best texture and richest flavor, especially when it’s going to be the star of the show. However, if you’re watching your calories, you can absolutely use a reduced-fat version, but be aware that the texture might be slightly less creamy and a tad firmer. Make sure it’s softened to room temperature – this is crucial for a smooth, spreadable consistency.
  • Pepper Jelly: One (10-ounce to 12-ounce) jar of your favorite pepper jelly. This is where you can truly customize the heat level and flavor profile of your Quick Pepper Jelly Cream Cheese Appetizer Dip And Bites! I personally love a classic red pepper jelly for its vibrant color and balanced sweet-spicy kick. But don’t hesitate to experiment! Green pepper jelly offers a slightly different aesthetic, while jalapeño jelly will dial up the heat. For a more unique twist, consider a fruit-infused pepper jelly like cranberry pepper jelly during the holidays or peach pepper jelly in the summer.
  • Crackers or Crostini: An assortment of your favorite crackers or a freshly sliced baguette, toasted into crostini. The vehicle for delivering this delightful dip is just as important as the dip itself! I love a good sturdy cracker, like a Ritz cracker for its buttery flavor, or a simple water cracker or flatbread for a neutral base that lets the cream cheese and jelly truly shine. For a more sophisticated presentation, thinly sliced and toasted baguette pieces (crostini) are perfect. You could also offer pita chips, pretzel thins, or even fresh apple slices or cucumber rounds for a lighter, gluten-free option.
  • Optional Garnishes:
    • Fresh chives, finely chopped, for a hint of oniony freshness and a pop of green.
    • Fresh cilantro, roughly chopped, if you enjoy its bright, citrusy notes.
    • Toasted pecans or walnuts, roughly chopped, for added crunch and a nutty depth of flavor.
    • A sprinkle of flaky sea salt, to enhance the flavors and add a tiny textural contrast.
    • A light dusting of paprika for color.

Preparing the Cream Cheese Base

The foundation of our Quick Pepper Jelly Cream Cheese Appetizer Dip And Bites is, of course, the cream cheese. Achieving the perfect texture here is key to an enjoyable experience. No one wants lumpy or hard cream cheese when they’re trying to scoop up this deliciousness!

  1. Softening the Cream Cheese: This is arguably the most important step! I always make sure to take my cream cheese blocks out of the refrigerator at least 1-2 hours before I plan to assemble the appetizer. Room temperature cream cheese is essential because it allows for easy spreading and creates a smooth, uniform base that will perfectly meld with the pepper jelly. If you’re short on time, don’t worry, I have a quick hack for you! Unwrap the cream cheese blocks and place them on a microwave-safe plate. Microwave on low power (around 30-50%) for 15-30 seconds, checking frequently, until just softened. Be careful not to melt it completely, or you’ll end up with a runny mess! We’re aiming for pliable, not liquid.
  2. Decide on Your Presentation Style: For this versatile Quick Pepper Jelly Cream Cheese Appetizer, you have a couple of fabulous options for how to prepare your cream cheese.
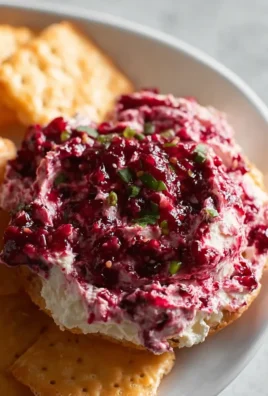
    • The Classic Block: The simplest method is to leave the softened cream cheese blocks as they are. You can gently arrange them side-by-side on your serving platter or mold them slightly into a single, cohesive rectangle or square shape directly on the plate. This method is wonderfully straightforward and always a crowd-pleaser.
    • The Whipped Dip: For an extra light and airy texture, you can whip the softened cream cheese. Simply place the softened cream cheese in a mixing bowl and beat it with an electric mixer (handheld or stand mixer) on medium speed for 1-2 minutes until it’s light, fluffy, and completely smooth. This creates a dreamier, more spreadable dip that pairs beautifully with crunchy crackers. If you go this route, you can then spread the whipped cream cheese into a shallow dish or bowl, creating a base for the jelly.
    • The Cream Cheese Ball (Optional but Fun!): If you want to get a little fancy, especially for a party, you can form the whipped cream cheese into a ball. After whipping, chill the cream cheese for about 30 minutes to firm it up slightly, then use your hands to shape it into a neat sphere. You can even roll it in finely chopped fresh chives or toasted nuts (like pecans or walnuts) for an extra layer of flavor and texture around the outside before topping with the jelly. This creates a stunning centerpiece for your Quick Pepper Jelly Cream Cheese Appetizer Dip And Bites!
  3. Prepare Your Platter: Select your serving platter or dish. For the classic block style, a rectangular or oval platter works wonderfully. For the whipped dip, a shallow, wide bowl or pie dish is ideal. If you’re making individual bites on crostini, you’ll need a flat surface to arrange them later.

Assembling Your Quick Pepper Jelly Cream Cheese Appetizer Dip And Bites

Now for the fun part – bringing it all together! This is where the magic happens and your Quick Pepper Jelly Cream Cheese Appetizer starts to take its delicious form.

  1. Arrange the Cream Cheese:
    • If you chose the Classic Block method, gently transfer the softened cream cheese blocks onto your chosen serving platter. You can place them side-by-side or slightly overlapping, depending on the size and shape of your platter. Use a spatula or the back of a spoon to gently smooth out the tops and sides, creating a neat surface.
    • For the Whipped Dip method, spoon or spread the whipped cream cheese evenly into your shallow serving dish. Create a slight well in the center if you like, to cradle the jelly.
    • If you opted for the Cream Cheese Ball, place your beautifully shaped ball directly in the center of your platter.

    Expert Tip: When placing the cream cheese, consider leaving a small border around the edges of the platter. This makes it easier for guests to scoop without making a mess and also allows space for your crackers or garnishes.

  2. Top with Pepper Jelly: Carefully spoon the entire jar of pepper jelly over the cream cheese. I like to start by spreading a generous amount over the center and then gently pushing it towards the edges with the back of a spoon, ensuring an even layer across the top. You want a good, thick layer of jelly so that every bite gets that perfect balance of sweet, spicy, and creamy. Don’t be shy with the jelly! It’s the star flavor alongside the cream cheese. If your jelly is very firm, you can gently warm it in the microwave for 10-15 seconds to make it more spreadable, but be careful not to make it too hot or watery. We want a luscious, glossy top layer.
  3. Chilling for Perfection: Once assembled, I highly recommend chilling your Quick Pepper Jelly Cream Cheese Appetizer Dip And Bites in the refrigerator for at least 30 minutes. This step is often overlooked but it’s really important! Chilling allows the cream cheese to firm up slightly, making it easier to scoop and preventing it from becoming too soft or messy as it sits out. It also helps the flavors to meld beautifully. You can even make this appetizer several hours in advance or the day before, which makes it an ideal party food! Just cover it loosely with plastic wrap to prevent it from absorbing any refrigerator odors.
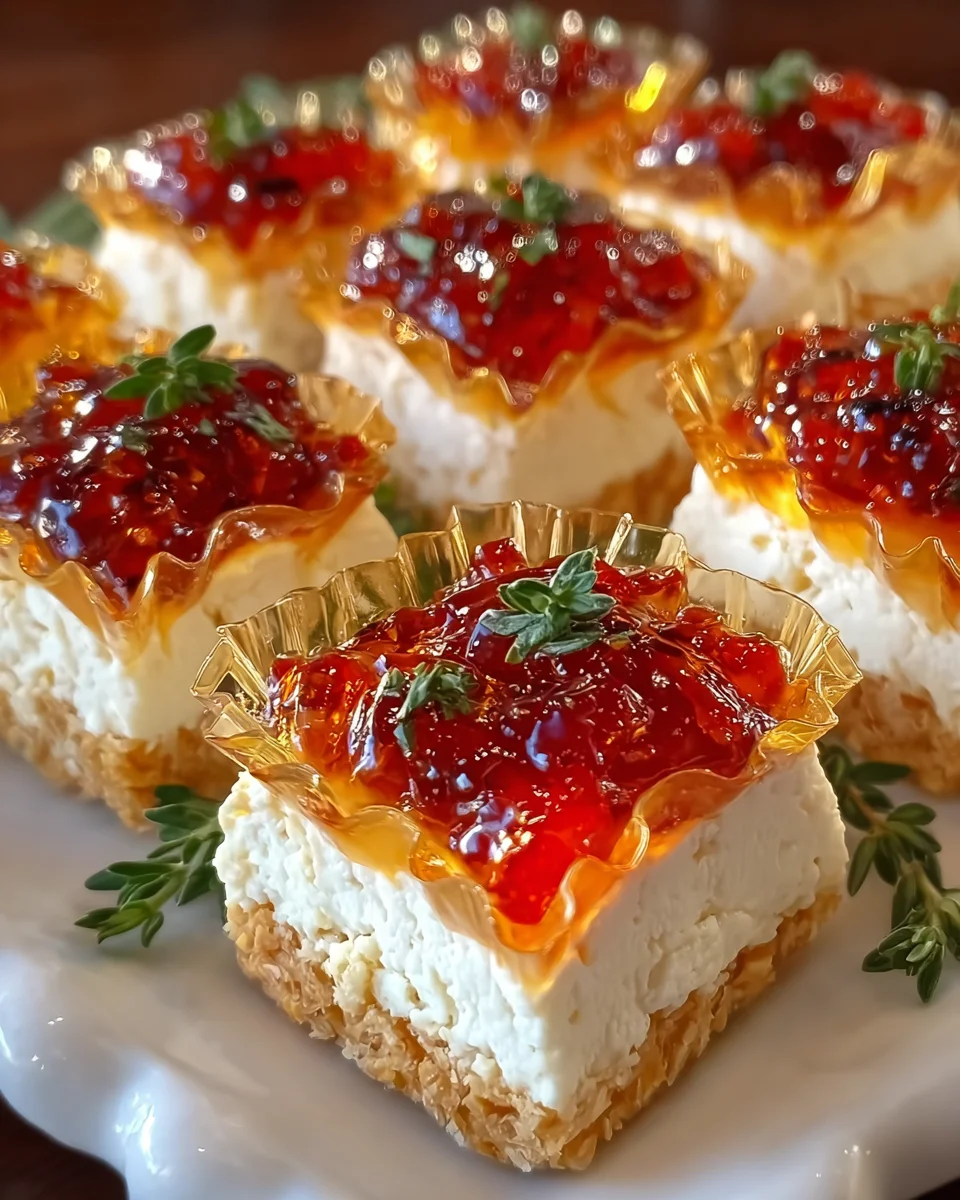
  4. Preparing Individual Bites (Optional but Impressive): If you’re aiming for individual, ready-to-grab bites, this is where the crostini come in handy. After toasting your baguette slices, allow them to cool completely. Then, spread a generous dollop of softened (or whipped) cream cheese onto each crostini. Top each with a small spoonful of pepper jelly. Arrange these beautiful little Quick Pepper Jelly Cream Cheese Appetizer Bites on a separate platter for an elegant presentation. This method is fantastic for events where guests might be mingling and you want to minimize shared serving utensils.

Serving Suggestions and Finishing Touches

You’ve done the hard work, and now it’s time to present your masterpiece! A beautifully garnished Quick Pepper Jelly Cream Cheese Appetizer Dip And Bites is not just a treat for the palate, but also for the eyes.

  1. Garnish with Flair: Just before serving, take your chilled appetizer out of the fridge. This is the perfect moment to add those optional garnishes that elevate both the look and the taste.
    • Fresh Herbs: Sprinkle finely chopped fresh chives or cilantro liberally over the pepper jelly. The vibrant green against the red jelly and white cream cheese is absolutely stunning and adds a wonderful fresh counterpoint to the richness.
    • Nutty Crunch: If you enjoy a textural contrast, sprinkle some toasted and chopped pecans or walnuts around the edges of the cream cheese or directly over the jelly. The warmth of toasted nuts adds a delightful complexity.
    • A Touch of Salt: A tiny pinch of flaky sea salt scattered over the top can miraculously enhance all the flavors, balancing the sweetness and creaminess.
    • Color Pop: A very light dusting of sweet paprika can add an extra layer of red color, making the dish even more visually appealing.
  2. Arrange the Dippers: Thoughtfully arrange your crackers, crostini, or other dippers around the cream cheese and jelly. You can fan them out on the same platter, or if you have a larger spread, place them in an adjacent bowl or basket. Offer a variety of textures and flavors in your dippers to cater to different preferences. Think about sturdy crackers for scooping, delicate water crackers for a lighter feel, or even vegetable sticks for a healthier option.
  3. Provide Serving Utensils: Don’t forget to include a small spreading knife or a spoon with your dip so guests can easily serve themselves. For the individual bites, ensure they are easy to pick up.
  4. Serving Temperature: While chilling is important, allowing the appetizer to sit out for 10-15 minutes before serving can slightly soften the cream cheese, making it even more enjoyable to scoop. However, don’t let it sit out for too long, especially on a warm day, to maintain food safety and optimal texture.

Creative Variations and Customizations

While the classic Quick Pepper Jelly Cream Cheese Appetizer Dip And Bites is perfect as is, it’s also a fantastic canvas for your culinary creativity! Don’t be afraid to experiment and make it your own.

  1. Cheese Swaps:
    • Goat Cheese: For a tangier, more assertive flavor, try using a log of goat cheese instead of cream cheese. It pairs incredibly well with the sweetness and heat of pepper jelly. Just soften it slightly and spread it.
    • Neufchâtel Cheese: This is a French cheese similar to cream cheese but with a slightly tangier flavor and often lower fat content. A great alternative if you want to experiment.
    • Whipped Feta Dip: Blend feta cheese with a bit of cream cheese or Greek yogurt until smooth, then top with pepper jelly for a Mediterranean-inspired twist.
  2. Jelly Adventures:
    • Seasonal Jellies: Embrace the seasons! Cranberry pepper jelly for Thanksgiving and Christmas, peach pepper jelly for summer barbecues, or apple pepper jelly for fall gatherings.
    • Spicier Kick: If you love heat, seek out an extra hot habanero or ghost pepper jelly. Just be sure to warn your guests!
    • Milder Options: For those who prefer less heat, a mild jalapeño jelly or even a regular sweet fruit jam (like apricot or fig preserves) can be used, though it won’t be a “pepper jelly” appetizer then!
  3. Savory Enhancements for the Cream Cheese:
    • Herbed Cream Cheese: Before spreading, mix the softened cream cheese with a tablespoon of finely chopped fresh herbs like dill, parsley, or chives. A tiny pinch of garlic powder or onion powder can also add a subtle savory depth.
    • Bacon Bits: Fold in some crispy, crumbled bacon bits into the cream cheese for a smoky, salty addition that complements the sweet and spicy jelly perfectly.
  4. Presentation Play:
    • Individual Cups: For a more hygienic and portion-controlled option, especially for larger parties, layer small dollops of whipped cream cheese and pepper jelly in shot glasses or mini serving cups.
    • Wreath Shape: For holiday entertaining, arrange your cream cheese ball or log in a wreath shape on a round platter, leaving a space in the center. Fill the center with the pepper jelly and garnish with fresh rosemary sprigs and cranberries for a festive look.
  5. Dipper Diversification:
    • Pretzel Crisps: Offer a salty, crunchy contrast.
    • Vegetable Sticks: Carrots, celery, bell pepper strips, or even blanched asparagus spears.
    • Apple or Pear Slices: The crispness and natural sweetness of fruit are fantastic with this appetizer.
    • Ginger Snaps: For a truly unexpected and delightful twist, especially with a cranberry pepper jelly, try serving with ginger snaps for a sweet and spicy festive bite!

Tips for a Perfect Quick Pepper Jelly Cream Cheese Appetizer Every Time

Even though this recipe is incredibly simple, a few pointers can ensure your Quick Pepper Jelly Cream Cheese Appetizer Dip And Bites always turns out perfectly, making you look like a seasoned chef with minimal effort!

  1. Temperature is Everything: As mentioned, perfectly softened cream cheese is non-negotiable for a smooth, spreadable base. If it’s too cold, it will be lumpy and hard to work with. If it’s too warm, it can become too soft and runny, especially once the jelly is added. Aim for that sweet spot: soft but still holding its shape.
  2. Quality Ingredients Matter: While a budget-friendly recipe, using good quality cream cheese and a pepper jelly you genuinely enjoy will make a noticeable difference. You’re only working with two main ingredients, so let them shine!
  3. Don’t Rush the Chill: Giving your assembled Quick Pepper Jelly Cream Cheese Appetizer at least 30 minutes in the fridge before serving is crucial. It allows the cream cheese to firm up just enough so it’s easy to scoop without being messy, and it lets the flavors meld together beautifully.
  4. The Right Tool for the Job: Provide a sturdy, small serving knife or spreader with the dip. This makes it easy for guests to scoop both the cream cheese and the jelly onto their crackers without making a mess or struggling.
  5. Consider Your Platter: Choose a platter or dish that complements the amount of cream cheese and jelly you’re using. A platter that’s too large will make your appetizer look sparse, while one that’s too small will make it look crowded. A slight lip on the platter can also help contain any stray drips of jelly.
  6. Mind the Environment: If serving outdoors or in a warm room, consider placing your Quick Pepper Jelly Cream Cheese Appetizer Dip And Bites platter on top of a larger bowl filled with ice. This will help keep the cream cheese firm and cool, extending its serving time without compromising texture or food safety.
  7. Taste and Adjust: Before serving, always do a quick taste test. Does the jelly have enough kick for your preference? Is the cream cheese sufficiently creamy? While there isn’t much to adjust, tasting helps you understand your ingredients better for next time.

Storage and Make-Ahead Advice

One of the many reasons I adore this Quick Pepper Jelly Cream Cheese Appetizer Dip And Bites is how incredibly forgiving it is and how well it lends itself to make-ahead preparation. This makes it an absolute lifesaver for entertaining!

  1. Make-Ahead the Dip:
    • You can fully assemble your pepper jelly cream cheese dip (cream cheese on the platter, topped with jelly) up to 2-3 days in advance.
    • Simply cover the platter tightly with plastic wrap, ensuring the wrap doesn’t directly touch the jelly if possible (you can create a little tent with toothpicks if you’re worried, but usually, it’s fine).
    • Store it in the refrigerator. The flavors will actually deepen and meld even more over time, making it even more delicious!
    • When you’re ready to serve, remove it from the fridge, uncover, add your garnishes, and arrange the crackers. Allowing it to sit at room temperature for about 15-20 minutes before serving will take the chill off and make the cream cheese perfectly scoopable.
  2. Storing Leftovers:
    • If you have any leftovers of the assembled dip, simply cover the platter tightly with plastic wrap and return it to the refrigerator.
    • It will remain fresh and delicious for another 3-4 days. The jelly might slightly bleed into the cream cheese over time, but this doesn’t affect the taste at all, just the crispness of the visual separation.
    • Important Note: While the dip itself stores well, any crackers or crostini that have already been dipped or sat next to the moist dip will likely become soggy. It’s best to store leftover dip separately from any uneaten crackers.
  3. Storing Ingredients Separately:
    • If you prefer to assemble just before serving, you can soften the cream cheese, place it on the platter, and cover it, storing it in the fridge for up to 3 days. Keep the pepper jelly in its jar.
    • Then, just before guests arrive, spoon on the jelly, garnish, and serve. This ensures the freshest look.
  4. Freezing? Not Recommended:
    • I generally do not recommend freezing cream cheese-based dips. Cream cheese, when frozen and then thawed, can often change in texture, becoming grainy or watery, which would definitely detract from the smooth, luxurious experience we’re aiming for with this Quick Pepper Jelly Cream Cheese Appetizer Dip And Bites.
    • The pepper jelly itself might freeze fine, but the combination together is best enjoyed fresh or simply refrigerated.

With these storage and make-ahead tips, you can confidently prepare this delightful appetizer well in advance, leaving you more time to enjoy your guests and less time fussing in the kitchen. Enjoy making and sharing this fantastic Quick Pepper Jelly Cream Cheese Appetizer Dip And Bites!

Zesty Pepper Jelly Cream Cheese Dip: Quick Appetizer

Conclusion:

Why This Appetizer Is a Must-Try:

So there you have it! We’ve journeyed through the simple steps to create an appetizer that truly punches above its weight. What I love most about this recipe is its sheer simplicity combined with an undeniable wow-factor. It’s that rare gem that requires minimal effort but always elicits compliments. Think about those moments when you need a fantastic dish to bring to a potluck, or a sophisticated yet unfussy starter for an impromptu gathering, or perhaps just a delightful treat for yourself after a long day. This recipe delivers every single time. It brings together the creamy richness of cream cheese, the vibrant sweetness and subtle heat of pepper jelly, and a delightful texture that makes every bite an experience. It’s wonderfully balanced, hitting all the right notes on your palate – sweet, savory, and just a hint of piquant warmth that makes you reach for more. The convenience factor cannot be overstated; from pantry to plate, it’s incredibly swift, making it an absolute lifesaver when time is of the essence but you refuse to compromise on flavor or presentation. This isn’t just another dip; it’s a testament to how incredible ingredients, thoughtfully combined, can elevate any occasion. You’ll find yourself relying on it again and again for its consistent deliciousness and ease, proving that gourmet taste doesn’t have to come with a gourmet effort or a lengthy prep time. It’s truly a standout for its approachable elegance.

Unleash Your Creativity: Serving Suggestions & Variations:

But the journey doesn’t end with the basic dip; oh no, the beauty of this creation truly shines in its versatility! While it’s utterly delicious scooped with classic buttery crackers, I wholeheartedly encourage you to branch out and explore the many possibilities. Imagine spreading it generously onto thinly sliced, toasted baguette rounds or rustic crostini – perhaps brushed lightly with olive oil and garlic before toasting – creating elegant, perfectly portioned, bite-sized morsels that are ideal for a sophisticated soirée or a casual wine night. For a gluten-free and lighter option, crisp cucumber rounds or vibrant bell pepper strips (think red, yellow, or orange for a pop of color) make excellent dippers, adding a refreshing crunch that contrasts beautifully with the creamy dip. Or, for a touch of fruity sweetness and a sophisticated pairing, try serving it alongside crisp apple or pear slices, allowing the fruit’s natural sugars and subtle tartness to play off the pepper jelly’s spice and the cream cheese’s richness. Don’t shy away from experimenting with garnishes either; a sprinkle of fresh chives, finely chopped parsley, or even a few sprigs of fresh thyme can add a beautiful pop of color and a fresh herbaceous note that brightens the whole dish. For those who love a little extra crunch and a deeper flavor profile, toasted pecans or walnuts scattered generously over the top provide a wonderful textural contrast and a nutty depth that complements the other flavors perfectly. And if you’re feeling adventurous and craving something warm and gooey, consider baking the entire cream cheese block with the jelly on top for about 10-15 minutes at 350°F (175°C) until it’s warm through and slightly bubbly; this creates a comforting, irresistible warm dip that’s absolutely perfect for colder evenings or cozy gatherings. You could even swap out the classic red pepper jelly for a fig jam, apricot preserves, or a more exotic mango chutney for a completely different yet equally delightful flavor profile, or introduce a tiny pinch of red pepper flakes into the cream cheese mixture for an extra fiery kick if you like things spicier. This is where the magic truly happens: personalizing it to your specific taste and the occasion!

Your Culinary Adventure Awaits!

Ultimately, this recipe for a Quick Pepper Jelly Cream Cheese Appetizer Dip And Bites is more than just a recipe; it’s a gateway to effortless entertaining and delightful indulgence. I genuinely believe it will become a much-loved staple in your culinary repertoire, a trusted go-to for countless future occasions. I urge you to give it a try – experience firsthand the sheer joy of creating something so remarkably flavorful and impressive with such minimal fuss. It’s a testament to how simple ingredients can come together to create something truly spectacular. And when you do, please don’t keep your success to yourself! I would absolutely love to hear about your experience. Did you discover a new favorite serving suggestion that stole the show? Did you add a unique twist or a secret ingredient that elevated it even further? Share your creations, your valuable feedback, and your culinary triumphs with me and our community! Your culinary adventures inspire me endlessly, and I can’t wait to see all the wonderful ways you make this simple yet spectacularly delicious appetizer your very own. Happy dipping, and happy sharing!


Quick Pepper Jelly Cream Cheese Appetizer Bites

Effortlessly elegant and incredibly delicious, these Pepper Jelly Cream Cheese Bites are the ultimate sweet, spicy, and creamy appetizer. Perfectly served in mini phyllo shells, they are a crowd-pleaser requiring minimal effort and no cooking.

Prep Time
15 Minutes
Cook Time
8 Minutes
Total Time
30 Minutes
Servings
15 appetizer bites

Ingredients


Instructions


Important Information

Nutrition Facts (Per Serving)

It is important to consider this information as approximate and not to use it as definitive health advice.

Allergy Information

Please check ingredients for potential allergens and consult a health professional if in doubt.

« Previous Post
Quick Chicken Pot Pie Pasta – Easy Weeknight Meal!
Next Post »
Spinach Dip Pinwheels: Easy, Delicious Bite-Sized Appetizer

If you enjoyed this…

Potato Cheese Sticks: Crispy, Tasty Homemade Snack!

Spicy Christmas Cranberry Jalapeno Dip Recipe!

Delicious Apple Camembert Skewers with Walnuts Recipe

Primary Sidebar

Browse by Diet

BreakfastDinnerLunchDessertAppetizer

Sweet Peach Yogurt Parfait Delight

One of my fondest memories is from a lazy summer afternoon spent at my grandmother’s house. The sun filtered through the kitchen window, casting a warm glow over the table where she would create her culinary magic. It was during one of those blissful moments that I first tasted her Peach Yogurt Parfait with Honey and Granola. The sweet aroma of ripe peaches mingling with creamy yogurt and the crunch of granola was nothing short of heavenly. It felt like summer captured in a bowl, and I still remember the joy of diving in with a spoon, each layer revealing a new burst of flavor.

When I think about that parfait, I can almost hear the gentle hum of the bees outside, reminding me of the floral notes that honey brings to every bite. The vibrant yellows and soft oranges of the peaches contrast beautifully with the creamy white yogurt and the golden crunch of granola. It’s a dish that not only looks delightful but also tastes like a celebration of fresh, wholesome ingredients.

What makes my version of this Peach Yogurt Parfait special is the careful balance of flavors and textures. I use ripe, juicy peaches, drizzled with locally sourced honey, and a homemade granola that’s bursting with nuts and seeds for an extra crunch. It’s a simple dish, but every layer is crafted with love and attention.

Let me show you exactly how to make this delightful parfait, so you can bring a bit of that summer magic into your kitchen!

Sweet Peach Yogurt Parfait Delight

Why You’ll Love This Recipe

  • Delightfully creamy texture from the Greek yogurt, paired with the juicy sweetness of fresh peaches.
  • Ready in under 20 minutes, making it a quick and satisfying breakfast or snack option.
  • Budget-friendly, using common ingredients that you may already have in your pantry.
  • Customizable with your favorite granola and nuts, allowing you to tailor each parfait to your taste.
  • Perfectly balanced flavors with the bright acidity of lemon juice and the sweetness of honey enhancing the peaches.

Ingredients

  • For the Parfait:
  • 2 cups plain Greek yogurt (or vanilla yogurt for a sweeter option)
  • 2 large ripe peaches, diced (about 2 cups)
  • 1 tablespoon fresh lemon juice (to prevent browning of peaches)
  • 2 tablespoons honey (plus more for drizzling)
  • 1 teaspoon vanilla extract (optional for extra flavor)
  • For the Granola:
  • 1 cup granola (store-bought or homemade; see notes for a simple granola recipe)
  • 1/4 cup sliced almonds (optional for added crunch)
  • 1/4 cup shredded coconut (optional for added flavor)

Let’s dive into some key ingredients that make this Peach Yogurt Parfait so delightful! First, the Greek yogurt is not only creamy but also packed with protein, making it a satisfying option for breakfast or a snack. If you’re looking for a sweeter option, you can easily substitute it with vanilla yogurt, though it may alter the overall flavor balance. Next, the ripe peaches are the star of the show; their natural sweetness shines through, so I recommend choosing peaches that yield slightly to pressure, indicating they’re perfectly ripe. If peaches aren’t in season, feel free to use nectarines or even frozen peaches—just thaw them before use. Finally, honey adds a lovely floral sweetness that ties everything together. If you prefer, maple syrup can serve as a delicious substitute.

Step-by-Step Instructions

  1. Start by preparing the peaches. Wash them thoroughly, then slice and dice them into bite-sized pieces. In a medium bowl, toss the diced peaches with 1 tablespoon of fresh lemon juice to prevent browning. Set aside for about 5 minutes while the lemon juice works its magic.
  2. In a separate bowl, combine the Greek yogurt, 2 tablespoons of honey, and 1 teaspoon of vanilla extract if using. Stir the mixture until smooth and thoroughly blended. This should take about a minute. Avoid overmixing to maintain the creaminess of the yogurt.
  3. Now it’s time to layer your parfait. Grab a clear glass or bowl to showcase your beautiful creation. Start with a generous spoonful of the yogurt mixture at the bottom—about 1/4 cup will do. Use a spoon to spread it evenly.
  4. Add a layer of the diced peaches over the yogurt, ensuring they cover the yogurt completely. You might want to use about half of what you have prepared—roughly 1 cup. This layer should be visually appealing, so arrange the peaches neatly.
  5. Sprinkle 1/4 cup of granola over the peaches. This adds a delightful crunch. Make sure to distribute it evenly to ensure every bite has that satisfying texture. Avoid packing it down too tightly, as you want it to maintain its crunch.
  6. Repeat the layers: spoon in another 1/4 cup of yogurt, followed by another cup of peaches, and another sprinkle of granola. You should have at least two layers, but feel free to add more depending on your glass size.
  7. Finish off your parfait with a drizzle of honey on top for added sweetness and a touch of elegance. If you’re using sliced almonds or shredded coconut, sprinkle them on top now. It adds a lovely visual contrast and extra flavor.
  8. Serve immediately or refrigerate for up to 30 minutes before serving to allow the flavors to meld together. However, I recommend enjoying it fresh to maintain the granola’s crunch.

Pro Tips for the Best Peach Yogurt Parfait With Honey And Granola

  • Make sure to choose ripe peaches for the best flavor and texture. A common mistake is using unripe fruit, which can lead to a less enjoyable parfait. Look for peaches that are fragrant and slightly soft to the touch.
  • Use a clear glass to assemble your parfait; this not only makes for a beautiful presentation but also allows you to see the colorful layers, which adds to the enjoyment of eating it.
  • For an even creamier texture, consider whipping the Greek yogurt with a hand mixer for a couple of minutes before layering. This small adjustment makes a huge difference in mouthfeel.
  • Be mindful of the granola-to-yogurt ratio. Too much granola can overwhelm the parfait, while too little can make it feel too creamy. Aim for about 1/4 cup of granola per layer for the perfect balance.
  • If you’re making this for a gathering, consider preparing the yogurt and peaches ahead of time and layering them just before serving. This ensures the granola stays crunchy!

Variations & Serving Ideas

There are so many ways to get creative with your Peach Yogurt Parfait! For a tropical twist, swap out the peaches for mangoes or pineapples and top with coconut flakes. If you prefer a berry flavor, mix in some blueberries or strawberries with the peaches for added color and taste. For a nutty version, incorporate chopped walnuts or pecans instead of almonds.

As for serving ideas, this parfait pairs beautifully with a side of scrambled eggs for a hearty breakfast or fresh fruit salad for a light lunch. You might also enjoy it alongside whole grain toast with almond butter for an energizing snack. The contrast of flavors and textures will elevate your meal experience!

Storage, Make-Ahead & Reheating

The Peach Yogurt Parfait is best enjoyed fresh, but you can prepare some components ahead of time. Store the layered parfait in an airtight container in the refrigerator for up to 24 hours. However, be cautious; the granola may lose its crunch if stored too long. You can freeze the yogurt and peach mixture for up to 2 months; just remember to thaw it in the refrigerator overnight before serving.

If you plan to enjoy this dish the next day, it can taste even better as the flavors meld together. Just remember to add the granola right before serving to keep its delightful crunch!

Frequently Asked Questions

Can I make Peach Yogurt Parfait With Honey And Granola ahead of time?

Yes — in fact, it tastes even better the next day as the flavors meld. However, I recommend waiting to add the granola until just before serving to maintain its crunch.

What can I substitute for Greek yogurt?

If you prefer a lighter option, you can substitute Greek yogurt with regular yogurt or a dairy-free alternative like coconut yogurt. Just remember that this may alter the creaminess and flavor profile slightly.

Can I use frozen peaches for this parfait?

Absolutely! Just make sure to thaw the frozen peaches before using them. They will still add great flavor, though the texture may be slightly softer than fresh peaches.

How do I make the parfait vegan?

To make a vegan version, substitute the Greek yogurt with a plant-based yogurt alternative, and replace honey with maple syrup or agave nectar. This keeps the parfait sweet while adhering to a vegan diet.

What other fruits can I use in this recipe?

You can mix and match fruits based on your preference. Try using strawberries, blueberries, raspberries, or even bananas. Just make sure to adjust the lemon juice as needed to prevent browning.

Sweet Peach Yogurt Parfait Delight

Final Thoughts

The Peach Yogurt Parfait with Honey and Granola is a delightful blend of creamy yogurt, sweet peaches, and crunchy granola that creates a satisfying and nourishing treat. Each layer bursts with flavor, making it a perfect choice for breakfast or a light dessert.

This is the kind of recipe I come back to again and again, especially when I want something refreshing and wholesome to start my day. The harmony of sweet and tart flavors, combined with the delightful crunch, never fails to lift my spirits!

I encourage you to give this parfait a try and indulge in its comforting goodness. Feel free to share your results or even add your own twist—perhaps a sprinkle of cinnamon or a handful of nuts. Enjoy creating your perfect parfait!

Print
clock clock iconcutlery cutlery iconflag flag iconfolder folder iconinstagram instagram iconpinterest pinterest iconfacebook facebook iconprint print iconsquares squares iconheart heart iconheart solid heart solid icon

Peach Yogurt Parfait


  • Author: Lily author
  • Total Time: 15 minutes
  • Yield: 4 servings 1x
Pin Recipe
Print Recipe

Description

This Peach Yogurt Parfait combines creamy Greek yogurt, juicy peaches, and crunchy granola for a delightful treat. It’s a perfect breakfast or snack that captures the essence of summer in every bite.


Ingredients

Scale
  • For the Parfait:
  • 2 cups plain Greek yogurt (or vanilla yogurt for a sweeter option)
  • 2 large ripe peaches, diced (about 2 cups)
  • 1 tablespoon fresh lemon juice (to prevent browning of peaches)
  • 2 tablespoons honey (plus more for drizzling)
  • 1 teaspoon vanilla extract (optional for extra flavor)
  • For the Granola:
  • 1 cup granola (store-bought or homemade; see notes for a simple granola recipe)
  • 1/4 cup sliced almonds (optional for added crunch)
  • 1/4 cup shredded coconut (optional for added flavor)

Instructions

  1. Start by preparing the peaches. Wash them thoroughly, then slice and dice them into bite-sized pieces. In a medium bowl, toss the diced peaches with 1 tablespoon of fresh lemon juice to prevent browning. Set aside for about 5 minutes while the lemon juice works its magic.
  2. In a separate bowl, combine the Greek yogurt, 2 tablespoons of honey, and 1 teaspoon of vanilla extract if using. Stir the mixture until smooth and thoroughly blended. This should take about a minute. Avoid overmixing to maintain the creaminess of the yogurt.
  3. Now it’s time to layer your parfait. Grab a clear glass or bowl to showcase your beautiful creation. Start with a generous spoonful of the yogurt mixture at the bottom—about 1/4 cup will do. Use a spoon to spread it evenly.
  4. Add a layer of the diced peaches over the yogurt, ensuring they cover the yogurt completely. You might want to use about half of what you have prepared—roughly 1 cup. This layer should be visually appealing, so arrange the peaches neatly.
  5. Sprinkle 1/4 cup of granola over the peaches. This adds a delightful crunch. Make sure to distribute it evenly to ensure every bite has that satisfying texture. Avoid packing it down too tightly, as you want it to maintain its crunch.
  6. Repeat the layers: spoon in another 1/4 cup of yogurt, followed by another cup of peaches, and another sprinkle of granola. You should have at least two layers, but feel free to add more depending on your glass size.
  7. Finish off your parfait with a drizzle of honey on top for added sweetness and a touch of elegance. If you’re using sliced almonds or shredded coconut, sprinkle them on top now. It adds a lovely visual contrast and extra flavor.
  8. Serve immediately or refrigerate for up to 30 minutes before serving to allow the flavors to meld together. However, I recommend enjoying it fresh to maintain the granola’s crunch.
  • Prep Time: 15 mins
  • Cook Time: 0 mins
  • Category: Breakfast
  • Method: No-cook
  • Cuisine: American

Nutrition

  • Serving Size: 1 parfait
  • Calories: 250
  • Sugar: 20 g
  • Sodium: 50 mg
  • Fat: 5 g
  • Saturated Fat: 2 g
  • Unsaturated Fat: 3 g
  • Trans Fat: 0 g
  • Carbohydrates: 40 g
  • Fiber: 3 g
  • Protein: 10 g
  • Cholesterol: 10 mg

Keywords: Choose ripe peaches for the best flavor and texture. Use a clear glass for a beautiful presentation. For creaminess, consider whipping the yogurt before layering. Be mindful of the granola-to-yogurt ratio. Prepare yogurt and peaches ahead of time for gatherings, layering just before serving.

Did you make this recipe?

Share a photo and tag us — we can't wait to see what you've made!

Sun-Kissed Frozen Orange Cream Slush

As a child, summer days felt like they lasted forever. I remember the sticky heat wrapping around me as I played outside, my laughter mingling with the sounds of the neighborhood. But nothing could cool me down quite like the moment I’d spot my grandmother, laboring over her blender, whipping up her famous Frozen Orange Creamsicle Slush. That vibrant orange treat, with its frosty texture and sweet citrus aroma, was like a burst of sunshine in a cup. Just one sip, and I could feel the coolness wash over me, sparking pure joy.

This Frozen Orange Creamsicle Slush has a way of making you feel like a kid again. Its creamy, dreamy consistency is a delightful balance of bright orange and soft vanilla, inviting you to dive right in. The refreshing tang of orange dances on your tongue, while the smooth creaminess envelops you in a comforting embrace. It’s a nostalgic treat that’s perfect for hot summer afternoons or anytime you need a little pick-me-up.

What makes my version of this slush stand out is the addition of a hint of vanilla bean, which elevates the flavor and adds an extra layer of richness. Plus, it’s super easy to whip up with just a few simple ingredients that you probably already have on hand! So, if you’re ready to relive those sun-soaked memories, let me show you exactly how to make it.

Sun-Kissed Frozen Orange Cream Slush

Why You’ll Love This Recipe

  • Each slush is a perfect blend of creamy vanilla and zesty orange, creating a nostalgic flavor reminiscent of summer days.
  • This refreshing treat is ready in under 15 minutes, making it an ideal quick dessert for unexpected guests or hot afternoons.
  • With just 8 simple ingredients, it’s budget-friendly, ensuring you don’t have to break the bank to enjoy a delicious slush.
  • The slush has a perfectly smooth texture, thanks to the combination of ice and ice cream, providing a delightful contrast to the bright citrus flavors.
  • It’s highly customizable; you can easily adjust the sweetness and add fresh herbs for a unique twist that suits your taste.

Ingredients

  • 2 cups orange juice (freshly squeezed or store-bought)
  • 1 cup vanilla ice cream
  • 1 cup crushed ice
  • 1/2 cup milk (whole or 2%)
  • 1/4 cup granulated sugar (adjust based on sweetness preference)
  • 1 teaspoon vanilla extract
  • Zest of 1 orange (for added flavor)
  • Fresh orange slices and mint leaves (for garnish)

The star of this Frozen Orange Creamsicle Slush is the orange juice, which provides the vibrant, citrusy base. Freshly squeezed juice will yield the brightest flavor, but store-bought options can be just as convenient. If you’re opting for store-bought, choose 100% pure juice with no added sugars for the best results. Another essential ingredient is the vanilla ice cream; it adds creaminess and sweetness. You can substitute it with dairy-free ice cream if you’re looking for a vegan option. Whole or 2% milk complements the ice cream, creating a smooth blend. If you want a lower-calorie version, almond or oat milk can be good alternatives.

Lastly, the granulated sugar can be adjusted based on your sweetness preference. If you prefer a more natural sweetener, consider using honey or agave syrup. The orange zest enhances the flavor profile, providing an aromatic pop that brings the whole slush together. Don’t skip it! It adds an extra layer of brightness that makes this slush truly special.

Step-by-Step Instructions

  1. Start by preparing your ingredients. Gather 2 cups of orange juice, 1 cup of vanilla ice cream, and 1 cup of crushed ice. Make sure the ice is finely crushed, as larger chunks can make blending difficult.
  2. In a blender, combine the orange juice, vanilla ice cream, crushed ice, and 1/2 cup of milk. Add 1/4 cup of granulated sugar and 1 teaspoon of vanilla extract. If you like a sweeter slush, consider adding a bit more sugar at this stage.
  3. Add the zest of 1 orange to the blender. This step is crucial for enhancing the citrus flavor of your slush. Make sure not to include the bitter white pith—only the flavorful zest.
  4. Blend the mixture on medium-high speed for about 30-45 seconds. Stop once the ingredients are fully combined and the slush has a smooth, even consistency. If you notice large chunks of ice, blend for an additional 10-15 seconds. Avoid over-blending, as this can make the slush too liquidy.
  5. Once blended, taste the slush. If it needs more sweetness, add a little more sugar and blend for a few more seconds. If it’s too thick, you can add a splash of milk to reach your desired consistency.
  6. Pour the slush into glasses. This recipe typically serves 4, but you can easily double it for larger gatherings. Use a spoon to help guide the slush into the glasses if needed.
  7. Garnish each serving with fresh orange slices and mint leaves. The mint not only adds a pop of color but also a refreshing aroma that complements the citrus flavors beautifully.
  8. Serve immediately and enjoy! If you’ve made extra, you can refrigerate it for a short time, but it’s best enjoyed fresh.

Pro Tips for the Best Frozen Orange Creamsicle Slush

  • Don’t skip the orange zest! It’s a game-changer for flavor. Always zest before juicing to make it easier.
  • Use a high-powered blender for the best texture. A standard blender may struggle with ice, leading to uneven consistency. If you have a food processor, that can work too, but ensure the ice is finely crushed.
  • Adjust the ice-to-liquid ratio carefully. If your slush is too thick, it won’t blend well. Start with less ice and add more until you reach your preferred texture.
  • Be cautious with the sugar! Always start with the lower amount, as you can easily add more, but it’s hard to fix an overly sweet slush.
  • For a fun twist, consider adding a splash of coconut milk or a handful of fresh fruit like strawberries or pineapple. This not only enhances the flavor but also adds a beautiful color contrast.

Variations & Serving Ideas

There are countless ways to put a spin on your Frozen Orange Creamsicle Slush. Consider making a tropical version by adding in some pineapple juice or coconut milk for a delightful tropical twist. If you’re feeling adventurous, try incorporating a handful of frozen mango or peach slices for added sweetness. For a lighter version, swap out the vanilla ice cream for Greek yogurt for a creamy yet tangy alternative.

As for serving ideas, this refreshing slush pairs wonderfully with light summer dishes like grilled chicken skewers, fish tacos, or a simple salad topped with citrus vinaigrette. The bright, zesty flavors of the slush complement these dishes perfectly, making them an ideal pairing for a sunny day.

Storage, Make-Ahead & Reheating

This Frozen Orange Creamsicle Slush is best enjoyed fresh, but if you have leftovers, you can store them in an airtight container in the fridge for up to 2 days. Just keep in mind that the slush may lose some of its texture over time as the ice melts. It doesn’t freeze well, as the ice will turn into a solid block. If you must freeze it, blend again after thawing to restore the slushy consistency. This treat is best the day you make it, as the flavors meld together beautifully overnight, enhancing its deliciousness.

Frequently Asked Questions

Can I make Frozen Orange Creamsicle Slush ahead of time?

Yes — in fact, it tastes even better the next day as the flavors meld. However, it’s best to enjoy it fresh, as the texture can change if stored for too long. If you need to prepare it ahead, keep it in the fridge and re-blend before serving.

What kind of orange juice should I use?

For the best flavor, use freshly squeezed orange juice. However, if you’re short on time, opt for 100% pure store-bought juice without added sugars. This will ensure that your slush remains flavorful and refreshing.

Can I substitute the vanilla ice cream?

Absolutely! If you’re looking for a dairy-free option, coconut milk ice cream or a non-dairy vanilla ice cream can work wonderfully. They will still provide the creamy texture and sweetness you desire.

How can I adjust the sweetness of my slush?

You can easily adjust the sweetness by modifying the amount of sugar added. Start with 1/4 cup and taste the mixture before blending. If you prefer it sweeter, add more sugar gradually until it reaches your desired level.

What should I do if my slush is too thick?

If your slush is too thick, simply add a splash of milk or orange juice and blend again. This will help achieve a more drinkable consistency while maintaining the slushy texture. Adjust gradually to reach your preferred thickness.

Sun-Kissed Frozen Orange Cream Slush

Final Thoughts

The Frozen Orange Creamsicle Slush is a delightful blend of refreshing citrus and creamy goodness, making it a perfect treat for warm days or any time you crave a taste of nostalgia. The way the bright orange flavor dances with the creamy texture truly elevates this slush, transforming it into a satisfying escape from the everyday.

This is the kind of recipe I come back to again and again, especially when I’m looking to cool down or impress guests at a summer gathering. It’s simple to make and always brings smiles all around! I encourage you to try this recipe for yourself—don’t hesitate to share your results or even put your own spin on it. Happy slushing!

Print
clock clock iconcutlery cutlery iconflag flag iconfolder folder iconinstagram instagram iconpinterest pinterest iconfacebook facebook iconprint print iconsquares squares iconheart heart iconheart solid heart solid icon

Frozen Orange Creamsicle Slush


  • Author: Lily author
  • Total Time: 15 minutes
  • Yield: 4 servings 1x
Pin Recipe
Print Recipe

Description

This Frozen Orange Creamsicle Slush is a refreshing treat that combines creamy vanilla and zesty orange flavors. Perfect for hot summer days, it brings back nostalgic memories with every sip.


Ingredients

Scale
  • 2 cups orange juice (freshly squeezed or store-bought)
  • 1 cup vanilla ice cream
  • 1 cup crushed ice
  • 1/2 cup milk (whole or 2%)
  • 1/4 cup granulated sugar (adjust based on sweetness preference)
  • 1 teaspoon vanilla extract
  • Zest of 1 orange (for added flavor)
  • Fresh orange slices and mint leaves (for garnish)

Instructions

  1. Start by preparing your ingredients. Gather 2 cups of orange juice, 1 cup of vanilla ice cream, and 1 cup of crushed ice. Make sure the ice is finely crushed, as larger chunks can make blending difficult.
  2. In a blender, combine the orange juice, vanilla ice cream, crushed ice, and 1/2 cup of milk. Add 1/4 cup of granulated sugar and 1 teaspoon of vanilla extract. If you like a sweeter slush, consider adding a bit more sugar at this stage.
  3. Add the zest of 1 orange to the blender. This step is crucial for enhancing the citrus flavor of your slush. Make sure not to include the bitter white pith—only the flavorful zest.
  4. Blend the mixture on medium-high speed for about 30-45 seconds. Stop once the ingredients are fully combined and the slush has a smooth, even consistency. If you notice large chunks of ice, blend for an additional 10-15 seconds. Avoid over-blending, as this can make the slush too liquidy.
  5. Once blended, taste the slush. If it needs more sweetness, add a little more sugar and blend for a few more seconds. If it’s too thick, you can add a splash of milk to reach your desired consistency.
  6. Pour the slush into glasses. This recipe typically serves 4, but you can easily double it for larger gatherings. Use a spoon to help guide the slush into the glasses if needed.
  7. Garnish each serving with fresh orange slices and mint leaves. The mint not only adds a pop of color but also a refreshing aroma that complements the citrus flavors beautifully.
  8. Serve immediately and enjoy! If you’ve made extra, you can refrigerate it for a short time, but it's best enjoyed fresh.
  • Prep Time: 15 min
  • Cook Time: 0 min
  • Category: Dessert
  • Method: Blending
  • Cuisine: American

Nutrition

  • Serving Size: 1 serving
  • Calories: 200
  • Sugar: 30 g
  • Sodium: 50 mg
  • Fat: 5 g
  • Saturated Fat: 3 g
  • Unsaturated Fat: 2 g
  • Trans Fat: 0 g
  • Carbohydrates: 40 g
  • Fiber: 1 g
  • Protein: 2 g
  • Cholesterol: 20 mg

Keywords: Don't skip the orange zest! It's a game-changer for flavor. Always zest before juicing to make it easier.

Did you make this recipe?

Share a photo and tag us — we can't wait to see what you've made!

Zesty Lemon Poppy Seed Delight

One rainy afternoon, I found myself in my grandmother’s cozy kitchen, the kind that always smelled like warmth and love. She was whipping up her famous Lemon Poppy Seed Loaf, a recipe that had been passed down through generations. As the batter came together, the zesty aroma of fresh lemons filled the air, mingling perfectly with the nutty fragrance of poppy seeds. I can still picture her, apron-clad, as she expertly drizzled a vibrant citrus icing over the loaf, creating a glossy, sun-kissed finish that beckoned us to dive in. It was a moment that sparked my own passion for baking, and this recipe has become a cherished staple in my home ever since.

When you take a bite of this Lemon Poppy Seed Loaf, it’s like a burst of sunshine on your palate. The loaf is beautifully golden, with a tender crumb that melts in your mouth. Each slice is speckled with tiny poppy seeds, adding a delightful crunch that contrasts beautifully with the tangy sweetness of the lemon. And that citrus icing? It’s the finishing touch that elevates this loaf from ordinary to extraordinary, with its bright, zesty flavor dancing on your taste buds.

This recipe stands out because it embraces simplicity while delivering on flavor. I’ve added a hint of vanilla to the batter, enhancing the overall taste and making it even more indulgent. Trust me, once you make this Lemon Poppy Seed Loaf With Citrus Icing, it’ll become a go-to in your baking repertoire.

So, let me show you exactly how to make it!

Zesty Lemon Poppy Seed Delight

Why You’ll Love This Recipe

  • Moist and tender crumb that melts in your mouth, thanks to the perfect balance of butter and buttermilk.
  • Bright, zesty lemon flavor paired with crunchy poppy seeds, creating a delightful texture and taste experience.
  • Easy to whip up in just about an hour, perfect for last-minute gatherings or a cozy afternoon treat.
  • Budget-friendly with everyday ingredients, making it an accessible option for all home bakers.
  • The citrus icing adds a sweet tang that elevates the loaf, turning a simple recipe into a showstopper!

Ingredients

  • 1 ½ cups (190g) all-purpose flour
  • 1 teaspoon baking powder
  • ½ teaspoon baking soda
  • ½ teaspoon salt
  • 3 tablespoons poppy seeds
  • ½ cup (115g) unsalted butter, softened to room temperature
  • 1 cup (200g) granulated sugar
  • 2 large eggs
  • 1 teaspoon vanilla extract
  • 1 teaspoon lemon zest (from about 1 medium lemon)
  • ½ cup (120ml) buttermilk
  • 2 tablespoons fresh lemon juice

For the Citrus Icing:

  • 1 cup (120g) powdered sugar
  • 2 tablespoons fresh lemon juice
  • 1 tablespoon orange juice
  • 1 teaspoon lemon zest (for garnish, optional)

Let’s dive into the key ingredients that make this Lemon Poppy Seed Loaf so special. The all-purpose flour provides the structure and base for the loaf, while the baking powder and baking soda ensure it rises perfectly, giving the loaf a light texture. For a gluten-free variation, you could substitute the flour with a gluten-free all-purpose blend. Poppy seeds not only add a delightful crunch but also contribute to the unique flavor profile that pairs well with the citrus notes.

Unsalted butter is crucial for achieving the buttery richness that makes this loaf so moist. If you’re looking for a dairy-free option, coconut oil or a vegan butter can be used instead. The buttermilk is another essential component, providing acidity that activates the baking soda for a fluffy texture. If you don’t have buttermilk on hand, you can easily make a substitute by mixing ½ cup of milk with 1 tablespoon of vinegar or lemon juice and letting it sit for about 5 minutes.

Step-by-Step Instructions

  1. Preheat your oven to 350°F (175°C). Grease a 9×5-inch loaf pan or line it with parchment paper for easy removal later.
  2. In a medium mixing bowl, whisk together 1 ½ cups of all-purpose flour, 1 teaspoon of baking powder, ½ teaspoon of baking soda, ½ teaspoon of salt, and 3 tablespoons of poppy seeds. This helps to evenly distribute the baking agents and ensures a uniform rise.
  3. In a large mixing bowl, cream together ½ cup of softened unsalted butter and 1 cup of granulated sugar using an electric mixer on medium speed for about 3-4 minutes, until the mixture is light and fluffy. Make sure to scrape down the sides of the bowl occasionally.
  4. Add 2 large eggs, 1 teaspoon of vanilla extract, and 1 teaspoon of lemon zest to the creamed butter and sugar, mixing until fully combined. You want a smooth consistency, so ensure there are no lumps of butter.
  5. In a small bowl, combine ½ cup of buttermilk and 2 tablespoons of fresh lemon juice. Alternately add the dry ingredients and buttermilk mixture to the butter mixture, starting and ending with the dry ingredients. Mix just until combined; do not overmix, as this can lead to a dense loaf.
  6. Pour the batter into the prepared loaf pan. Smooth the top with a spatula, ensuring it’s even. Bake in the preheated oven for 50-60 minutes, or until a toothpick inserted in the center comes out clean. The edges should be lightly golden brown, and the center should feel just set.
  7. Once baked, remove the loaf from the oven and allow it to cool in the pan for about 10 minutes. Then, transfer it to a wire rack to cool completely. Resist the urge to slice too soon, as it will be crumbly if it’s still warm.
  8. While the loaf is cooling, prepare the citrus icing. In a medium bowl, whisk together 1 cup of powdered sugar, 2 tablespoons of fresh lemon juice, and 1 tablespoon of orange juice until smooth. If the icing is too thick, you can add a little more juice to reach your desired consistency.
  9. Once the loaf is completely cool, drizzle the citrus icing over the top. If you like, sprinkle with an additional teaspoon of lemon zest for an extra pop of flavor and color.

Pro Tips for the Best Lemon Poppy Seed Loaf With Citrus Icing

  • Be careful not to overmix your batter; this is a common mistake that can lead to a dense loaf. Mix just until the dry ingredients are incorporated for a light and fluffy texture.
  • Use room temperature ingredients, especially the butter and eggs. This helps to create a smoother batter and ensures even baking. Take your eggs out of the fridge about 30 minutes before you start.
  • For a more pronounced lemon flavor, consider adding a little lemon extract in addition to the zest and juice. Just a half teaspoon can elevate the citrus notes significantly.
  • When measuring your flour, spoon it into the measuring cup and level it off with a knife instead of scooping directly from the bag. This prevents packing and ensures you don’t end up with a dry loaf.
  • Invest in a good quality loaf pan; it makes a difference in heat distribution, which ensures even baking. If your pan is dark-coated, reduce the oven temperature by 25°F to prevent over-browning.

Variations & Serving Ideas

For a delightful twist, consider adding blueberries or raspberries to the batter for a fruity burst of flavor. You can also experiment with different citrus fruits—try lime or grapefruit zest and juice for a refreshing change. For a healthier option, substitute half of the all-purpose flour with whole wheat flour for added fiber without compromising too much on texture.

This Lemon Poppy Seed Loaf pairs beautifully with a light salad, such as a mixed greens salad with a vinaigrette, or a cup of tea for a cozy afternoon treat. It also complements a creamy cheese platter, as the acidity of the loaf balances rich cheeses perfectly. Lastly, a scoop of vanilla ice cream on the side creates a delightful contrast of temperatures and flavors!

Storage, Make-Ahead & Reheating

This Lemon Poppy Seed Loaf can be stored at room temperature for up to 3 days if wrapped tightly in plastic wrap. If you want to keep it longer, it freezes well for up to 3 months. To freeze, wrap the loaf tightly in plastic wrap and then in aluminum foil to prevent freezer burn.

When you’re ready to enjoy it again, simply thaw it in the fridge overnight. Reheat individual slices in the microwave for 15-20 seconds or in a toaster oven until warmed through. Interestingly, many people find that this loaf tastes even better the next day, as the flavors have time to meld!

Frequently Asked Questions

Can I make Lemon Poppy Seed Loaf With Citrus Icing ahead of time?

Yes — in fact, it tastes even better the next day! You can make the loaf a day in advance, allowing the flavors to develop. Just be sure to store it in an airtight container to maintain its moisture.

Can I substitute the poppy seeds?

Absolutely! If you don’t have poppy seeds on hand or prefer an alternative, you can use sesame seeds for a similar crunch or omit them entirely for a smooth loaf.

What can I use instead of buttermilk?

If you don’t have buttermilk, you can easily create a substitute by mixing ½ cup of milk (dairy or plant-based) with 1 tablespoon of vinegar or lemon juice. Let it sit for 5 minutes before using in the recipe.

How can I make this recipe gluten-free?

To make a gluten-free version of this Lemon Poppy Seed Loaf, substitute the all-purpose flour with a gluten-free all-purpose flour blend. Just ensure that the blend contains a binding agent like xanthan gum for the best results.

What is the best way to store leftover loaf?

Leftover Lemon Poppy Seed Loaf should be stored in an airtight container at room temperature for up to 3 days. For longer storage, wrap it tightly and freeze for up to 3 months. Thaw it before serving for the best texture.

Zesty Lemon Poppy Seed Delight

Final Thoughts

The Lemon Poppy Seed Loaf with Citrus Icing is truly a delightful treat that brings a burst of brightness to any occasion. The zesty lemon flavor combined with the subtle crunch of poppy seeds creates a satisfying balance, while the citrus icing adds a touch of sweetness that perfectly complements the loaf’s tanginess.

This is the kind of recipe I come back to again and again, especially when I want to brighten up a gloomy day or celebrate a small victory. The aroma that fills the kitchen as it bakes is absolutely heavenly! I encourage you to give this recipe a try; you might just find it becoming a beloved staple in your home. Don’t forget to share your results or even add your own unique twist—I can’t wait to see what you create!

Print
clock clock iconcutlery cutlery iconflag flag iconfolder folder iconinstagram instagram iconpinterest pinterest iconfacebook facebook iconprint print iconsquares squares iconheart heart iconheart solid heart solid icon

Lemon Poppy Seed Loaf


  • Author: Lily author
  • Total Time: 25 minute
  • Yield: 1 loaf 1x
Pin Recipe
Print Recipe

Description

This Lemon Poppy Seed Loaf is a delightful treat that combines zesty lemon flavor with crunchy poppy seeds. Topped with a citrus icing, it’s perfect for any occasion.


Ingredients

Scale
  • 1 ½ cups (190g) all-purpose flour
  • 1 teaspoon baking powder
  • ½ teaspoon baking soda
  • ½ teaspoon salt
  • 3 tablespoons poppy seeds
  • ½ cup (115g) unsalted butter, softened to room temperature
  • 1 cup (200g) granulated sugar
  • 2 large eggs
  • 1 teaspoon vanilla extract
  • 1 teaspoon lemon zest (from about 1 medium lemon)
  • ½ cup (120ml) buttermilk
  • 2 tablespoons fresh lemon juice
  • 1 cup (120g) powdered sugar
  • 2 tablespoons fresh lemon juice
  • 1 tablespoon orange juice
  • 1 teaspoon lemon zest (for garnish, optional)

Instructions

  1. Preheat your oven to 350°F (175°C). Grease a 9×5-inch loaf pan or line it with parchment paper for easy removal later.
  2. In a medium mixing bowl, whisk together 1 ½ cups of all-purpose flour, 1 teaspoon of baking powder, ½ teaspoon of baking soda, ½ teaspoon of salt, and 3 tablespoons of poppy seeds. This helps to evenly distribute the baking agents and ensures a uniform rise.
  3. In a large mixing bowl, cream together ½ cup of softened unsalted butter and 1 cup of granulated sugar using an electric mixer on medium speed for about 3-4 minutes, until the mixture is light and fluffy. Make sure to scrape down the sides of the bowl occasionally.
  4. Add 2 large eggs, 1 teaspoon of vanilla extract, and 1 teaspoon of lemon zest to the creamed butter and sugar, mixing until fully combined. You want a smooth consistency, so ensure there are no lumps of butter.
  5. In a small bowl, combine ½ cup of buttermilk and 2 tablespoons of fresh lemon juice. Alternately add the dry ingredients and buttermilk mixture to the butter mixture, starting and ending with the dry ingredients. Mix just until combined; do not overmix, as this can lead to a dense loaf.
  6. Pour the batter into the prepared loaf pan. Smooth the top with a spatula, ensuring it’s even. Bake in the preheated oven for 50-60 minutes, or until a toothpick inserted in the center comes out clean. The edges should be lightly golden brown, and the center should feel just set.
  7. Once baked, remove the loaf from the oven and allow it to cool in the pan for about 10 minutes. Then, transfer it to a wire rack to cool completely. Resist the urge to slice too soon, as it will be crumbly if it’s still warm.
  8. While the loaf is cooling, prepare the citrus icing. In a medium bowl, whisk together 1 cup of powdered sugar, 2 tablespoons of fresh lemon juice, and 1 tablespoon of orange juice until smooth. If the icing is too thick, you can add a little more juice to reach your desired consistency.
  9. Once the loaf is completely cool, drizzle the citrus icing over the top. If you like, sprinkle with an additional teaspoon of lemon zest for an extra pop of flavor and color.
  • Prep Time: 15 mins
  • Cook Time: 50-60 mins
  • Category: Dessert
  • Method: Baking
  • Cuisine: American

Nutrition

  • Serving Size: 1 slice
  • Calories: 200
  • Sugar: 15 g
  • Sodium: 150 mg
  • Fat: 8 g
  • Saturated Fat: 5 g
  • Unsaturated Fat: 3 g
  • Trans Fat: 0 g
  • Carbohydrates: 30 g
  • Fiber: 1 g
  • Protein: 3 g
  • Cholesterol: 40 mg

Keywords: Be careful not to overmix your batter; this is a common mistake that can lead to a dense loaf. Use room temperature ingredients for a smoother batter and even baking.

Did you make this recipe?

Share a photo and tag us — we can't wait to see what you've made!

  • Privacy Policy
  • Terms Of Service
  • Contact
  • About
  • GDPR

Copyright © 2025 Homesmad